If you have been following our blog by now you know that I’m always on the lookout for unique and eco-friendly projects.
Recently I stumbled upon the delightful idea of crafting a ladybug using pistachio shells.
Who would have thought that these discarded nutshells could be transformed into such charming garden creatures? With just a handful of supplies and a splash of creativity, I managed to bring these tiny ladybugs to life.
In this article, I’ll guide you through the process step-by-step, sharing tips and tricks I learned along the way.
But first, let’s take a quick look at the list of basic craft supplies you’ll need to make the Ladybug.
Step 1: Materials Required For This Pistachio Shell Ladybug Craft

- Pista Shells: I have used Pista (Pistachio) Shells to make the body structure of the Ladybug.
- Acrylic Paint or Watercolor: To shade the Pista Shells I have used black and red acrylic paint. However, you can also use standard water colors for the same.
- Paintbrush: You can use a regular paintbrush to apply paint over the Pista Shells.
- Markers: To shade dots over the ladybug’s body I used a black permanent marker.
- Glue: To stick the Shells together you will need glue (You can either use a hot glue gun or a multipurpose glue will do the trick).
Estimated Time taken to make the Pistachio Shells LadyBug Craft: It took 20 minutes for me to make the Pista Shells Ladybug Structures (It includes the painting and drying time).
Step 2: Shading The Pistachio Shells

To create ladybug shapes, you need to color them properly.
For this ladybug craft project, I combined red and black colors to create a striking look.
In the images above, you can see that I painted the pistachio shells with red and black acrylic paint.
Painting pistachio shells can be a bit messy, so you might want to wear gloves.
If you don’t have gloves, just wash your hands after painting.
Once you finish painting the shells, place them on a newspaper and let them dry.
Step 3: Highlighting The Patches (Placing the black dots)

The red paint on the pistachio shells has dried, so now it’s time to add the black dots.
To create these, I used a black permanent marker to draw dots all over the shells, as shown in the images above.
Step 4: Assembling The Ladybug Structure

Next up, I used the shells painted black as the bodies of the ladybugs.
Then, I took two red shells for each ladybug’s wings and carefully placed them over the black shells.
I repeated this process to assemble all four ladybug structures.
To attach the shells, I used a glue gun, but you can also use multipurpose or quick-dry glue.
After gluing the ladybug structures, I let the pieces dry for a while.
Step 5: Highlighting The Eyes

Once the glue dried, it was time to draw the eyes of the ladybugs.
As I didn’t have a white marker on hand, I opted for white paint instead.
To create the dots for the eyes, I used the back end of a regular paintbrush.
I dipped the tip of the paintbrush into the white paint and carefully dotted the eyes onto each ladybug.
I repeated this process for the eyes on the remaining ladybug structures.
Step 6: Giving The Finishing Touches To The Final Structures

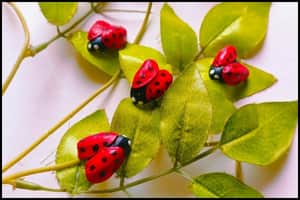
If you look at the image above, you can see the final ladybug structures made using pistachio shells.
To make them look even more realistic, you can place them around artificial leaves, as shown in the image below.
I’ve stuck them over artificial leaves using a double sided tape (as seen above).
In fact, you can mount or place them as desired as they’ll look beautiful in brighter spaces.
Final Thoughts
This project not only recycles pistachio shells but also transforms them into adorable decorations.
It’s a perfect activity for children or adults looking for a quick, creative outlet.
I’d recommend experimenting with different color combinations or adding small antennae using thin wire for extra realism.
You can use the combination of orange, green, and even purple with black and make multiple ladybug structures.
Remember, acrylic paints offer glossy finish and hence it helps enhance the craft structures.
Consider using this craft as part of a larger garden-themed display or as unique gift toppers.
For those concerned about sustainability, this project showcases how everyday waste can be repurposed into art.
Note: For your reference I have shared a short video tutorial of the Pista Shells LadyBug Craft on our official YouTube channel.