As a person who loves craft and DIY stuff I’m always on the lookout for unique, last-minute projects that not only spark joy but also have the potential to turn a profit.
Imagine transforming simple pinecones into adorable snowmen, or crafting elegant gold marble ornaments that catch the light just so.
With the holiday season fast approaching, I’ve discovered 20 fantastic last minute christmas craft ideas that are not only quick to make but also perfect for selling at local markets or online.
From no-sew fabric stockings to whimsical button tree ornaments, these projects cater to all skill levels and budgets.
Whether you’re a seasoned crafter or just starting out, these creative and profitable Christmas crafts are sure to spread holiday cheer and fatten your wallet.
So, without wasting any time let’s take a quick look at the list of 20 Last Minute Christmas Crafts To Make And Sell.
Pinecone & Felt Snowmen: Adorable Winter Friends

These cute little snowmen are a breeze to create and perfect for selling at a holiday market.
You’ll need pinecones, white felt circles (various sizes), black buttons, orange felt triangles, mini glue dots, and a red marker.
Simply stick a large white felt circle to the base of the pinecone for the snowman’s body.
Use smaller circles for the head and stack them on top.
Add black buttons as eyes and an orange felt triangle as the nose using glue. Finish with a red marker dot for a charming smile.
Target Audience: These snowmen are great for both adults and children to create. They are easy enough for kids to enjoy making with minimal supervision, making them a perfect family crafting activity.
Skill Level Required: This craft requires basic skills, such as cutting and gluing, making it accessible for anyone, including those new to crafting.
Cost Estimation: Estimated cost for materials is around $3-$6 per snowman, depending on the quality and source of the pinecones and felt.
Profit Potential: With a low cost of materials, you could price these snowmen between $8-$14 each, providing a good profit margin, especially when sold in sets.
Mini Clay Cookie Ornaments: Adorable and Customizable
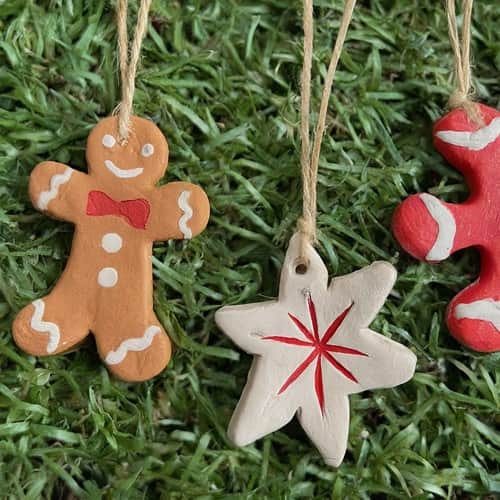
These bite-sized clay cookies are perfect for hanging on the tree or using as gift tags.
They’re surprisingly easy to make and offer endless customization options.
Here’s what you’ll need:
- Air-dry clay (white or colored)
- Rolling pin
- Cookie cutters (various Christmas shapes)
- Straw (for hanging holes)
- Acrylic paint (optional)
- Twine or ribbon (for hanging)
Instructions to make this mini clay cookie ornaments:
- Knead the air-dry clay until smooth and pliable.
- Roll out the clay to a desired thickness (around 1/4 inch).
- Use cookie cutters to cut out festive shapes from the clay and before the clay sets, use a straw to create a tiny hanging hole at the top of each piece.
- Let the clay ornaments dry completely according to package instructions (usually 24-48 hours).
- After the clay cookies have dried, decorate them with vibrant colors and imaginative designs using acrylic paint (This step is optional).
- The last step is to string twine or ribbon through the openings to hang them up.
Target Audience: Adults and older children.
Skill Level Required: Beginner
Cost Estimation: Estimated cost for materials is around $10-$15 for a batch of clay cookies, depending on the amount of clay and paint used.
Profit Potential: These can be sold for about $3-$5 each or in sets of 5-10 for $15-$25. With low material costs, this offers a good profit margin.
No-Sew Fabric Scrap Stockings: Quick and Colorful

This project is a fantastic way to use up leftover fabric scraps and create charming little stockings perfect for selling at a last-minute craft fair.
You’ll need:
- Colorful fabric scraps in various festive patterns
- Fabric scissors (pinked shears are optional)
- Fabric glue
- Twine or ribbon for hanging
Instructions to make this No-Sew Fabric Scrap Stockings:
- Cut two identical stocking shapes from your fabric scraps. (Use a template online or freehand a simple stocking design). Pinked shears can be used to prevent fraying, but aren’t essential.
- Apply a thin layer of fabric glue to the wrong side of one fabric piece, leaving a small gap at the top for hanging.
- Carefully place the second fabric piece on top, aligning the edges, and press firmly to secure the seam.
- Once the glue dries completely, use a small piece of fabric or ribbon to create a loop for hanging at the top gap.
These no-sew fabric scrap stockings are a breeze to make, requiring minimal materials and no sewing skills.
The use of colorful fabric scraps creates a unique and eye-catching display, perfect for those who appreciate handmade and sustainable crafts.
Target Audience: Ideal for adults and older children who enjoy crafting
Skill Level Required: This project is simple and requires no sewing skills, making it accessible for all skill levels.
Cost Estimation: Estimated cost for materials is around $5-$10 per set of stockings, depending on the fabric scraps and glue used.
Profit Potential: With a low cost of materials, you can price these stockings between $5-$10 each, or sell sets of three for $15-$25, ensuring a good profit margin.
Wooden Bead Garland with Jingle Bells
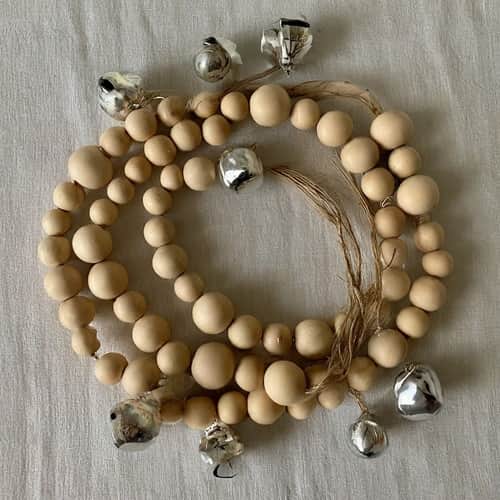
This simple garland combines natural elements with a touch of festive cheer, making it perfect for last-minute crafting.
You’ll need:
- Wooden beads (various sizes work well)
- Jingle bells
- Twine or yarn
- Embroidery needle (optional)
Here’s how to make it:
- Start by determining the length of twine or yarn needed to create your perfect garland size.
- If using small beads, you can thread them directly onto the twine with your fingers.
- For larger beads, consider using an embroidery needle to thread them more easily.
- Alternate between wooden beads and jingle bells as you assemble the garland.
- You can create a pattern with the bead sizes or keep it random for a more rustic look.
Target Audience: Adults and older children
Skill Level: (Beginner) The steps are straightforward, making it an easy project for anyone to tackle.
Cost Estimation: Estimated cost for materials is around $7-$12, depending on the quantity and quality of beads and bells.
Profit Potential: These garlands can be sold for $15-$25 each, offering a good profit margin given the low cost of materials.
Quick Pressed Flower Ornaments

These handcrafted ornaments showcase the beauty of pressed flowers and make for lovely last-minute gifts or decorations.
Here’s what you’ll need:
- Pressed flowers (various colors and shapes)
- Clear plastic ornaments (flat or round work well)
- Craft paper or tissue paper (optional)
- Scissors
- Hot glue gun
Instructions:
- Start by collecting the pressed flowers, ensuring they are thoroughly dried and flattened.
- If using a round ornament, cut a circle of craft paper or tissue paper slightly smaller than the ornament’s opening. This will create a setting that highlights the flowers.
- Arrange your pressed flowers on the craft paper (if using) or directly inside the clear ornament, creating a pleasing composition.
- Once you’re happy with how they’re arranged, use a hot glue gun to securely fix the flowers in their spots.
Target Audience: Adults and Teens.
Skill Level: (Beginner to Intermediate) Basic crafting skills are required, but arranging the flowers may require a bit of artistic sense.
Cost Estimation: Estimated cost for materials is around $3-$8 per ornament, depending on the type and quantity of pressed flowers and ornaments used.
Profit Potential: These pressed flower ornaments can be sold for $10-$20 each, providing a good profit margin given the low material costs and high perceived value.
Pom-Pom Wreath: Fluffy and Fun

This cheerful pom-pom wreath adds a burst of color and texture to any holiday decor.
It’s surprisingly easy to make and perfect for creating in a short amount of time.
Here’s what you’ll need:
- Yarn (various colors)
- Cardboard cutouts (donut shape) – two per wreath (you can make your own or purchase pre-cut shapes online)
- Scissors
- Hot glue gun
Instructions:
- Cut two identical donut-shaped pieces from your cardboard (To serve as the foundation for your wreath).
- Choose your yarn colors and create several pom-poms using your preferred method (pom-pom maker, fork method, etc.). The quantity of pom-poms used will vary based on their size and your desired level of coverage for the wreath.
- Place a small dot of hot glue on the back of a pom-pom and adhere it to one of the cardboard donut shapes.
- Keep attaching pom-poms to the cardboard base, ensuring they cover every inch with minimal gaps. You can alternate colors or create a random pattern for a more playful look.
- Once all the pom-poms are secured, carefully place the second cardboard donut shape on top, creating a complete wreath form. Apply a line of hot glue along the inner edge to securely join the two cardboard pieces.
Target Audience: Adults and older children.
Skill Level: (Beginner to Intermediate) – Basic crafting skills are needed, but making pom-poms and assembling the wreath is straightforward and fun.
Cost Estimation: Estimated cost for materials is around $7-$13, depending on the amount and type of yarn used.
Profit Potential: These wreaths can be sold for $20-$29 each, providing a good profit margin due to the low cost of materials and the high perceived value of the handmade item.
Folded Paper Candy Cane Bookmarks
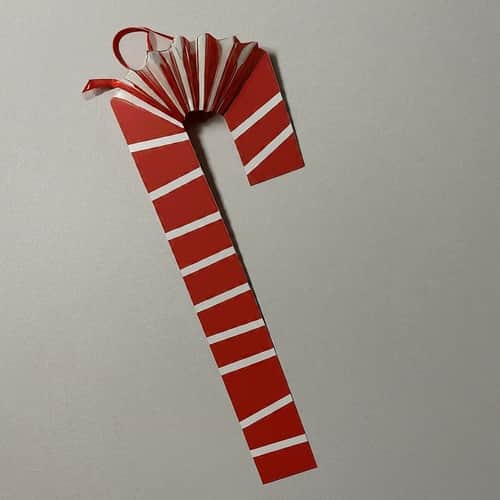
These adorable folded paper bookmarks resemble candy canes, making them the perfect (and quick) Christmas-themed craft for last-minute sales. Here’s what you’ll need:
- Red and white cardstock paper
- Glue stick
- Scissors
- Decorative ribbon (optional)
Instructions:
- Cut strips of white cardstock paper and stick them on the red cardstock paper as shown in the image above.
- Next, accordion fold the entire bicolored strip (Aim for even folds, creating a candy cane pattern) as seen in the image above.
- Once fully folded, carefully glue down the top end of the folded strip to secure the candy cane shape.
- Trim a small section of decorative ribbon and affix it to the bookmark’s top to enhance its festive appeal (Optional).
Target Audience: Great for children and adults who love reading and enjoy festive holiday crafts.
Skill Level Required: Beginner
Profit Potential: These bookmarks can be sold for $1-$3 each or in sets of three for may be $5 to $8, offering a good profit margin due to the low cost of materials and quick production time.
DIY Washi tape Owl Ornament for Christmas
Credit: thecountrychiccottage.net
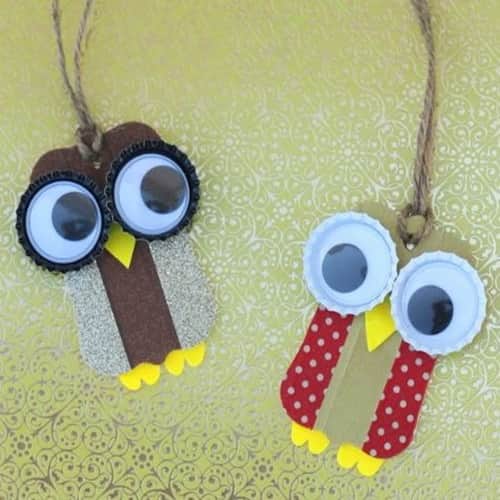
The Washi Tape Owl Ornament offers a quick and charming option for handmade Christmas sales, perfect for both festive decor enthusiasts and gift hunters alike.
To create these ornaments, start by covering a wooden shape with assorted washi tape, neatly trimming any excess using a craft knife.
Next, attach googly eyes to bottle caps using hot glue, then position them on the wooden shape and mark their placement.
Add more strips of washi tape to the sides, trimming as needed.
For the beak, fold a piece of washi tape into a triangle shape and secure it in place.
Attach the bottle cap eyes with hot glue, and create feet using a similar method as the beak, affixing them to the back of the ornament.
Finally, add a twine loop for easy hanging.
For the step-by-step instructions to make this adorable washi tape owl ornament visit The Country Cottage.
Why it’s a good fit to sell?:
The Washi Tape Owl Ornament combines simplicity with a whimsical design, making it appealing to shoppers looking for unique and handmade Christmas decorations. Its use of inexpensive materials like washi tape and recycled bottle caps keeps production costs low, while its charming appearance ensures it stands out in holiday craft markets and online sales platforms.
Target Audience: Adults and children.
Skill Level Required: Beginner to Intermediate.
Profit Potential: These ornaments can be sold for $8-$15 each, offering a good profit margin due to their handmade appeal and festive charm.
Variations and Customization Tips:
- Colors and Patterns: Experiment with different combinations of washi tape to create unique owl designs. Consider seasonal colors or patterns that match holiday themes.
- Embellishments: Add additional embellishments like glitter accents, small bows, or tiny bells to customize each ornament and make them stand out.
- Personalization: Offer to personalize ornaments with names or dates using a permanent marker for a special touch.
- Packaging: Consider packaging sets of ornaments in clear cellophane bags tied with festive ribbon for easy gifting.
Selling Tips:
- Where to Sell: Display these ornaments at craft fairs, holiday markets, and online platforms like Etsy. They are also perfect for school bazaars and local gift shops.
- Presentation: Showcase the ornaments on a themed display, such as a small Christmas tree or a rustic wooden tray. Use bright lighting and holiday-themed decorations to attract customers.
- Pricing: Set competitive prices that reflect the handmade quality and unique design of each ornament. Provide special bundle offers or discounted rates for multiple purchases to boost sales.
Quick And Easy Popsicle Stick Reindeer Bookmarks

These adorable reindeer bookmarks made from popsicle sticks are a fun and festive craft for kids and adults alike. They’re perfect for last-minute crafting and add a touch of whimsy to any book.
Here’s what you’ll need:
- Popsicle sticks (natural or pre-colored)
- Brown paint (optional)
- Paintbrush (optional)
- Googly eyes (two per bookmark)
- Red pom-poms (small size)
- Black marker
- White craft glue
Instructions:
- Decorate the popsicle stick (optional): If using plain popsicle sticks, paint them brown to resemble reindeer bodies. Let the paint dry completely.
- Attach the googly eyes: Use white craft glue to adhere two googly eyes to the top third of the popsicle stick, creating the reindeer’s face.
- Create the nose: Glue a small red pom-pom below the googly eyes in the center of the popsicle stick for the reindeer’s nose.
- Draw the antlers: Using a black marker, draw simple antler shapes on either side of the googly eyes. You can create simple branched antlers or get creative with more elaborate designs.
- Optional embellishments: Feel free to add other festive details with the black marker, like a small smile or a red ribbon around the “neck” of the popsicle stick reindeer.
Target Audience: Ideal for both children and adults
Skill Level Required: Beginner.
Profit Potential: These bookmarks can be sold for $0.99-$3 each, offering a good profit margin due to their low cost and high appeal as handmade holiday items.
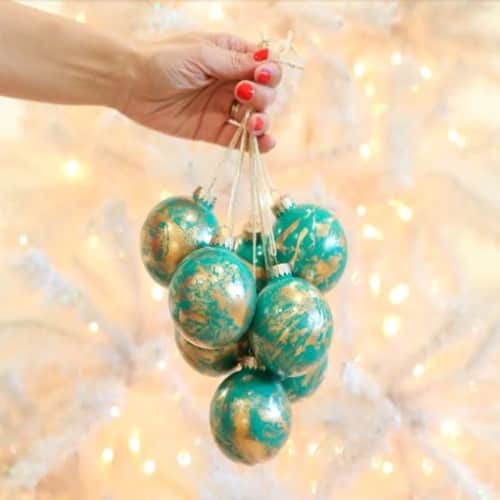
DIY Gold Marble Christmas Ornaments to Sell
Credit: lovelyindeed.com
If you are looking for unique and best gift selling options then you can consider these beautiful DIY Christmas ornaments.
What makes it more attractive is the vibrant paint and lush gold marble.
You can use materials such as clear glass ornaments, spray paint, liquid gilding, disposable plastic tub, and toothpicks to make this epic decor at home.
To make this start by removing the metal top and spray paint the ornaments, allowing each coat to dry.
Prepare a marbling solution using water and liquid gilding drops, swirling them together to achieve a unique marble pattern.
Dip and roll each ornament in the bath until satisfied with the gold coverage (Let dry, then reattach the metal hook).
For a comprehensive step-by-step Tutorial visit lovely indeed.
Why it’s a good fit to sell?:
These DIY ornaments stand out due to their luxurious appearance created by the marble effect and shimmering gold accents. The use of simple materials and a straightforward technique makes them accessible for crafting enthusiasts of all skill levels. Their elegant finish makes them appealing as high-end gifts or premium holiday decorations, suitable for both traditional markets and online platforms catering to sophisticated tastes in seasonal decor.
Target Audience: Adults
Skill Level: Intermediate.
Profit Potential: These ornaments can be sold for $12-$29 each, offering a good profit margin due to their handmade and luxurious appearance.
Variations and Customization Tips:
- Color Choices: Experiment with different base colors of spray paint to match various holiday themes or home decor styles.
- Marble Patterns: Try different swirling techniques or mix colors with the liquid gilding for unique marble patterns.
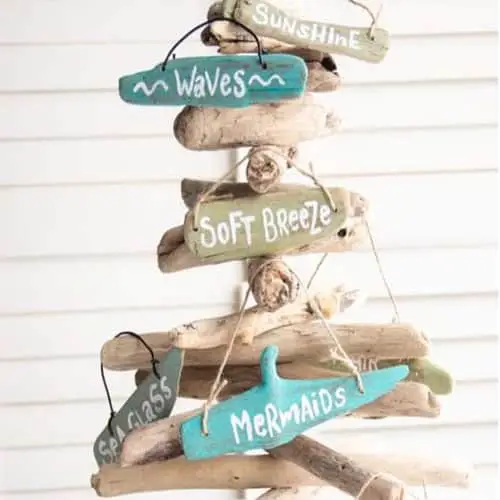
DIY Coastal Crafts for Christmas to Sell
Credit: Craftsbyamanda.com
These DIY coastal ornaments are truly unique, making them perfect for thoughtful gifts tailored to beach lovers during the Christmas season.
They can be enjoyed long after Christmas has passed, adding a touch of seaside charm to any cottage.
To create these ornaments, gather materials such as flat driftwood pieces, Decoart Vintage Effect Wash in Turquoise, Patina, and Light Green.
You’ll also need Decoart Americana Acrylic paint in Titanium White, along with paint brushes, paper towels, and sandpaper.
Get the detailed step by step instructions at craftsbyamanda.com.
Why they’re a good fit to sell?:
These ornaments appeal to those who cherish coastal living and are seeking distinctive, handmade decorations. Their use of natural materials like driftwood combined with vibrant paint finishes ensures each piece is a unique work of art. Plus, they offer versatility as they can be displayed beyond the holiday season, enhancing beach-themed decor year-round. This makes them ideal for holiday craft fairs, coastal gift shops, and online markets catering to beach enthusiasts.
Target Audience: Individuals who love rustic and beach-themed decor (Adults)
Skill Level Required: Intermediate.
Profit Potential: These ornaments can be sold for $7.99-$18 each, depending on the intricacy of the designs and the market demand for handmade, rustic decor.
Variations and Customization Tips:
- Color Variations: Experiment with different shades of the Vintage Effect Wash or add accents with additional acrylic paint colors.
- Lettering Styles: Customize the lettering to include holiday greetings, personalized names, or inspirational quotes.
- Embellishments: Consider adding small seashells, beads, or miniature starfish to enhance the coastal theme.
Super Easy Snowflake Lotion Bars

Credit: awortheyread.com
Winter is the perfect time to craft and sell Lotion Bars, providing essential skin moisture during the cold season.
These bars are easy to make using supplies like beeswax pellets, a blend of oils (coconut, vitamin E, and peppermint essential oil), cocoa butter, and a snowflake-shaped silicone mold.
To make them, melt beeswax, coconut oil, cocoa butter, and vitamin E oil together in a microwave-safe measuring cup until completely dissolved.
Afterwards, add peppermint oil, stir well, and pour the mixture into your snowflake molds.
Once set, freeze for 15-20 minutes, then gently stretch the sides of the mold to release your lotion bars.
Visit awortheyread.com for complete step-by-step instructions to make this diy snowflakes lotion bar.
Why are they a good fit to sell?:
Lotion Bars offer practical skincare benefits tailored for winter conditions, making them a sought-after item during the holiday season. Their handmade quality and use of natural ingredients appeal to health-conscious consumers seeking effective, environmentally friendly skincare solutions. They’re ideal for sale in winter markets, gift boutiques, and online platforms catering to individuals looking for luxurious and nourishing skincare products.
Target Audience: Primary Audience is Women and other Individuals looking for natural skincare solutions to combat dry winter skin.
Skill Level Required: Beginner.
Profit Potential: These lotion bars can be sold for $5-$10 each, depending on size and market demand for handmade skincare products.
Variations and Customization Tips:
- Scent Options: Experiment with different essential oils like lavender or citrus for varied scents.
- Decorative Touches: Dust the tops with shimmering mica powder or sprinkle dried herbs for a decorative finish.
- Packaging: Wrap in eco-friendly wax paper or place in reusable tin containers for a sustainable touch.
Selling Tips:
- Where to Sell: Market these lotion bars at winter craft fairs, local holiday markets, and online platforms focused on handmade beauty products.
- Presentation: Display them alongside other winter skincare items or gift sets. Use natural elements like pinecones or faux snow to enhance the seasonal appeal.
- Marketing: Highlight the nourishing properties of cocoa butter and coconut oil, and the refreshing scent of peppermint to attract customers seeking natural skincare solutions.
Easy Pine Cone Santa Claus Ornaments
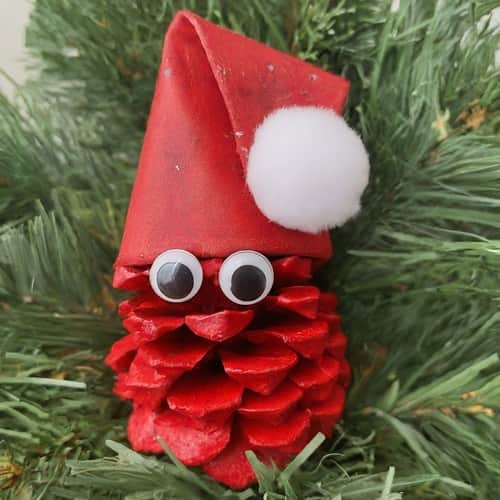
These adorable little Santa Claus ornaments are a perfect way to add a touch of whimsy to your Christmas tree. They’re also a fun and easy craft to make with kids.
What you’ll need
- Pinecones
- Red felt
- White craft paint or white pom pom
- Googly eyes
- Craft glue
- Scissors
Instructions
- Choose a pine cone that is free of debris and relatively symmetrical.
- Cut a small circle out of the red felt (to make Santa’s hat). Achieve a precise circle by using a compass or tracing around a round object.
- Shape the felt circle into a cone by rolling it and secure the seam with glue. Alternatively, if you don’t have red felt, you can cut a triangle out of red felt and roll it up to form a cone shape, gluing the edges together.
- Dab a small amount of glue on the bottom of the felt cone and place it on the top of the pine cone. Next, keep it steady for a moment until the glue sets.
- If you’re using white craft paint, paint a small dot on the tip of the pine cone for Santa’s nose. Let the paint dry completely.
- Once the paint is dry, glue the googly eyes to the pine cone, above the white pom pom or painted nose.
Tips:
- You can use different colors of felt for Santa’s hat.
- If you don’t have googly eyes, you can use black markers to draw on eyes.
- You can add other embellishments to your Santa Claus ornaments, such as tiny white pom poms for beard or pipe cleaners for arms.
DIY mini stocking gift card holder to sell

Credit: happiestcamper.com
To create this charming DIY mini stocking gift card holder, gather materials like:
- Red Linen Fabric
- White Felt
- All-purpose thread
- Hand sewing Needle
- Sewing clips or Pins
- A Sewing machine
- Washable fabric pen
- Ribbon, and scissors
Begin by cutting the red linen fabric into mini stocking shapes using the provided pattern.
Next, trace and cut out circle and heart shapes from the white felt sheet.
Sew these designs onto the felt shapes and affix them onto the mini stockings.
Using a sewing machine, sew white border patches around the edges to finish.
Why it’s a good fit to sell?:
This DIY mini stocking gift card holder combines festive charm with practicality, perfect for holding holiday gift cards or small presents. Handcrafted from quality materials like linen and felt, each piece is unique and makes a delightful gift or stocking stuffer. Its handmade appeal and customizable design make it a standout item at Christmas markets, craft fairs, and online shops catering to shoppers seeking personalized, festive accessories.
To learn how to make this easy mini stocking gift card holder visit happiestcamper.com.
Target Audience: These DIY mini stocking gift card holders are perfect for anyone looking to add a personal touch to their holiday gift giving. They appeal to craft enthusiasts and those who appreciate handmade holiday decor.
Skill Level: Intermediate.
Profit Potential: These mini stocking holders can be sold for $0.99-$3.99 each, making them an affordable and attractive option for holiday markets and craft shows.
Variations and Customization Tips:
- Fabric Choices: Experiment with different fabrics like velvet or cotton for varied textures.
- Embroidery Details: Add personalized initials or festive embroidery patterns to customize each stocking.
- Gift Card Size: Adjust the size of the stockings to fit standard gift cards or small trinkets for versatile gifting options.
Selling Tips:
- Display these mini stocking holders at holiday bazaars, local craft fairs, and online handmade marketplaces.
- Present them in clear cellophane bags or hang them on decorative display boards for easy viewing.
- Highlight their handmade quality and versatility as both gift card holders and tree ornaments to attract seasonal shoppers.
Functional Pinecone Fire Starter Bundles
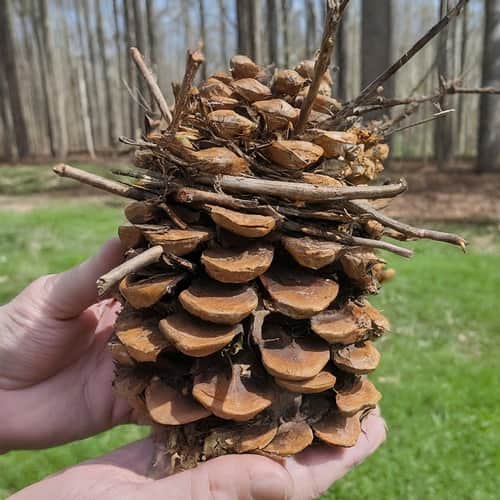
These beautiful pinecone fire starter bundles are not only visually appealing but also provide a practical and eco-friendly way to light a fire. They’re perfect for last-minute crafting and make unique stocking stuffers.
Here’s what you’ll need:
- Pinecones (various sizes and openness)
- Dried kindling (twigs, wood shavings, dried leaves)
- Natural twine
- Scissors
Instructions:
- Gather your pinecones, choosing a mix of open and closed cones for better kindling placement.
- Prepare your dried kindling. You can use a combination of twigs cut into small pieces, wood shavings, or even dried leaves.
- Take a small amount of kindling and loosely stuff it into the open spaces between the pinecone scales.
- Securely wrap the twine around the base of the pinecone and stuffed kindling, creating a bundle. You can wrap multiple times for a tighter hold.
- Trim any excess twine with scissors.
Target Audience: These pinecone fire starter bundles are ideal for outdoor enthusiasts, campers, and eco-conscious individuals who appreciate sustainable and practical gifts.
Skill Level Required: Beginner.
Profit Potential: Sell these pinecone fire starter bundles for $2-$6 each, offering a good profit margin due to their low production cost and unique appeal as eco-friendly gifts.
DIY Twig Christmas Tree Crafts to sell
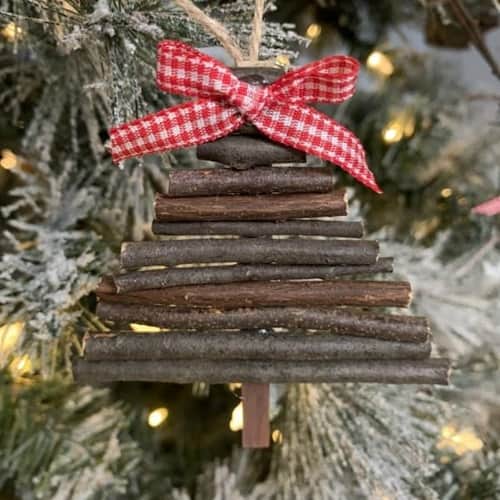
Image Credit: ginghamgardens.com
Creating Christmas trees and star shapes from twigs is a wonderful crafting idea with great selling potential.
You’ll need basic supplies such as Twigs, Jute Twine, a Glue Gun, Ribbon, buttons, tiny bells, etc.
Start by using a popsicle stick as the base structure and cut the twigs into various lengths.
Place them strategically on the popsicle stick, beginning at the top with the smallest pieces.
Secure them with a hot glue gun and embellish with jute twine or decorative thread for hanging.
For detailed Instructions to make this DIY Twig Christmas Tree Craft visit: ginghamgardens.com.
Why they’re a good fit to sell:
These twig-based Christmas decorations offer rustic charm and eco-friendly appeal, making them popular among those seeking natural, handmade decor. They’re versatile enough for both traditional and contemporary holiday themes, appealing to buyers looking for unique ornaments or wall hangings. Plus, their use of simple materials ensures cost-effectiveness in production while their handmade quality makes them ideal for craft markets, boutique shops, and online platforms catering to eco-conscious consumers.
Target Audience: Nature lovers, rustic decor enthusiasts, and those seeking unique handmade ornaments for holiday decorating.
Skill Level: Beginner.
Profit Potential: Sell these rustic twig ornaments for $0.99-$4.99 each, offering a good profit margin due to their handmade and unique appeal.
Variations and Customization Tips:
- Natural Elements: Use different types of twigs or add pinecones, dried berries, or foliage for a more natural look.
- Color Options: Paint the twigs or add glitter for a sparkling effect, catering to different holiday color schemes.
- Display Ideas: Showcase them in groups on a mantle, as part of a centerpiece, or individually on a Christmas tree.
Mason Jar Snow Globe Craft

Mason jar snow globes are a fun and festive way to decorate for Christmas. They’re also a great way to use up any leftover holiday trinkets you might have.
What you’ll need
- Mason jar
- Distilled water
- Glycerin (optional)
- Glitter
- Miniature Christmas figurines or decorations
- Hot glue gun
- Craft glue
Instructions
- Thoroughly cleanse your mason jar and remove any adhesive labels.
- Choose the Christmas figurines or decorations you wish to feature inside your snow globe. Fasten them to the mason jar’s interior using hot glue.
- Fill the mason jar with distilled water. If you’d like, incorporate a few drops of glycerin into the jar. Glycerin assists in slowing down the descent of glitter through the water, mimicking the gentle fall of real snow.
- Add your choice of “snow” i.e. either clear plastic craft beads or glitter. You can decide how much glitter to add, but using more will enhance the visual impact.
- Secure the lid on the mason jar tightly. You may want to add a layer of craft glue around the rim of the lid for extra security.
Note: Feel free to choose any size or style of mason jar for this project. If you don’t have any glycerin, you can use clear corn syrup instead. If possible, use different colors of glitter to create a more festive look.
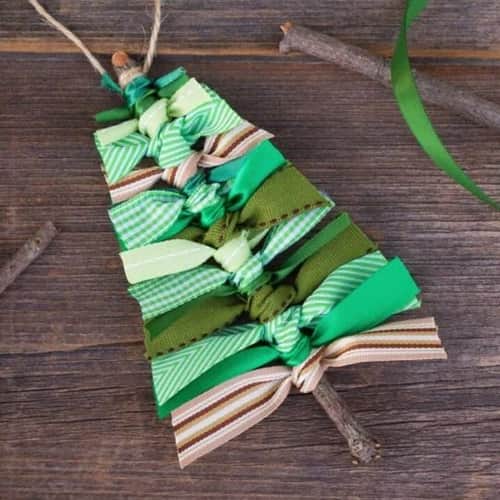
DIY Scrap Ribbon Christmas Tree Ornament
Credit: firefliesandmudpies
DIY Scrap Ribbon Tree Ornaments are a perfect choice to create and sell this Christmas season.
They’re suitable for crafters of all ages and make for an enjoyable activity crafting these charming, rustic ornaments.
To make them, gather Straight sticks or cinnamon sticks, Ribbons in shades of green and brown, a Hot glue gun, Twine, and scissors.
Creatively bind the ribbons around the sticks to mimic the welcoming branches of a Christmas tree.
Follow these quick steps: Secure the ribbon scraps along the twig or cinnamon stick, adjusting them into place.
Trim the ribbon scraps into a tree shape using scissors and finish by attaching a loop of twine at the top of the tree with hot glue or tying it.
Add a personal touch by finishing the tree with a wooden star, a yellow button, or a rustic metal star.
For a detailed instructions to make this DIY Scrap Ribbon Christmas Tree Ornament visit: firefliesandmudpies.com
Target Audience: These DIY scrap ribbon tree ornaments appeal to rustic decor enthusiasts, crafters of all ages, and shoppers seeking handmade and personalized Christmas decorations.
Skill Level: Beginner.
Profit Potential: Sell these charming ornaments for $1.99-$4.99 each, offering a good profit margin due to their handmade and customizable nature.
Variations and Customization Tips:
- Ribbon Selection: Experiment with different shades of green and brown ribbons, or add touches of red or gold for a festive look.
- Decorative Accents: Besides stars, try using tiny bells, mini pinecones, or faux berries for additional flair.
- Packaging: Present each ornament in a clear bag tied with twine or display them in a rustic basket for a cohesive holiday theme.
Button Tree Ornaments: Whimsical and Textured

Transform a collection of buttons into delightful and textured Christmas tree ornaments.
This craft is perfect for using up odd buttons and allows for endless design variations.
Here’s what you’ll need:
- Buttons (various sizes, colors, and textures)
- Styrofoam cones (various sizes)
- Hot glue gun
- Additional options: Ribbon or twine (for hanging), tiny pom-poms, glitter, paint
Instructions:
- Choose a Styrofoam cone size based on your desired ornament size.
- Decide on your button placement. You can create a random pattern, color clusters, or even a spiral design.
- Using a hot glue gun, carefully adhere the buttons onto the Styrofoam cone, starting at the bottom and working your way up.
- (Optional) Once the buttons are secured, you can add a small pom-pom to the top of the cone for a festive hat.
- (Optional) For extra sparkle, use a paintbrush to apply a thin layer of glitter glue over the buttons.
- Trim a length of ribbon or twine and fashion a hanging loop by securing it at the top of the ornament with hot glue (Optional).
These button tree ornaments offer a unique and textured addition to any Christmas tree.
The use of mismatched buttons creates a whimsical and eclectic look, while the Styrofoam cone base allows for easy customization.
This craft is perfect for using up leftover buttons and requires minimal crafting skills, making it ideal for last-minute creations.
Target Audience: Crafters.
Skill Level: Beginner.
Profit Potential: Sell these charming ornaments for $1.99-$8.99 each, considering their handmade and customizable nature, which allows for a good profit margin.
DIY Wine Glass Snowman

Credit: craftymorning
Create charming wine glass snowmen for Christmas decor that are perfect for selling.
It’s a delightful craft suitable for both kids and adults during the holiday season.
Gather these materials:
- Wine glass
- Epsom Salt
- Mod Podge
- Acrylic Paint or Buttons
- Scarf or Fabric
- Snowman hat ornament
- Paintbrushes
- Glue
Begin by evenly coating the inside of the wine glass with Mod Podge, then sprinkle Epsom Salt inside.
Apply Mod Podge to the bottom of the wine glass and add acrylic paint or glue on buttons to create a snowman face.
Remove the string from the snowman hat ornament and affix it around the rim of the wine glass with glue.
Tie a scarf strip into a bow around the wine glass and secure it with a dab of glue if desired.
For comprehensive step-by-step instructions to make this DIY Wine Glass Snowman visit: craftymorning.com.
Why they’re a good fit to sell:
These wine glass snowmen combine festive charm with practical decor, appealing to shoppers looking for unique holiday items. They offer versatility as tabletop decorations or candle holders, enhancing Christmas displays with their whimsical design. Their use of common crafting materials and customizable features make them attractive for holiday markets, gift shops, and online platforms seeking handmade, festive decor options.
Target Audience: Crafters of all ages and individuals looking to create unique Christmas decorations.
Skill Level: Beginner.
Profit Potential: Sell these charming wine glass snowmen for $8.99-$14.99 each, considering their handmade appeal and festive design.
Variations and Customization Tips:
- Snowman Faces: Experiment with different facial expressions and styles for unique personalities.
- Hat and Scarf Options: Offer a variety of hat styles and colors, and use different fabrics for scarves to appeal to diverse tastes.
- Bulk Orders: Consider offering discounts for bulk orders, making them ideal for corporate gifts or party favors.
Selling Tips:
- Market Venues: Display these snowmen at Christmas markets, craft fairs, local boutiques, and online platforms.
- Gift Sets: Pair them with other Christmas-themed items or offer them as part of a gift set to increase sales.
- Demonstrations: Consider demonstrating the crafting process at events to attract customers and showcase the craft’s simplicity and charm.
Final Thoughts
As someone looking to capitalize on the holiday market, I’d recommend focusing on crafts that balance uniqueness, ease of creation, and profitability.
The DIY Gold Marble Christmas Ornaments and Pinecone Fire Starter Bundles stand out as particularly promising options.
They offer a great combination of visual appeal, practicality, and potential for customization.
My advice would be to start with 3-4 different craft ideas that align with your skills and available materials. Take into account your target audience and local market trends when making your selection.
Keep your pricing competitive while ensuring a healthy profit margin.
Lastly, presentation is key so invest time in creating attractive packaging or displays to make your crafts stand out at markets or online.
With some creativity and effort, these last-minute crafts can be a great way to earn extra income during the holiday season.


