This Dinosaur Mother’s Day Craft for Kids is about to become your new secret weapon.
It’s the perfect way to channel your little paleontologist’s dino-mania into a roar-some Mother’s Day gift.
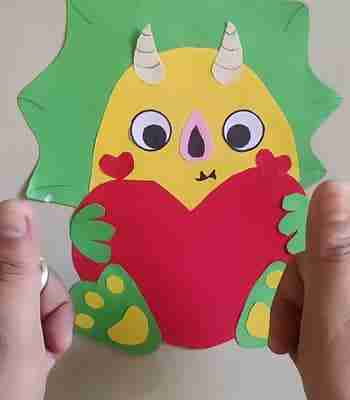
We’re talking about a super-cute, easy-to-make Dinosaur Mom’s Day Craft that features a heart with a sweet “Dino Hugs For Mom” message.
So, round up your mini Michelangelos, gather your crafting supplies, and get ready to unleash their inner dinosaur experts.
It’s time to create a dino-mite gift that Mom will cherish forever (or at least until the next dino rampage… I mean, adventure).
Let’s take a quick look at the list of items required to make this easy peasy dinosaur for mothers day.
List of items required to craft dinosaur
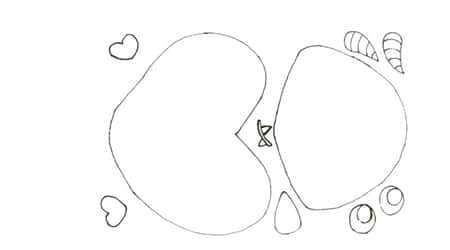
- Paper Cut Out Template to cut the shapes
- Construction paper
- Glue to stick the pieces
- Kids safe scissors
- Marker or sketch pen (Optional if you are cutting all the shapes)
Steps to Craft Dinosaur For Mothers Day
Here’s how you can craft your dinosaur for this mothers day step-by-step.
Step 1: Gather Your Herd (or Download the Dino template)

There are two ways to kick off this dino-tastic craft adventure:
Option 1: Unleash Your Inner T-Rex of Design
If you’re feeling adventurous, grab some paper, a pencil, and your bravest adventurer (your child, of course).
Let them channel their inner dinosaur expert and sketch out the basic shapes of their Mother’s Day dino.
Don’t worry about perfection, a few circles, ovals, and spikes are all you need to create a prehistoric masterpiece.
Option 2: Download the Dino Posse (Save Time for More Roaring Fun)
Short on time, or not feeling too confident in your artistic skills? No worries, Just download the free, ready-to-cut Dinosaur Mother’s Day Craft template.
This way, you can skip right to the fun part i.e. decorating your dino and making Mom smile.
Step 2: Let’s Cut Out Our Dino Buddies
Grab your scissors (adult supervision required for younger Picassos) and your colorful construction paper.
Here’s what you’ll need to cut from each color (I used the below colors, you can choose any colors of your choice):
Green Construction Paper:
- 1 Frill shape (spiked crest for the head)
- 2 leg shape cutouts
- 2 Hands
Yellow Construction Paper:
- For the face and toes
Pink Construction Paper:
- 1 Tiny nose piece (shape may vary)
Black Construction Paper:
- Tiny black piece that goes over the nose (shape may vary)
Red Construction Paper:
- 3 Heart shapes
White Construction Paper:
- 1 Horn shape
Top Tip: If you have a helper with super steady hands, they can help cut out the smaller pieces like the eyes, spikes, nose pieces, and toes. Otherwise, feel free to tackle those yourself to keep things safe and frustration-free.
Step 3: Assemble Your Dino Pal
Now that you have all your dino parts cut out, it’s time to bring them together.
Here’s how to turn your construction paper shapes into a prehistoric pal:

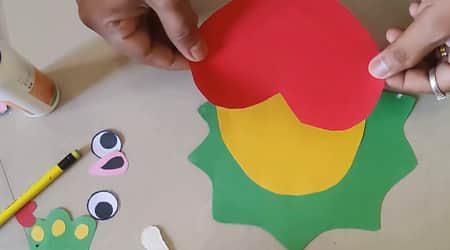
Grab the green frill (spiked crest) cutout and place it flat on a surface followed by placing the yellow paper (face) over the green frill.
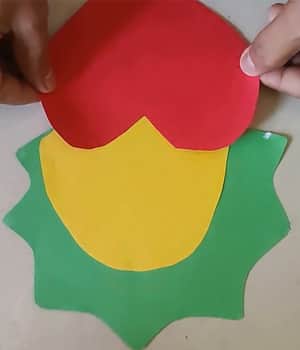
Next, place the heart shape over the face (over the yellow cutout) as shown above.

Then, attach the eyes, and nose followed by attaching the heart over the large heart shape.
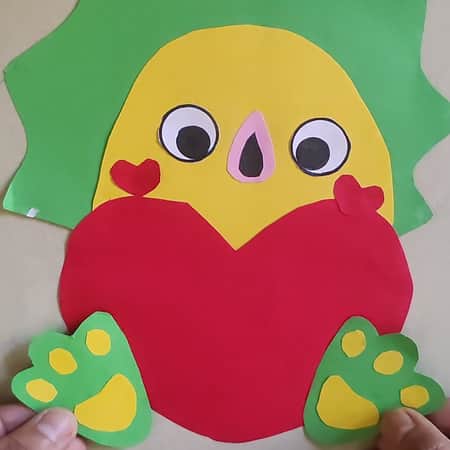
Next up, attach the legs as shown above.
Apply glue to the designated gluing areas on the leg cutouts
Carefully position the legs onto the body, lining up the gluing areas.
Hold the legs in place for a few seconds to allow the glue to set.
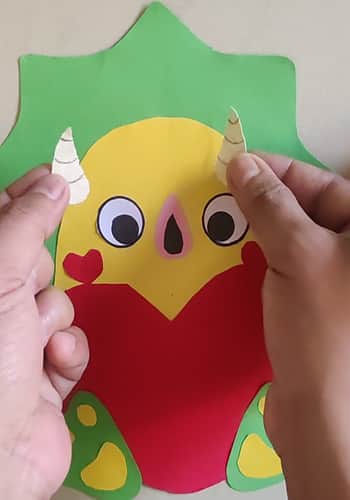
Then, attach the horn as shown above.
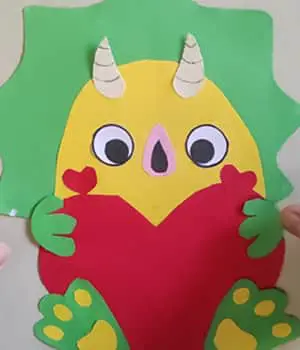
The final step is to attach the hands followed by adding a cute smile using a marker.
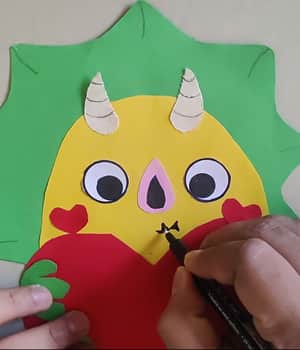
Using a marker I added a cute smile to our little dino and this is how the completed project looks like.
Top Tip:
- Let each glued section dry completely before moving on to the next piece. This will prevent the paper from warping or the pieces from coming loose.
- If you’re working with younger children, you can help them with the trickier gluing parts like the eyes and the nose.
Final Thoughts
If possible, go beyond the template and encourage your child to add unique details to their dino.
Maybe spikes become flowers or the tail transforms into a heart.
Craft a little story about the dinosaur and its adventures, turning it into a cherished keepsake for Mom.
Consider adding dimension by using pom poms for the belly or wiggly eyes for an interactive touch.
Lastly, use leftover construction paper to create a background scene for the dinosaur, depicting a prehistoric landscape or a garden filled with love.
Remember, the focus is on having fun and creating a gift filled with love. So crank up some dino music, grab your supplies, and get ready to unleash your inner paleontologist.
Note: I have also uploaded a video walkthrough of this DINO Project on our Youtube Channel, you can follow that just in case you want to see how it can be made visually.
Frequently Asked Questions
How long does this mothers day dinosaur craft take?
The time it takes will depend on the age of the child and their level of involvement. It can take anywhere from 10 minutes to 30 minutes, but the best part is the creative process.
How can I make this type of Dinosaur crafts more educational?
While creating the dinosaur, discuss the names and functions of the different body parts like horns, frills, and claws. Before or after the craft, explore different dinosaur species with your child using books or online resources. Discuss their unique features and diets. If possible, create multiple dinosaurs and use a shoebox or cardboard box to design a miniature dinosaur museum exhibit.
Can I adapt this dinosaur craft for other occasions?
Yes, this basic dinosaur template can be adapted for other occasions by changing the colors and adding specific elements. For example, add a graduation cap for a graduation theme or a witch’s hat for Halloween.


