Looking to make your mom feel truly cherished on Mother’s Day without spending a fortune? Look no further than this paper flower bouquet craft.
In just 10 minutes, you can create a personalized, lasting mothers day paper bouquet craft that shows your mom how much you care.

No artistic skills required, just some basic materials and a willingness to get creative.
This DIY project is not only budget-friendly but also allows you to tailor every aspect to your mom’s tastes.
From color choices to personal messages, each element can be customized.
Ready to learn how to make a gift that will touch your mom’s heart? Let’s dive into this simple yet impactful Mother’s Day craft that transforms ordinary paper into an extraordinary expression of love.
Step 1: Materials Required For This Mother’s Day Bouquet Craft
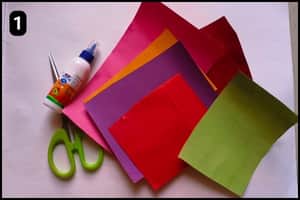
- Colorful Papers: You can use standard colorful craft papers or origami paper sheets.
- Scissor: To cut petals, leaves, and other shapes for the craft you’ll need scissors.
- Glue: To stick the paper shapes together you’ll need glue (I’ve used a multipurpose glue).
- Other Elements: To draft a message on a small paper I have used colorful marker pens.
Estimated Completion Time: The Mother’s Day special paper bouquet craft took me 10 minutes to create (Including the glue drying time).
Step 2: Cutting Flower Shapes
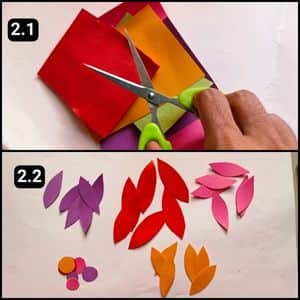
First, I cut petal shapes from colorful paper sheets, as shown in image 2.2 above.
I also cut a few circles to stick in the center of the flowers.
You can adjust the size of the shapes according to your preference. For each flower, I cut a total of six petal shapes.
Step 3: Preparing the paper Flower Structures
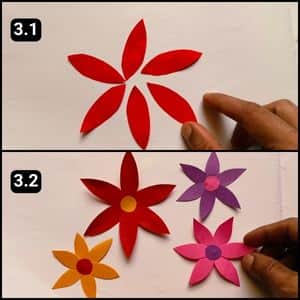
Now it’s time to assemble the petals and create the main structure of the paper flowers.
Ensure they are properly aligned to achieve even shapes.
Finally, I attached the circle shapes to the center of each flower, as shown in image 3.2 above.
Step 4: Preparing the Paper Stem and Leaves
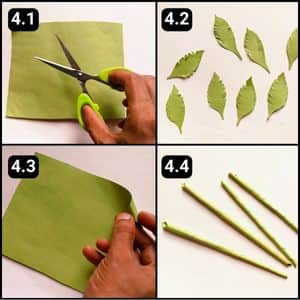
Let’s prepare the leaves and stem for the paper flowers.
I used green paper to cut leaf shapes, making two leaves for each flower.
Be sure to cut along the edges for a neat look, as shown in image 4.2 above.
With the leaves ready, it’s time to make the stems.
Start with green paper strips and roll them up from one corner.
Once rolled, secure the ends with glue.
Repeat this process to create four stems, as seen in image 4.4 above.
Step 5: Assembling the Flower
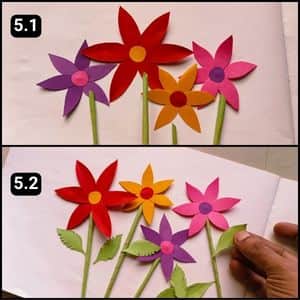
It’s time to assemble the paper flowers with their stems and leaves.
First, glue the stem to the back of each flower and then, attach the leaves.
Make sure to let the glue dry before proceeding.
Once the leaves and stems are fixed, allow some additional drying time before moving on to the next steps.
Step 6: Assembling the Paper Bouquet

Finally, it was time to create the base of the paper bouquet.
I used a dark brown sheet, but you can choose any color you like.
To create the base, I rolled the paper into a cone, as shown in image 6.1 above. Once I achieved the proper shape, I secured the edge with glue.
Next, I placed the flower structures one by one into the bouquet base with care.
To enhance its appearance, I garnished the bouquet with round circles.
Lastly, I added a message for my mom on a piece of white paper and attached it to the bouquet.
I used colorful markers to draft the message, but you can also use stickers or write your own message.
Video Tutorial of this Mother’s Day Paper Bouquet Craft
Final Thoughts
This mother’s day bouquet craft is not just about creating a gift, it’s about expressing love through a handmade creation.
I recommend personalizing it further by incorporating your mother’s favorite colors or adding pressed flowers from her garden.
Consider writing a heartfelt note to accompany the bouquet, sharing specific memories or things you appreciate about her.
For those short on time, this craft can be adapted using pre-cut shapes or even repurposed paper from magazines.
Remember, the value lies in the effort and thought, not perfection.
This kids craft activity could also be a wonderful bonding experience to do with siblings or children, creating lasting memories while crafting a thoughtful gift.
Note: I have also shared a quick video tutorial of this Mother’s Day special paper bouquet on our official YouTube channel.


