Check out this Mothers Day paper craft for kids that beautifully captures a mother’s love for her children.
Crafted with care and creativity, this project portrays a mother tenderly holding her child, symbolizing the unbreakable bond between them.

As someone who loves crafting and DIY projects, I wanted to plan a special activity that celebrates motherhood in a unique way (with my kids of course).
That’s when the idea for this heartfelt paper craft struck me.
I’m excited to share with you the step-by-step instructions for creating this touching piece of art.
Along with the instructions, I’ve included images as well as a free template to guide you through each step of the process.
So, let’s gather our basic craft supplies and involve the little ones in making this meaningful structure for Mother’s Day.
Materials needed for this mothers day paper craft for kids
- Pencil and black marker pen for drawing the template (if not using the provided one).
- Scissors for cutting out the template shapes.
- Glue stick or other adhesive for assembling the cutouts.
- Optional: Crayons, markers, or colored pencils for decorating the template before cutting.
Step 1: Making The Mother’s Day Template

To kick off this activity, I started by sketching out a one-of-a-kind template on a blank sheet of paper using a pencil.
After ensuring the shapes were just right, I grabbed a black marker pen and carefully traced the outlines of both the mother and the baby.
While I’ve provided the template and detailed steps below for your convenience, feel free to get creative and draw your own shapes to tailor the craft to the Mother’s Day theme.
Step 2: Download The Mother’s Day Template
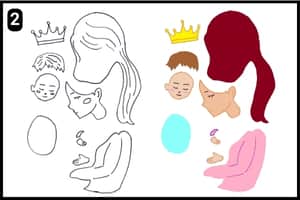
Here’s the template I’ve created for this craft activity.
You have two options i.e. one with blank outlines and the other pre-filled with colors.
If you’re looking to add your own artistic touch with different shades, opt for the blank template and shade it according to your preference.
Alternatively, if you’re short on time or have a group of kids joining in on the fun, simply print multiple copies of the colorful template.
Feel free to download and print either version of the template with just a few clicks, and then we can move on to the assembling process.
Step 3: Cutting the Template Shapes
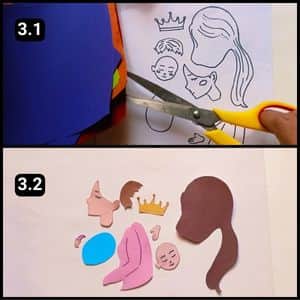
Now that you’ve selected your preferred template, it’s time to accurately cut out the shapes.
I personally opted for the colorful template and meticulously cut out each shape with precision, as shown in image 3.1 above.
Step 4: Assembling the Mother’s Structure
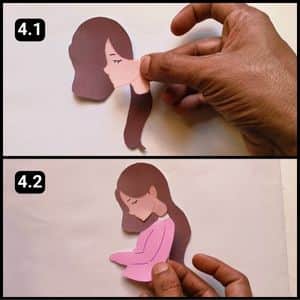
Now that I have the cutouts ready, it’s time to assemble the shapes. I started by assembling the mother’s structure, as shown in the images above.
I began by using the hair shape as the foundation of the assembly process. Then, I carefully aligned and attached the facial structure on top.
Next, I positioned the mother’s body structure below the facial features and securely attached it in place.
Step 5: Assembling the Baby’s Structure
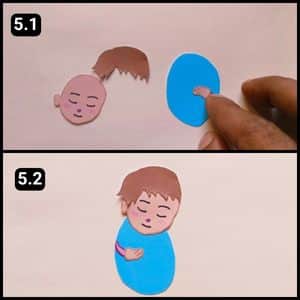
Once I finished assembling the mother’s structures, it was time to assemble the baby. I had the head, hair, and body shapes ready.
I started by attaching the baby’s hair shape to its head, ensuring a secure fit. Then, I positioned the body structure below the head and carefully affixed it in place.
Step 6: Bringing Baby And Mom Together
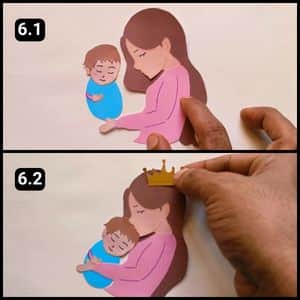
Now we’re at the final step of our Mother’s Day craft activity, where we’ll reunite the baby with mom and add the finishing touch of the crown.
To finalize the structure, I carefully positioned the baby’s head below the mother’s face, making sure her hand is delicately placed above the baby.
Lastly, I affixed the crown over the mother’s head, bringing this heartfelt craft activity to a beautiful conclusion.
Here’s how the completed project of mothers day paper craft looks like:
Final Thoughts
This adorable Mother’s Day craft is such a heartwarming way to celebrate the precious bond between a mother and child.
I love how simple yet meaningful it is, the perfect activity to do with kids of all ages.
I would say first let children get creative by decorating and coloring the template pieces themselves.
Then, have them carefully assemble the cut-outs, practicing fine motor skills.
As they construct the mother cradling her baby, discuss what motherly love means to them.
Once complete, the craft makes a cherished keepsake mom will treasure.
For an extra touch, kids could write a sweet Mother’s Day message on the back. Overall, an incredibly thoughtful project fostering quality family time.
Note: I have also uploaded the complete video walkthrough of this Mother’s Day paper craft on our official YouTube channel.
Frequently Asked Questions
How long did it take to craft the Mother’s Day Structure?
It took 8 minutes to craft the structure of the mother and baby using the ready template from the website.
Are there any tips for making the assembling process easier?
Yes, pre-fold the paper along the attachment points before applying glue and use small amounts of glue to avoid making the paper soggy. Also, let the glue dry completely before handling the assembled structure.
Is there a specific type of paper recommended for this Mothers day craft?
Cardstock paper is ideal for this mothers day craft as it provides a sturdier base for the structure. However, regular printer paper can also be used.


