Ever dreamt of becoming an aircraft engineer for a day and crafting your very own airplane? Well, today, that dream is about to take flight!
Today, I’m thrilled to walk you through a step-by-step Origami tutorial that will allow you to create your DIY airplane.
The best part? You can make use of everyday household items instead of letting them go to waste.
So without wasting any time let’s get those creative engines revving!
Things you will need to craft your Airplane
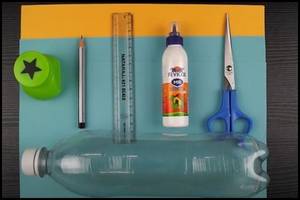
- Card Papers: I have used blue and yellow card papers to craft the Aeroplane, however, you can use different color themes.
- Pencil: You will need a pencil to mark and cut the required materials of preferred lengths and sizes.
- Scale Ruler: A ruler will help you with proper and accurate markings.
- Glue & Scissor: Glue and scissors are essential tools, just like the basic features in smart devices. They help you cut and stick things together easily.
- Star Shapes: I have used it to add a touch of decor to the DIY Aeroplane Wings.
- A water bottle: A pet water bottle with a liter capacity is sufficient for this project, however, you can use an even smaller or larger bottle as per your choice. Instead of scrapping them you can use them for DIY craft ideas.
Steps by step instructions to craft your Airplane
Step 1: Cover the bottle
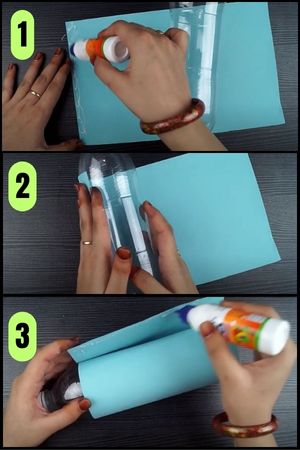
Use a bottle that’s queued for scrapping in your home. I am sure you’ll find many.
I am using a bottle with a capacity of 500 ml for this particular project.
I have used a blue card paper to cover the bottle’s body as seen in the image above.
Starting from the bottom of the bottle, measure and cut the card paper all the way to the top where the plain or flat part is. For your reference refer to the image above.
Apply some glue to the bottle’s surface and wrap the card paper to the bottle.
Next, apply glue to the edges and press it softly to let it fix firmly.
Step 2: Let it dry
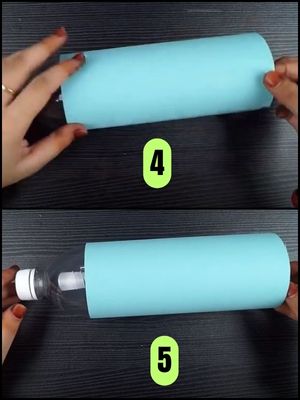
Hold the paper in place and let the glue dry for some time before proceeding with the next step.
It will ensure the main body of the airplane is ready for further procedures.
Step 3: Craft the Wings
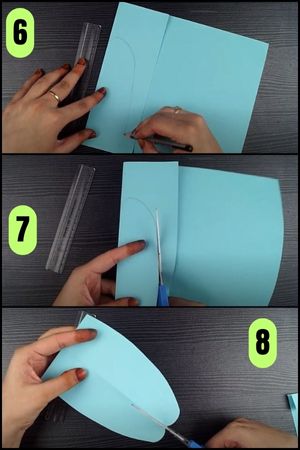
I have used similar paper to craft the airplane wings.
To do this, you can fold one part of the paper as seen in image 6.
Use a pencil to draw and cut the design as per images 6 and 7.
Finally, unfold the cutout and further cut it into half to create 2 wings for the airplane as seen in image 8.
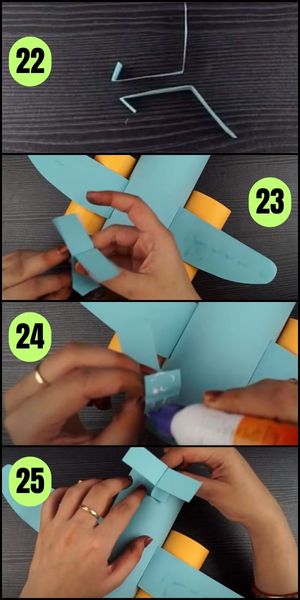
Step 4: Tail Fin Stabilizer
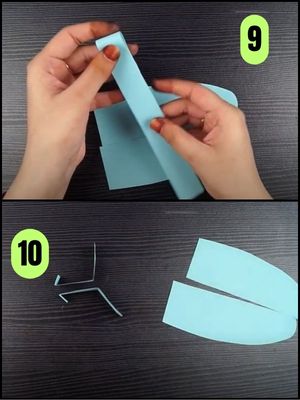
Your airplane can go off balance without a stabilizer fixed to the top of its tail.
Cut a strip of paper and divide it into two.
Fold the ends of the strips as seen in the image 10 above.
You can fold one of their ends bigger than the other for sticking purposes.
Now you have the wings and the tail fin ready.
Step 5: The making of the Jet Engine
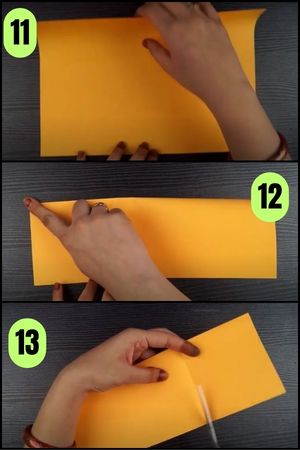
To make the jet engine that goes under the wings, I have used yellow card paper.
The size was too big so I separated some part of the sheet by cutting it using the scissor.
Fold the paper to divide it into two sheets and then cut the excess length properly.
Step 6: Shaping the Jet Engines
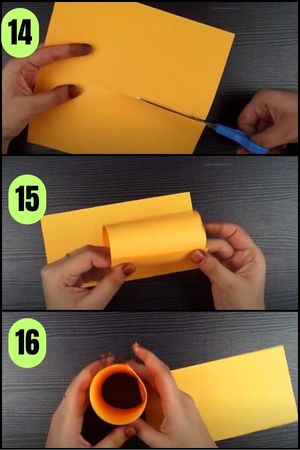
You will need two jet engines for two wings, hence unfold and cut the paper into two equal parts. (Refer to image 14)
Next, roll the card papers to form a cylindrical shape as seen in image 15 and 16.
Step 7: Add Wings to the airplane

Now it’s time to fix the wings to your airplane.
Grab the wings you crafted in Step 3 and stick them to the airplane.
If you refer to the image 17, I have slightly folded the paper from one end that can be glued and stuck to the airplane.
Similarly, follow the step for the other wing and stick them properly as per image 18.
Step 8: Alignment of the Jet Engines
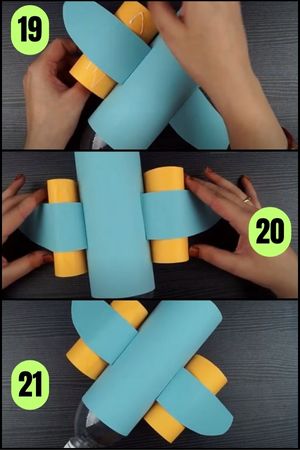
Align the jet engines and apply glue to the surfaces that connect to the body and the wings.
Do it for both the sides and align to fix them properly to their places.
Your airplane is now equipped with powerful jet engines.
Step 9: Add stability by installing the Tail fin
Grab the tail fin that was crafted in step 4 and fix them together.
Apply glue and fix them together to craft the Tail fin stabilizer.
Next, put glue on the bottom side and attach them to the back of the airplane, as seen in pictures 24 and 25.
Step 10: Add you tag logo
I have stuck star shapes to the edges of the wings as a tag or a touch of decor.
You can use similar or something else depending on your preferences.
Step 11: Attaching The Turbo Fan
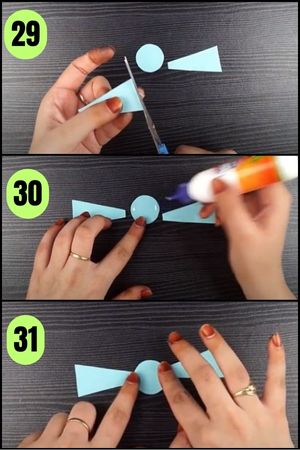
This is totally special and makes a big impact on this craft project.
I’ve cut a circle to match the size of a bottle cap and made two blades for the turbo fan.
All you have to do is cut and glue them together to create the fan, and then attach it to the airplane.
Step 12: Glue the fan to the bottle cap
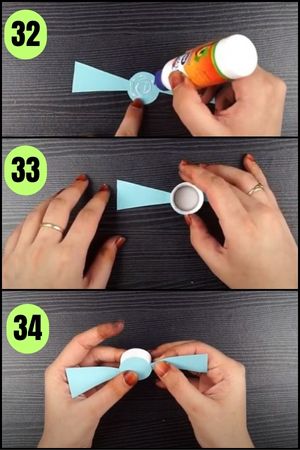
In this step, I have applied glue to the paper and stuck it to the cap of the bottle on the outer end.
You can refer to the above images for your reference.
Step 13: Installing the Turbo Fan
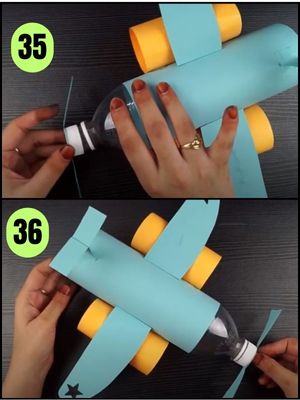
Once the cutouts are firmly stuck, fix the cap to the bottle’s head to offer the final touch.
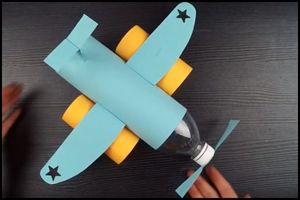
Your airplane is ready to take off, so fasten your seatbelt and enjoy the flight!
Final Thoughts
Now that you’ve mastered the art of creating your DIY airplane, don’t stop here.
Get creative and experiment with different color patterns and textures to decorate your space.
Share this exciting project with friends and family, and encourage them to join in the crafting fun.
Remember, the key to successful DIY projects is patience and imagination.
Don’t hesitate to explore other DIY ideas using items that often go to waste.
Your creativity knows no bounds, and there are countless possibilities waiting to be discovered.
So, fasten your seatbelts, not just for your airplane but for the endless adventures in the world of DIY crafting.


