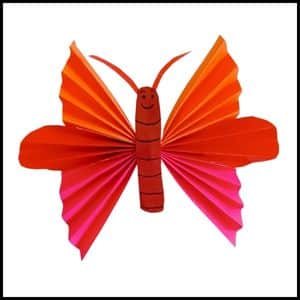
You won’t believe the vibrant origami paper butterfly I just crafted!
The wings are a stunning blend of orange, red, and pink that seem to flutter even when still.
Let me walk you through how I brought this beauty to life.
It all started with meticulously folding and cutting the origami papers into precise shapes.
With each fold, I could envision the wings taking form.
The real magic happened when I bound the folded sheets together with a decorative thread, the wings emerged, ready to take flight! But the journey wasn’t complete until I handcrafted the body, shading in expressive eyes and stripes with a marker.
When I finally attached the body to the wings, I had to do a double take.
This DIY origami butterfly looked like it could flutter right off the page! Want to learn how I did it? Keep reading…
Editor’s Note: I have also made different versions of paper butterfly craft for kids and you can find them below:
Things I’ve Used to craft this Origami paper butterfly
- Origami Paper: I have used red, pink, and orange origami paper to make the butterfly.
- Thread: To tie the butterfly wings I’ve used a decorative thread.
- Glue: To stick the butterfly’s body structure with the wings I’ve used multipurpose glue.
- Marker: To draw shades over the butterfly’s body such as eyes, mouth, and stripes I’ve used marker pens.
Step 1: Aligning the Origami Papers
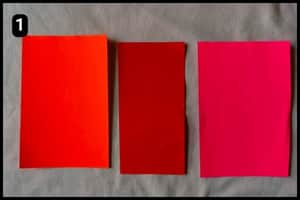
I crafted the butterfly wings using orange, red, and pink origami papers.
The pink and red papers are 6×4 inches each, with a red one in the center.
You can stick with these sizes or mix it up with different dimensions to personalize your butterfly.
Step 2: Cutting the Papers
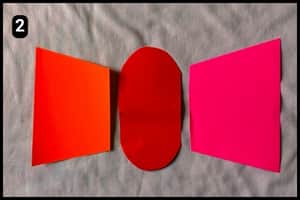
I cut the orange and pink papers from the sides, shaping them like cups as shown in the image above.
Then, I cut the red origami paper into an oval shape and placed it in the middle.
You can use similar shades or customize your paper butterfly with different colors.
Step 3: Folding the Sheet
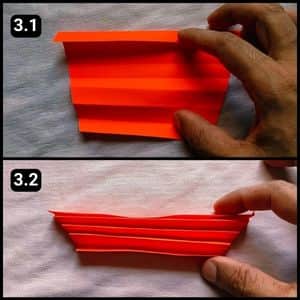
I folded the orange sheet back and forth in an accordion style.
I folded one section forward and the next backward, continuing this pattern until the entire sheet was folded.
You can refer to images 3.1 and 3.2 above for more clarity.
Step 4: Fold them all
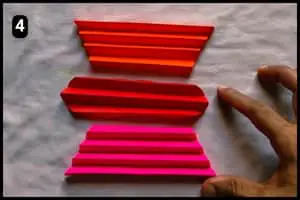
Just like with the orange sheet, I folded the red and pink papers (I made each fold about ½ inch wide).
Step 5: Fold the Top and Bottom
I folded the orange and pink papers in half to create the curves at the top and bottom of the structure, as shown in the images above.
I didn’t need to fold the red sheet since it stayed at the center of the structure.
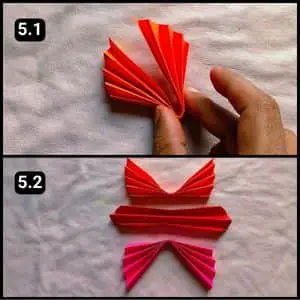
Step 6: Tying the thread
I tied the papers together with a piece of decorative thread, securing it at the center and trimming the excess, as shown in image 6.2 above.
This completed the wing structure of the origami paper butterfly.
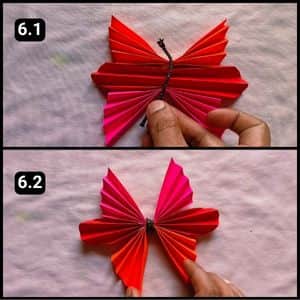
Step 7: Assembling the body

To craft the body of the butterfly, I used a brown piece of origami paper.
I started by cutting it into a rectangle, then trimmed the corners to create curvy edges.
Next, I used a marker to add details like the body stripes, eyes, and mouth.
Finally, I cut two curving strips of paper and attached them above the butterfly’s head.
After crafting the body, I applied glue to the center of the wing structure and adhered the body to it.
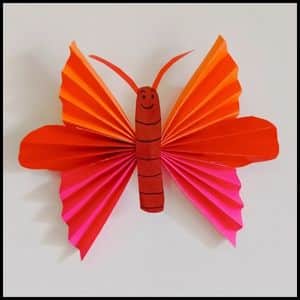
Looking at the final image, the vibrant shades I used for the wings turned out amazingly well.
Final Thoughts
If you’re looking for a fun, creative activity, I highly recommend giving this origami butterfly a try.
Not only is it a great way to spend an afternoon, but you’ll end up with a beautiful keepsake.
Also, don’t be afraid to put your own spin on it! Feel free to play around with different color combinations or add some embellishments for extra flair.
You could even make a whole garden of butterflies in varying sizes.
This versatile project allows your imagination to take flight.
One thing’s for sure, the sense of accomplishment when you finish is unmatched.
So gather your materials and prepare for some folding fun! With a little patience, you too can craft a paper butterfly stunner.
Note: I have also shared the complete video walkthrough of the origami paper butterfly on our official YouTube channel for your reference.
Frequently Asked Questions
How long did it take to make this origami paper butterfly craft?
It took 10 minutes for me to complete this amazing origami butterfly craft.
Is this origami butterfly craft suitable for beginners?
While the folding technique is explained, this origami butterfly might be a little challenging for absolute beginners due to cutting and shaping steps. It’s more suited for beginners with some origami experience. That being said, I have also made a simpler version of origami butterfly here for absolute beginners.
Can I use regular paper instead of origami paper for this paper butterfly?
Yes, you can use regular printer paper or construction paper for this origami paper butterfly. Origami paper might hold creases better, but regular paper will work in a pinch.


