Oven baked clay is one of those things that looks intimidating but honestly isn’t.
I kept delaying it for years thinking it needs talent.
It doesn’t. With oven baked clay, a home oven, and some patience, you can make beautiful, imperfect pieces that feel truly homemade.
This list is focused on oven baked clay ideas that work for beginners, not studio artists.
I’ll explain baking temps, shaping tricks, and small mistakes people usually make.
1. Textured Oven Baked Clay Coasters
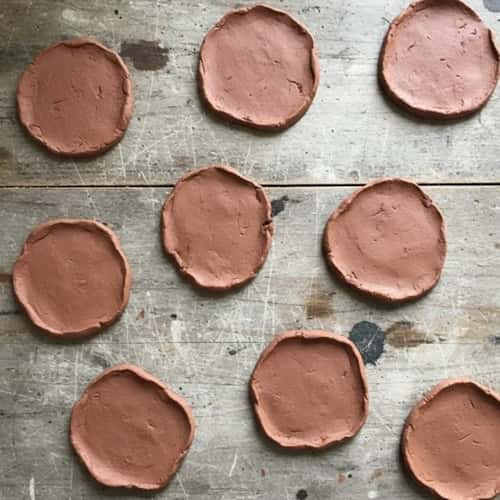
This is one of the best Oven Bake Clay Ideas For Beginners. Coasters are forgiving. No one expects perfection here, thank god.
What you need
- Oven baked clay (polymer clay works best)
- Rolling pin or bottle
- Knife
- Textured fabric, leaf, or fork
- Baking tray + parchment paper
- Oven
How to make it
Step 1: Start by conditioning your clay. Knead it with your hands for 3–5 minutes until it’s soft. Cold clay cracks when baked, and yes this step matters a lot.
Step 2: Roll the clay to about 6 to 7 mm thickness. Too thin and it warps, too thick and it takes forever to bake.
Step 3: Cut out circles or rough squares. Don’t stress edges, uneven is fine. Press fabric or a leaf gently on top for texture. This is where baked clay ideas really shine.
Step 4: Place pieces on parchment paper. Bake at 110 to 130°C (about 230 to 265°F) depending on your clay brand. Bake for 25 to 30 minutes. Let them cool fully inside the oven. Don’t touch early, they bend.
Optional: light sanding after cooling. Seal if you want, but it’s not mandatory. I probably would skip sealing honestly.
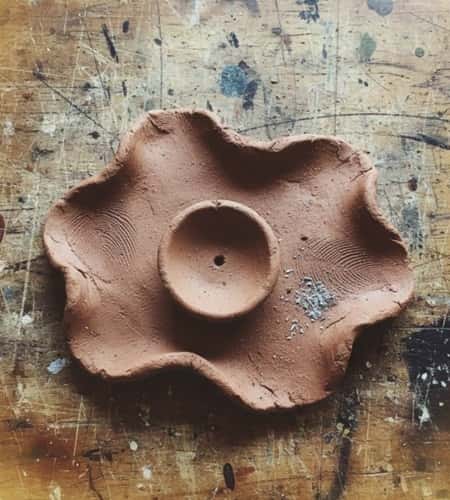
2. Minimal Clay Candle Holders
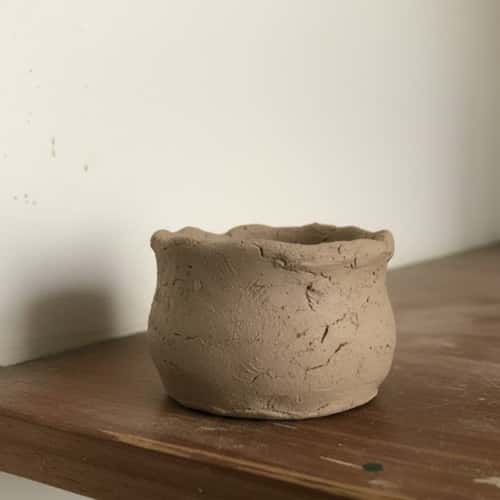
These are simple, modern, and slightly wonky. Which I love. This is a solid Oven Bake Clay Gift Ideas option too.
What you need
- Oven bake clay
- Tealight candle
- Toothpick
- Baking tray + parchment
- Oven
How to make it
- Take a ball of clay about the size of a lemon. Roll it lightly but don’t overwork it.
- Press it down gently to make a thick disc. Push a tealight halfway into the clay to mark the shape. Remove candle carefully.
- Use a toothpick to smooth cracks. Or don’t smooth them, cracks look nice sometimes. Make sure the base is flat. If it rocks, baking will lock that mistake forever.
- Bake at 120°C (250°F) for 30 minutes. Longer is fine. Polymer clay doesn’t burn easily at correct temps. Let it cool fully. Do not insert candle when hot, please don’t.
3. Oven Baked Clay Fridge Magnets
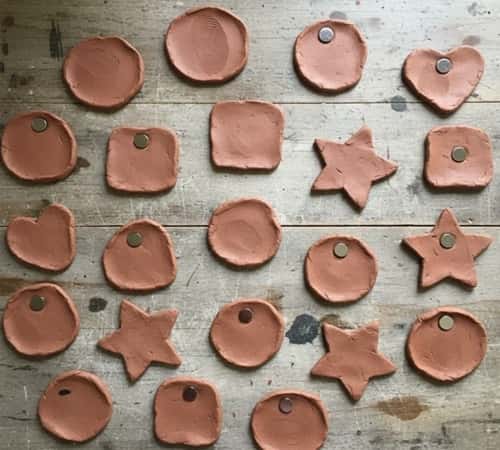
These are small, fast, and weirdly addictive. Perfect Clay Crafts Oven Bake project when you don’t want commitment.
What you need
- Oven baked clay
- Fridge magnets (flat back)
- Craft knife
- Toothpick
- Baking tray + parchment
- Strong glue (after baking)
How to make it
- Condition the clay first. Always. Roll it to about 4 to 5 mm thick. Cut tiny shapes – blobs, arches, circles, abstract forms. Keep them small. Heavy magnets fall.
- Use a toothpick to add lines or tiny dots. Don’t go too deep. Clay expands slightly while baking and details can blur.
- Bake at 120°C (250°F) for 20 to 25 minutes. Smaller pieces bake faster. Let them cool fully. This part people rush and regret.
- Once cooled, glue the magnet to the back. Press firmly and let it cure overnight. No shortcuts here. If you glue while warm, it fails.
These work great as Fridge Decor, Clay Magnets, and even Oven Bake Clay Ideas Easy for kids (with adult baking).
4. Modern Napkin Rings (Minimal + Imperfect)
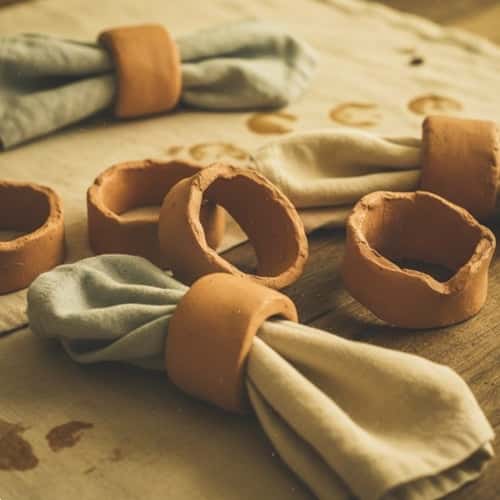
These look high-end but aren’t. Which is my favorite kind of project. Classic Modern Napkin Rings using Diy Bake Clay.
What you need
- Oven bake clay
- Rolling pin
- Knife
- Small bowl (for shaping curve)
- Baking tray + parchment
How to make it
Step 1: Roll clay into a long rope, about finger thickness. Keep pressure uneven on purpose. Perfect cylinders look factory-made and boring.
Step 2: Wrap the clay rope around a small bowl or jar to form a ring. Overlap ends slightly and press gently to join. Smooth with finger, or don’t fully smooth. Texture adds charm.
Step 3: Place rings flat on parchment. Make sure they’re not twisted. Twisted rings bake weird, trust me.
Step 4: Bake at 110 to 120°C (about 230 to 250°F) for 30 minutes. Let them cool naturally. Removing early causes cracks sometimes and its annoying.
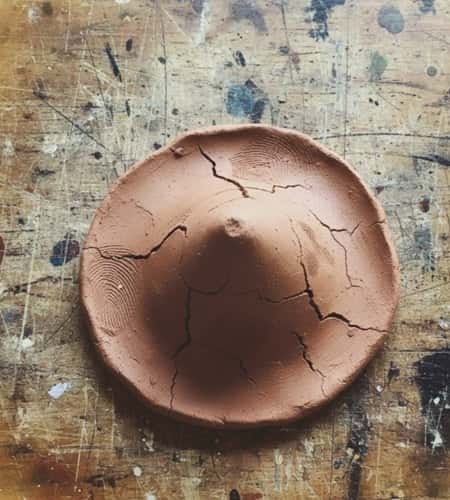
5. Organic Clay Trinket Tray
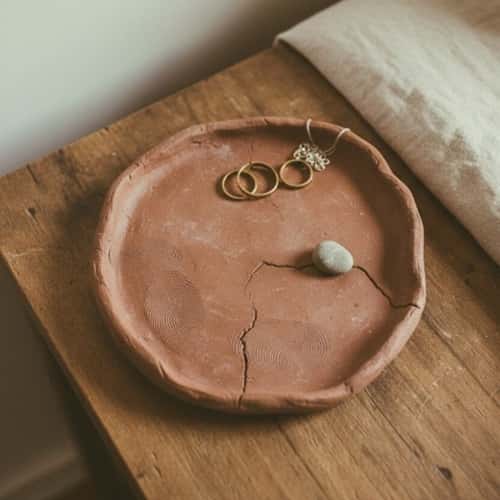
This is one of those Oven Bake Clay Ideas that looks fancy but behaves simple. Great for keys, rings, random stuff we pretend is organized.
What you need
- Oven baked clay
- Rolling pin or glass bottle
- Knife
- Small bowl
- Baking tray + parchment
How to make it
Step 1: Condition the clay well. If it cracks while rolling, knead more. Roll it to around 6 mm thick. Cut an uneven circle or oval. Don’t use a ruler. Real homes don’t have ruler-perfect trays.
Step 2: Lift the clay and gently place it inside a bowl. Press lightly so the sides curve up. If cracks appear, smooth them with your finger. Or leave some cracks, they look real.
Step 3: Take it out carefully and place it on parchment. This step feels risky, but go slow.
Step 4: Bake at 120°C (250°F) for 30 to 35 minutes. Let it cool fully in the oven. Sudden cooling causes warping and it’s annoying.
6. Oven Baked Clay Wall Hooks

These are functional and a little risky, but totally doable. Light items only. This is where Oven Clay Crafts meet common sense.
What you need
- Oven bake clay
- Metal hook screw or nail
- Knife
- Baking tray + parchment
How to make it
- Start with a thick clay block, at least 2 cm deep. Thin hooks snap. Shape it into a soft triangle or blob. Flatten the back slightly so it sits on the wall later.
- Push the metal hook or nail halfway into the clay. Remove it carefully. This creates a channel. Do NOT bake with metal inside unless clay brand allows it. Most don’t.
- Bake at 110 to 120°C (230 to 250°F) for 35 to 40 minutes. Thick clay needs time. Let it cool completely.
- Once cool, reinsert the hook using glue if needed. Mount using wall-safe adhesive. These work for keys, caps, not backpacks. Be realistic.
7. Oven Baked Clay Photo Holders

This is one of those Oven Bake Clay Ideas For Beginners that feels useful immediately. Also great desk clutter control.
What you need
- Oven baked clay
- Toothpick or butter knife
- Rolling pin
- Baking tray + parchment
How to make it
Step 1: Condition the clay till it’s smooth and slightly warm. Roll a thick rope, about thumb-width. Cut 5 to 6 cm long pieces. Stand them upright. If they fall, flatten the base slightly.
Step 2: Using a toothpick or knife, cut a shallow slit on top. Angle it slightly backward. Straight slits don’t hold photos well, learned that the hard way.
Step 3: Bake at 120°C (250°F) for 25 to 30 minutes. Let them cool fully before testing. Warm clay bends and snaps easy.
8. Minimal Clay Earrings (Lightweight)
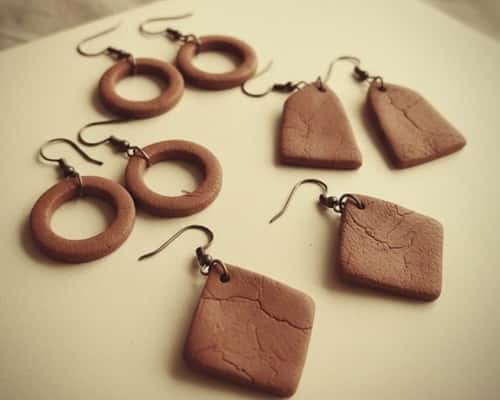
These are delicate but beginner friendly. Keep them thin or they feel heavy. This counts as Oven Bake Clay Projects Easy when done right.
What you need
- Oven bake clay
- Rolling pin
- Knife or cutter
- Toothpick
- Baking tray + parchment
- Earring hooks (after baking)
How to make it
Step 1: Roll clay thin, about 3 mm. Thin is good here. Cut simple shapes – arches, drops, circles. Overdesigning ruins it.
Step 2: Use a toothpick to make a hole near the top. Do this before baking. Forgetting this step is common and frustrating.
Step 3: Bake at 110 to 120°C (230 to 250°F) for 20 – 25 minutes. Let cool completely. Attach hooks only after cooling.
9. Oven Baked Clay Incense Holders
Simple, calm, and forgiving. This one smells like success if you don’t rush it. Great Baking Clay Ideas project.
What you need
- Oven baked clay
- Incense stick
- Toothpick
- Rolling pin
- Baking tray + parchment
How to make it
Step 1: Condition the clay until it bends without cracking. Roll it into a long rope, about pencil thickness. Gently curve it into an S-shape or shallow wave. Straight holders look boring.
Step 2: Press one end slightly flat. Insert the incense stick at a slight angle to mark the hole. Remove it slowly. If the hole closes, reopen gently with a toothpick.
Step 3: Bake at 120°C (250°F) for 25 to 30 minutes. Let it cool fully before testing. Warm clay snaps easy, this is not optional.
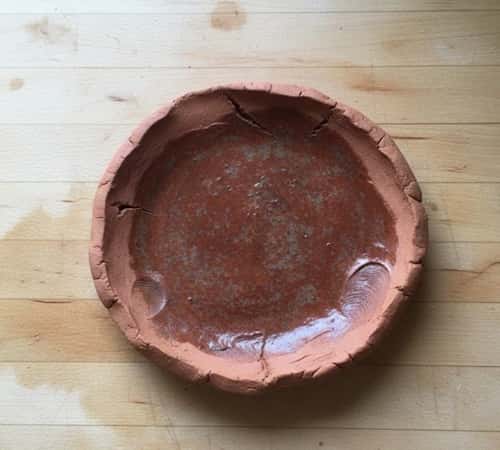
10. Baked Clay Key Bowl
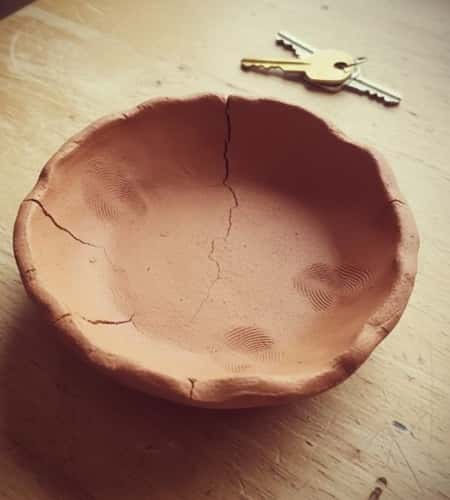
This is like a trinket tray’s tougher cousin. Everyday useful. Nobody complains about this gift.
What you need
- Oven bake clay
- Rolling pin
- Knife
- Small bowl
- Baking tray + parchment
How to make it
- Roll clay to about 7 mm thickness. Cut a rough circle. Don’t aim for symmetry. Lift and place it into a bowl, pressing gently to form depth.
- Smooth cracks lightly. Or don’t smooth all of them. Uneven edges make it look handmade, not cheap.
- Bake at 120 to 130°C (about 250 to 265°F) for 30-35 minutes. Let cool inside oven. Sudden cooling warps the base and it sucks.
11. Oven Baked Clay Plant Markers
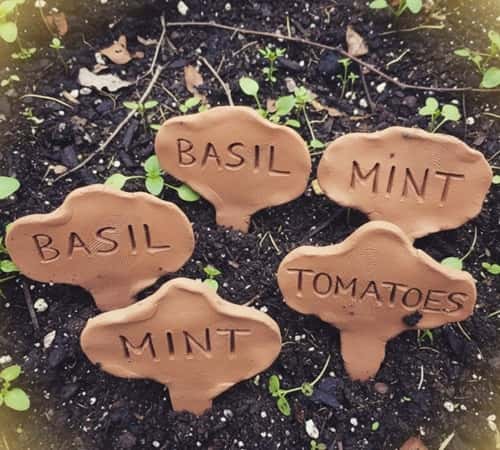
These are simple, useful, and a little messy in a good way. Perfect Oven Bake Clay Ideas Easy for people who kill plants but still try.
What you need
- Oven baked clay
- Rolling pin
- Knife
- Toothpick or skewer
- Baking tray + parchment
How to make it
Condition the clay well. Roll it to about 5 mm thickness. Cut long rectangles or soft leaf shapes. Don’t make them too thin or they snap later.
Use a toothpick to write plant names. Press gently. Deep carving weakens the clay, and thats annoying later.
Taper one end slightly so it goes into soil easily. Keep the top wider.
Bake at 110 to 120°C (about 230 to 250°F) for 25 – 30 minutes. Let them cool fully before using. Warm clay bends, cold clay holds.
12. Baked Clay Ring Cones
This is one of those Baked Clay Ideas that looks harder than it is. Rings hide mistakes really well.
What you need
- Oven bake clay
- Rolling pin
- Knife
- Baking tray + parchment
How to make it
Step 1: Roll clay into a thick rope. One end thinner, one end thicker. Shape it into a cone by gently smoothing upward. Don’t overwork it or it collapses.
Step 2: Flatten the base slightly so it stands. Test it on the table. If it wobbles now, it will wobble forever.
Step 3: Bake at 120°C (250°F) for 30 to 35 minutes. Let it cool naturally. Rushing cooling causes hairline cracks sometimes and thats frustrating.
13. Oven Baked Clay Spoon Rest
This one is practical and forgiving. If it’s uneven, it still works. That’s my favorite kind of Oven Baked Clay Project.
What you need
- Oven baked clay
- Rolling pin
- Knife
- Small bowl
- Baking tray + parchment
How to make it
Step 1: Condition the clay well. Roll it to about 7 mm thick. Cut an oval or bean shape. Don’t go thin. Thin spoon rests crack easier.
Step 2: Place the clay partially inside a bowl to create a gentle curve. One side higher than the other works best for catching drips.
Step 3: Smooth cracks lightly with your finger. Leave some fingerprints. Perfection is boring.
Step 4: Bake at 120 to 130°C (about 250 to 265°F) for 35 minutes. Let it cool inside oven. Removing early warps the curve.
14. Oven Baked Clay Mini Wall Tiles
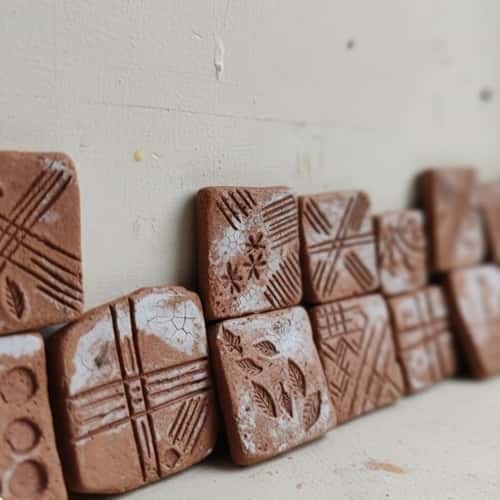
This is slightly artsy but still beginner-safe. Good way to use leftover clay.
What you need
- Oven bake clay
- Rolling pin
- Knife
- Toothpick
- Baking tray + parchment
How to make it
Step 1: Roll clay to 5 to 6 mm thickness. Cut small squares or rectangles. Don’t obsess over straight lines. Slight crookedness adds charm.
Step 2: Use a toothpick to carve lines, dots, or abstract patterns. Keep designs shallow. Deep cuts weaken tiles.
Step 3: Bake at 110 to 120°C (230 to 250°F) for 25 to 30 minutes. Let cool completely. These can be glued to walls or used as decor pieces.
Final Thoughts
Oven baked clay is less about skill and more about patience.
Temperature control matters more than design. Thick clay survives mistakes.
Thin clay exposes them. If something warps, cracks, or bends, that’s not failure – that’s how you learn how Oven Baked Clay actually behaves in a real home oven
Don’t chase perfection. Chase understanding. Once you get how baking time, thickness, and cooling work, you can turn almost any idea into a solid Oven Bake Clay Project.
Start small. Finish what you start. And let it look handmade, because it is.


