Learning their ABCs? Make it Fun with This Adorable Paper Bunny.
Is your little one learning their letters? “B” is for bunnies, and what better way to bring it to life than with a cute paper craft project? This adorable bunny is perfect for children of all ages, and it’s a great activity to do together for the upcoming weekend.
I just made this adorable paper bunny with the help of hand made templates made by me and you too can do it easily.

Let’s take a look at the step-by-step process below to make this adorable paper bunny craft.
Editor’s note: I made many versions of paper bunny and you can find the variations below:
- Simple Origami Paper Bunny (Easter Craft Ideas for Kids)
- DIY Pen Decoration (Easter Bunny): Gift Idea for kids
- DIY Sleeping Eye Mask (Easter Bunny): Ideal Gift For Kids
- DIY Bunny Pen holder: Ideal Easter Gift Idea for Kids!
- Origami Bunny: You Won’t Believe How Easy This Craft Is!
- Dancing Paper Rabbit Bunny
- Printable Paper Bunny Simple Version
Step 1: The Making of the paper bunny template

Want to create an adorable bunny craft project but don’t have time to design your own template? I’ve got you covered!
Similar to my other craft projects I have made this particular unique bunny structure myself.
Initially, I employed a pencil to sketch the framework of my beloved bunny, guided by my vivid imagination.
After incorporating the necessary corrections and refining the overall structure, I used a black marker pen to precisely outline and finalize the design.
Step 2: Paper bunny template source (Download it if you don’t prefer sketching)
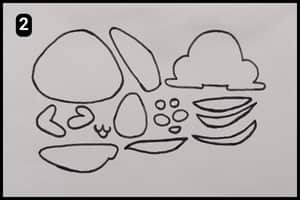
If you look at the image above it is the actual template that I made and it can be downloaded here.
Using templates not only saves time but also helps you to skip the drawing step.
Step 3: Choose the color themes for the cutout

For this adorable bunny paper craft, I used pink and cream white paper sheets.
The pink paper sheets were used to cut out the shades and details of the bunny.
Feel free to choose your own preferred color scheme.
Step 4: Streamlining the Cutout Shapes

I used cream-white origami paper to cut out the complete shapes of the bunny.
For the ear shades, nose, cheeks, and abdomen, I used a sheet of pink paper.
Lastly, I used black paper to create the bunny’s eyes. Since they were tiny circles, I used a paper punching machine to make two small circles.
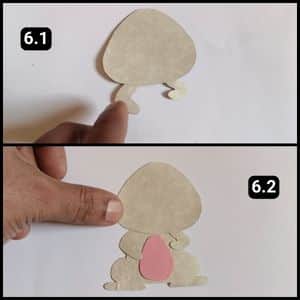
Step 5: Shading the Bunny’s Tummy

Let’s begin with the assembling process of the paper Bunny’s structure.
To begin with I will first place the Bunny’s Body structure as the base.
Next, I will stick the cutout resembling the Bunny’s Tummy in pink.
Step 6: Assembling the arms and Head
Following the anatomy of the bunny, I began by attaching the arms to the facial structure.
Next, I secured the arms to the base structure of the paper bunny.
Step 7: Assemble the Ears and Draw the Mouth

To create the bunny’s ears, I used cream white paper and cut out the desired shapes.
For the ear shades, I used pink-colored paper, as shown in Image 7.1.
To assemble the ears, I will attach the left ear pointing upwards and the right ear curving downwards, as depicted in Image 7.2.
Lastly, to create the bunny’s mouth, I will draw the shape using a black marker pen.
Step 8: The Facial Impressions
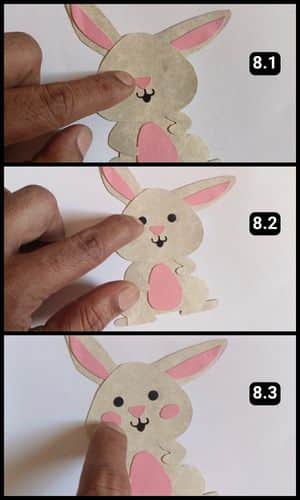
Now comes the finishing touch i.e. bringing our bunny’s face to life.
First, I carefully attached the tiny cutout for the nose.
The eyes, being so small, were a bit tricky, but with a little patience, I managed to stick them on perfectly.
Finally, the pink cheeks (cutouts) were added, completing our adorable bunny’s features.
Final Thoughts
This adorable paper bunny craft is a delightful project for crafters of all ages, especially young children.
Choosing and using different colored paper allows children to explore color combinations and express their creativity.
In other words, it’s a perfect way to introduce them to basic crafting techniques like cutting, assembling, and personalizing.
The use of a template, downloadable for your convenience, removes any artistic pressure and allows even beginners to create a charming bunny.
For your reference I have also put a video walkthrough of the paper bunny on our YouTube channel.
Frequently Asked Questions
How long did it take to make the paper Bunny craft?
It will take about 15 minutes to make the paper bunny craft using the ready template from our website.
Which glue is suitable to stick the cutouts for this paper bunny project?
You can use regular craft glues suitable for papers or multipurpose glue such as fevicol.
Can I customize the template to create different bunny breeds?
Yes, the provided template can be a base for variations. Here are some ideas:
– Lop Eared Bunny: Extend the ear shapes and make them droop slightly.
– Flopsy Bunny: Shorten the ears and round out the tips slightly.
– Cottontail Bunny: Add a small white puff tail using additional paper or cotton balls.
How can I add different facial expressions to the bunny?
Go beyond the basic drawn mouth, here are some ideas to give different personality to your bunny:
– Use pre-made wiggle eyes that move for a more playful look.
– Cut out different shaped mouths (smile, frown, etc.) from colored paper and glue them on.
– Experiment with marker expressions like raised eyebrows or rosy cheeks.


