Flitting from flower to flower, nectar-feeding and pollinating as they go, butterflies are nature’s delicate, symmetrical, winged wonders.
Their colorful, bold patterns and metamorphic journey from caterpillar to chrysalis to pupa to butterfly never fail to captivate.
What could be more enchanting than crafting your own easy paper butterfly craft for kids?
Imagine the delight on your little one’s face as they transform a simple sheet into a fluttering beauty, just like the Monarch butterfly.
This weekend, why not spread the creative wings and bring the magic of these fascinating creatures into your homes?
Get ready to be swept away by a world of vibrant colors, intricate designs, and the sheer joy of watching your child’s imagination take flight.
In today’s article, I will show you how to create a paper butterfly craft step by step along with images.
Here’s what this article covers:
- Free downloadable template (blank & colored)
- Step-by-step guide with pictures & video tutorial
- Educational Value
Step 1: Preparing The Paper Butterfly Template

Before we proceed, let me walk you through how I created a paper butterfly template.
I like to design my own templates either by sketching them out or using online software. I aim for designs that are both unique and simple to follow.
I start by sketching the outlines of the shapes I need with a pencil.
Once they’re just right, I go over them with a black marker to make them stand out.
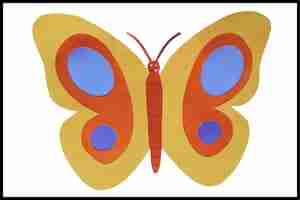
Feel free to customize your template by drawing your own shapes, but don’t worry, I’ve already made a paper butterfly template for you to use (You can check it out in the image above).
You can easily download and print the template with just a few clicks, then you’re ready to dive into the fun of crafting your paper butterfly.
I’ve provided the template in two versions:
- One with just the outlines, perfect for your own creativity
- Another pre-filled with bright colors to make things even easier
If you’re working with a group, simply print out multiple copies of the colorful template to share with everyone.
To add your own personal touch, consider incorporating different shapes like ovals, circles, or blobs into your butterfly design.
Step 2: Cutting the Butterfly Shapes
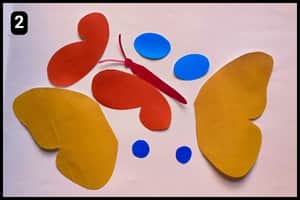
I opted for the pre-filled butterfly template because it saved me time and effort.
The goal was to print the colorful template and precisely cut out the butterfly shapes.
If you decide to experiment with different shades and patterns, that’s perfectly fine too.
Step 3: The Assembling Process
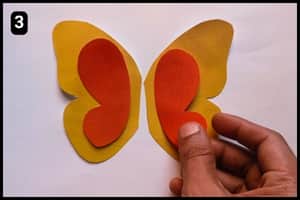
Once I had the cutouts ready, I started assembling the butterfly.
I began by using the pair of wings as the foundation.
Then, I attached the orange shape onto the wings, post which I allowed everything to dry thoroughly.
Step 4: Sticking the Oval Shades
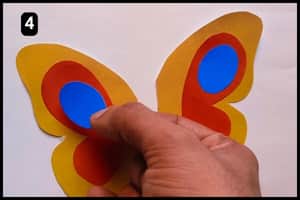
Since the orange shades were securely attached to the wings, I proceeded to stick the oval shapes, as shown in the above image.
Remember to fix the oval shape cutouts on top, directly over the orange shades.
Step 5: Sticking the Circles
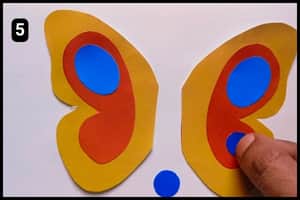
It was time to assemble the final shades, which were the small circle shapes below.
I stuck the circle shapes over the orange shade on the lower side (see the above image for reference).
Step 6: Assembling the Wings with Body
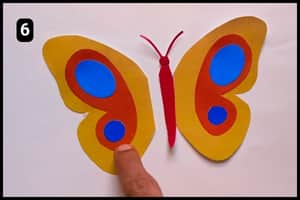
All the necessary shades were evenly stuck over the butterfly’s wings, so it was time to assemble the main structure.
I aligned the body structure of the butterfly between the wings and stuck them evenly.
Afterward, I let it dry since there were slightly lower sections where I needed to adhere the wings to the body.
As you can see in the image above, the paper butterfly’s final structure is now ready to flutter and dance among the blooming flowers.
Final Thoughts
Encourage kids to experiment with colors, shapes, and textures found in nature. This creative exercise will deepen their appreciation for these winged wonders.
Next, consider using materials beyond just paper, like tissue paper for delicate, translucent wings or pipe cleaners to add antennae that wiggle and sway.
You could even incorporate recycled materials, teaching an invaluable lesson about repurposing everyday items.
Once your butterflies are complete, why not set up a miniature garden using construction paper, popsicle sticks, and fresh flowers from your yard?
Let their handmade creations “pollinate” this tiny eco-system as they play.
Remember, the true magic lies in the bonding experience, not just the final craft.
Soak in every giggle, question, and moment of awe as you unlock the joys of the natural world together, one paper butterfly at a time.
Note: For your reference, I have also shared the complete video walkthrough of the paper butterfly craft on our official YouTube channel.
Frequently Asked Questions
How long did it take to craft the paper butterfly?
It took only 5 minutes to assemble the paper butterfly using the ready template from our website.
Is this paper butterfly craft appropriate for young children?
Yes, this craft is designed to be easy for kids to follow, especially with the pre-made template. That being said, adult supervision is recommended for younger children using scissors.
What type of paper should I use for printing this butterfly template?
Regular printer paper works well for this paper butterfly. However, it’s recommended that you use thicker cardstock for a sturdier butterfly.
How can I modify this paper butterfly craft for younger children?
For very young children, you can pre-cut the butterfly shapes or help them with the cutting process. This will help them to focus on gluing and decorating the butterfly freely.