Paper crafts are awesome for everyone, regardless of age.
I just finished making a paper cat craft that my kids truly enjoyed and I’m thrilled to share this DIY with you.

All you need is some craft paper, glue, scissors, and a bit of imagination to create your very own furry buddy (Don’t worry you don’t need to reinvent the wheel as I have a free downloadable template for this craft).
Whether you are a pet lover or simply enjoy crafting, this project is bound to put a smile on your face.
Let me walk you through the steps and materials needed to craft your own paper cat.
Step 1: Outlining Shapes for Cut Out

If you have been following my blog home life chic you’ll know I typically make my own outlines to craft different figures.
And for this craft too I made a cat figure outline manually.
First, I used a pencil to outline the cutout shapes, and then I traced the final shapes with a dark marker pen.
Once I had the template ready, I started crafting the cat figure using colorful papers.
If you want to craft a similar paper cat, you don’t need to draw the outlines yourself as I have uploaded the ready template on my blog here for your reference.
All you have to do is download and print the cat figure template to start with the project.
Step 2: Cutting the Shapes

In the images above, I’ve shown you one of the steps I followed to create the paper cat.
First, I cut out the facial structure of the cat and pasted it onto a yellow piece of paper.
Then, I let it dry for about a minute (the drying time depends on the type of glue you are using).
Step 3: Cutting the Shape

Once the glue is dry and the cutout looks securely attached to the yellow sheet of paper, I’ll carefully cut it using scissors.
It’s important to cut the edges and curves slowly to achieve the perfect shape.
Step 4: Get other shapes ready

You can follow the same process to cut out other shapes from the template and paste them onto colorful paper sheets of your choice.
After the cutouts are securely glued and dry, begin cutting them out one by one and set them aside in an organized manner.
Step 5: Start Fixing the Shapes
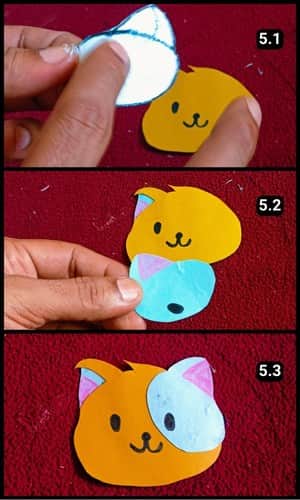
I drew the facial details, like the eyes and mouth, using a black marker pen, just as I did in the previous step.
But if you prefer larger eyes, you can use either a marker or googly eyes sticker.
Then, I began sticking the cutouts together, starting with the ears as seen above followed by applying glue and securing the ear shapes in place.
Step 6: Fix the lower body
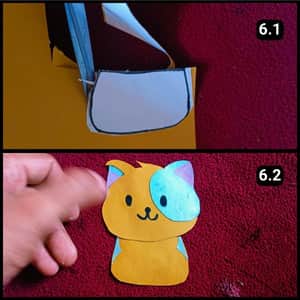
I cut out the shape of the cat’s lower body and stuck it below the head.
Then, I glued two small patches with blue paper on its sides. The main structure looked ready, so I moved on to the next step.
Step 7: Fixing the Tail and the Legs
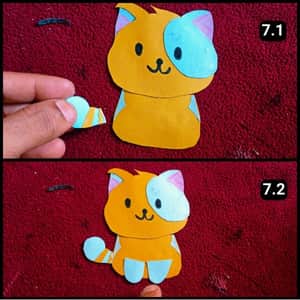
With precise movements, I carefully positioned the tail and tiny legs onto the paper cat.
The tail, meticulously cut from a vibrant sheet of blue paper, was adorned with bold yellow stripes, enhancing its overall appearance.
Using glue, I securely attached the tail to the back of the cat’s body.
Furthermore, I crafted the legs from the same shade of blue paper and strategically placed them at the front, completing the cat’s structure.
Now, my mind pondered the next creative challenge i.e. how to enhance the whiskers and bring added charm to this paper feline.
Step 8: Crafting the Whiskers
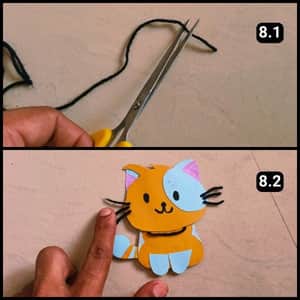
To make the Whiskers, you can either cut and use the shapes from the template or you can make your own as I did.
I have used a black wool thread to make the cat’s Whiskers.
First, I have cut the thread into 6 pieces (3 for each side).
Next, I applied glue to its edges and stuck them one by one and let them dry evenly.
Note: Whiskers refer to the long mustache like hairs just so you are not confused.
Here’ how the final completed paper cat craft project looks like:

Video Walkthrough Of Paper Cat Craft
Final Thoughts
If you’re new to this craft, I highly recommend starting by printing the template from our blog and carefully following the provided instructions.
It’s a rewarding activity that anyone can enjoy, regardless of age or skill level.
To further assist you, I’ve also uploaded a video detailing the entire process on our YouTube channel.
Watching the steps visually can be incredibly helpful in grasping the techniques involved and inspiring your creativity.
Frequently Asked Questions
How long does it take to make a paper cat with this template?
With the provided template, you can easily create a charming paper cat in just 5 to 10 minutes.
Are there any alternative materials I can use for the whiskers if I don’t have black wool thread?
If you don’t have black wool thread, you can use thin strips of black paper or even thin straws as an alternative for the whiskers.
Can I make modifications to the template to create different cat breeds or poses?
Feel free to customize the template to create different cat breeds or poses by adjusting the shapes and proportions as desired.
What are some creative ways I can use leftover paper scraps from this craft?
Leftover paper scraps from this craft can be used for other paper crafts, such as collage art, greeting cards, bookmarks, or even as colorful confetti for decorations.


