Looking for a way to keep your little ones entertained, motivated and unleash their artistic side? Look no further than the adorable world of paper clown crafts for kids.
These colorful characters are a joy to create and the perfect introduction to crafting for young children.
And the best part about this paper clown craft is that it’s surprisingly simple to make.
Do you know Why??
It’s because I’ve created a downloadable paper clown template and it’s available on my blog to save you time and frustration.
With just a few snips and some glue, you and your child can be well on your way to crafting a paper clown masterpiece in no time.
So, without wasting any time let’s get clowning.
Step 1: Paper Clown Template Source

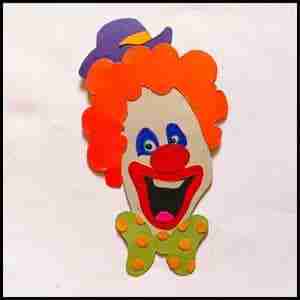
As an initial step, I crafted a template consisting of various shapes which represents a clown’s face. These shapes were intended for cutting and then assembling.
To begin the crafting process, I sketched the outlines of the shapes intended for cutting with a pencil, followed by tracing the finalized shapes using a black marker pen.
If you look at the image 1.1 above it’s the final template of the paper Clown craft.
I have made the Clown’s template available on my blog which can be downloaded for free.
To craft a similar Clown face you can download and print the template right away.
However, if you want to customize or draw your own template you can draw the shapes accordingly.
The next step involves cutting out shapes from colorful paper sheets, which will then be assembled later (let’s take a quick look at it).
Step 2: Colorful Cutouts

I have cut the required shapes precisely and have posted an image above for your reference.
Next up, I aligned the cutouts for assembling in a systematic order.
Step 3: The Assembling Process

I started the assembling process by first placing the Clown’s facial cutout and hair and stuck them.
Then, I applied glue to the edges of the hair shape and stuck it around the facial shape of the Clown.
Step 4: The Clown’s Hat
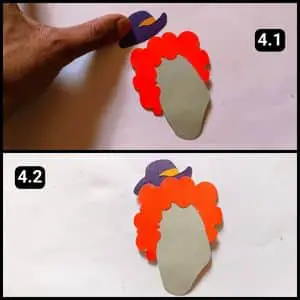
Our funny-haired clown looks a bit bare without a hat.
So, I fixed that by attaching the hat template behind the clown’s hair as seen in image 4.1 above.
This step completes the head and brings our wacky creation to life.
Step 5: Attached The Big Smile

Let’s adhere to the typical mouth shape of a clown, which makes for great makeup.
To create this shape, I first cut out a large smiling mouth shape from red paper (available in our template).
Next, I cut out the mouth shape slightly smaller from a black sheet.
Then, I created a white cutout to represent the teeth and a pink cutout for the tongue, and I affixed them onto the black cutout.
Finally, I placed the black cutout over the red shape to complete the mouth structure.
Step 6: Shading the eyes and fixing the nose

Since I didn’t have blue construction paper for cutouts during this craft, I decided to draw the clown’s eyes with marker pens.
While I had other colored paper, blue was the perfect choice for eyes.
Once the blue marker-drawn eyes were complete, I added some definition with a black marker pen to highlight the pupils.
Step 7: Preparing the Clown’s Bow

Next up, I crafted the clown’s bow prior to attaching it beneath its face.
I cut the bow shape on a green craft paper and used yellow paper for shades.
To cut the yellow papers into tiny circles I used the paper punching machine (A paper punching machine is typically used to punch holes for paper files).
I stuck the circles one by one all over the Bow and finally it looked enough so I let the glue dry evenly for about a minute.
Step 8: Sticking the Bow

It was time to align and stick the designer bow beneath the clown’s face, marking the conclusion of this craft activity.
If you look at the final image below the structure looks amazing to the eyes and like real.
Video Walkthrough Of Paper Clown Craft Project
Final Thoughts
While this template is a great starting point, feel free to add your own personal touches to make it truly unique.
Consider embellishing your creation with glitter, pom-poms, or funky buttons for a one-of-a-kind look.
Furthermore, try using different colored papers and customize each clown with a unique expression.
Also, if possible, attach some string to the top of the clown and hang it for a delightful decoration.
Note: For your reference, I have also shared the complete video walkthrough of this paper Clown craft on our official YouTube channel.
Frequently Asked Questions
How long did it take to make this paper Clown craft?
It took 10 minutes for me to make this paper Clown craft using the ready template available on our blog. However, the time may increase by 15 to 20 minutes if you customize your own Clown shape template.
What age is this paper clown craft suitable for?
This paper clown craft is ideal for children ages 3 and up. However, regardless of the age adult supervision will be needed for cutting and gluing.
Is there anything else I can add to the paper clown besides the materials mentioned?
Pipe cleaners can be used in this paper clown project for crazy hair or bendy arms. Also, tissue paper scraps can create a 3D clown nose and ribbon can be used to create a more elaborate bowtie.
How can I encourage my child to be creative with this paper clown craft?
You can encourage your child to be creative by letting them choose their favorite colors and embellishments. If possible, ask them to come up with a name and personality for their clown and encourage them to create a story or skit featuring their paper clown.