I just finished making an adorable paper dolphin craft for kids by assembling the shapes after cutting them from a self-made template.
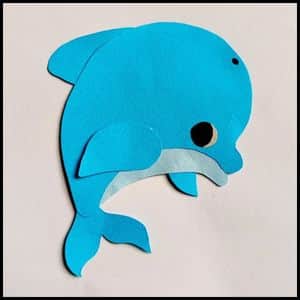
This paper Dolphin Craft Project is perfect for a rainy day activity or a creative playdate with friends, this project is easy enough for little ones and dazzling enough to impress everyone.
Forget complicated folds and cuts, all you need is a simple template (you can download it from my blog here) and some colorful construction paper.
With a little snipping and sticking, you’ll be well on your way to crafting a pod of friendly dolphins that can dive, jump, and play right on your tabletop.
In this article, I’ll walk you through detailed instructions for making a paper dolphin, complete with illustrative images.
So, gather your basic craft supplies and let’s begin the crafting process.
Step 1: The Making of Paper Dolphin Template
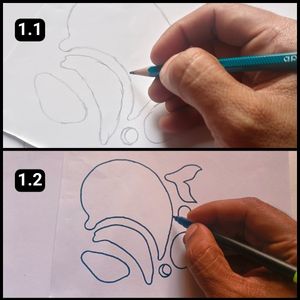
First up, using a pencil, In accordance with the specifications, I created the preliminary sketch for the dolphin’s structural form.
Following that, I carefully traced the outlines of the final shapes with a black marker pen.
Step 2: The Paper Dolphin Template Source
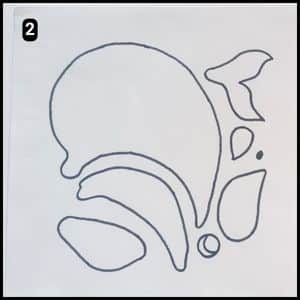
You can either design your structure or simply get it free from my blog here.
With just a few clicks, you can download and print the template, then proceed with the next steps.
Step 3: Cutting the Shapes on colorful papers
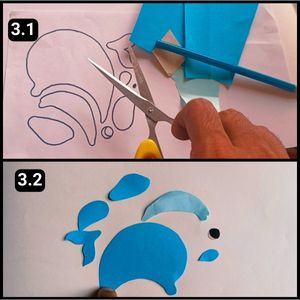
With the template in hand, it’s time to unleash your inner dolphin trainer.
Grab your scissors and colorful construction paper.
I used classic blues and light blues to mimic the real deal, but feel free to customize.
Let your creativity run wild, maybe you envision a playful pod in vibrant purples and pinks? The choice is yours.
Step 4: The Assembling of the Shapes
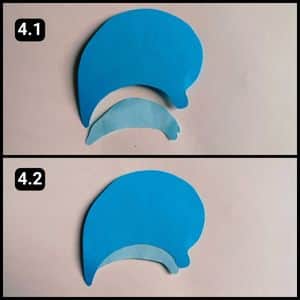
With all the shapes or cutouts prepared, let’s initiate the assembly process of the paper dolphin.
Firstly, I utilized the larger blue-colored cutout as the craft’s base, representing its main body.
Secondly, I employed the sole light blue cutout to shade the dolphin’s lower body, adding dimension to the craft.
Step 5: Assembling the Large Fins
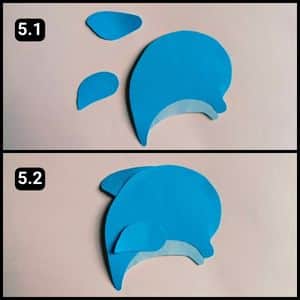
To complete the dolphin model, it was time to attach the large fin to its body.
I selected two shapes from the back of the structure and positioned one over the main body of the dolphin and the other over the back, as seen in the images above.
Step 6: Assembling the Small Fin, Tail Fin, and the Eye
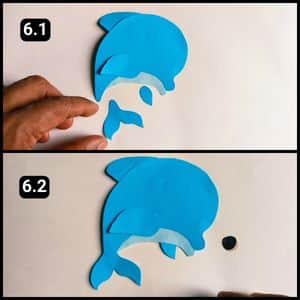
The next step was to attach the small fin by sticking it to the back of the main structure, around the dolphin’s neck.
Following that, I fixed the tail fin into place by sticking it to the rear of the main structure once more.
Last but not least, it was time to give the dolphin vision by sticking its eye in place.
Step 7: The Final Structure
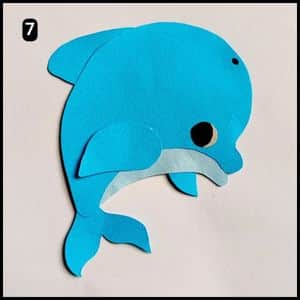
If you look at the final structure of the dolphin it looks amazing and adorable.
To construct the eyes, I cut out a circular shape from a sheet of white paper and then attached it to its designated spot.
Next, I used a black marker to fill in the shape of the eye, using shading.
The resulting paper dolphin resembled a real dolphin, and the children were thrilled with the finished product.
Facts about Dolphin (For Kids Learning):
If you look at the image above I have highlighted a dot using a black marker in its head. This replicates a dolphin’s blowhole (nostrils) which is common in Whales and Dolphins.
It is to help them breathe air into their lungs, just like humans.
Like most fish and underwater creatures they cannot breathe underwater as they do not have gills.
They breathe through the blowhole located on top of their heads which are their nostrils.
Video walkthrough of paper dolphin craft for kids
Final Thoughts
Now that you’ve mastered the basics, take your dolphin adventure to the next level by using your paper dolphin as a springboard to explore the real deal.
Research their habitat, communication methods, and incredible intelligence.
Watch videos, read books, and become a mini-dolphin expert together with your kids.
Use construction paper to create a blue ocean base, add seaweed cutouts, and maybe even craft some friendly ocean neighbors like a playful octopus or a majestic whale.
If possible, make each dolphin unique, try to add glitter to their fins for an extra sparkly touch, use colorful markers to create unique patterns, or attach wiggle eyes for a playful look.
With a little imagination, your paper dolphin pod can become a gateway to endless adventures in the magical underwater world.
Note: For additional assistance I have uploaded the complete video tutorial of the paper dolphin craft on our official YouTube channel.
Frequently Asked Questions
How long will it take to make the paper Dolphin craft?
It will take approximately 5 minutes of your time to craft this adorable paper dolphin using the ready template from our website.
What if I don’t have a printer to print the paper dolphin template?
If you don’t have a printer, you can still create your paper dolphin by finding an image of a dolphin online and use it as a guide to draw your own template on a piece of paper.
Is there anything else I can add to make this paper dolphin craft more interactive?
Yes, One way to make it interactive is to add a string and popsicle stick. Poke a hole in the dolphin’s back, thread a string through it, and tie it to a popsicle stick. Now your child can “puppeteer” the dolphin and make it swim around.


