Today, I’m excited to share a fin-tastic paper Dory fish craft that’s perfect for kids and adults alike.
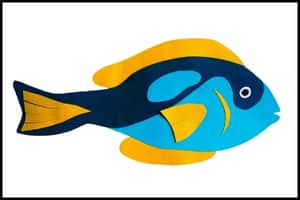
This sea animal craft is more than just a fun activity, it’s a hands-on way to explore ocean life and boost creativity.
In just 8 minutes, you can transform simple craft papers into a vibrant 3D Dory that looks ready to swim right off the table.
Whether you’re a Finding Nemo fan or just love ocean crafts, this paper fish project is sure to make a splash.
So, let’s dive in and discover how easy it is to bring this beloved character to life with our step-by-step guide to creating a paper Dory craft for kids.
But first let’s check out the list of basic craft materials you’ll need to make the paper Dory Fish in Step 1 below.
Step 1: Things You’ll Need For Dory Fish Craft
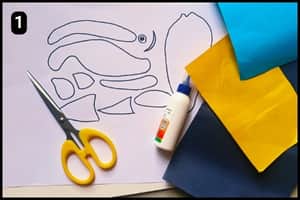
- Craft Papers: You can use regular craft papers of the required shades i.e. blue, yellow, and black. Make sure the paper sheets are thick enough to hold the shape firmly.
- Scissor: To cut the shapes of the Dory Fish from the template using colorful papers you will need a scissor.
- Glue: To stick the parts of the Dory Fish together you can use a regular craft glue ideal to stick papers.
- Dory Fish Template: To obtain the required shapes of the paper Dory for cutting and assembling you will need a template. To access the paper Dory template simply scroll down to step #2 below.
Estimated Completion Time: It took 8 minutes for me to craft the paper Dory Fish using the ready template from our website.
Step 2: Preparing/Downloading The Dory Fish Template
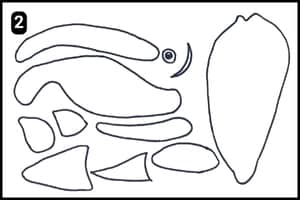
The image above shows a template with blank Dory Fish designs.
Download and print it to cut out shapes on colorful paper, matching the shades (Customize with different colors for certain shapes as desired).
Step 3: Preparing/Cutting the Shapes
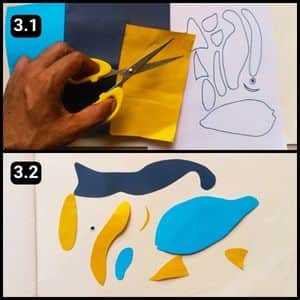
I downloaded and printed the template on A4 paper and proceeded to cut out the shapes.
The main body was crafted from blue and black sheets, as shown in image 3.2.
I cut the fin shapes from yellow paper, except for one which I made from blue (The gill shape was cut from a curvy yellow strip).
Note: For the eye shape, you can use googly eyes or cut a white circle and highlight the black spot with a marker.
Step 4: Assembling the Main Body
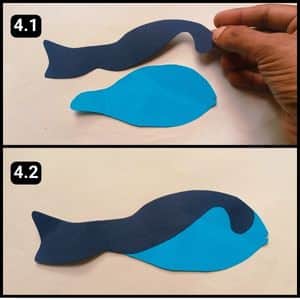
Now that all the shapes are prepared, it’s time to assemble and glue them together to complete the structure.
I started by aligning the black shape onto the blue cutout for the main body.
Applying glue to the joining edge of the black shape, I carefully attached it to the blue shape.
Refer to image 4.2 above to see the completed main body structure of the paper Dory Fish.
Step 5: Fixing The Eye, Gill, and Fins
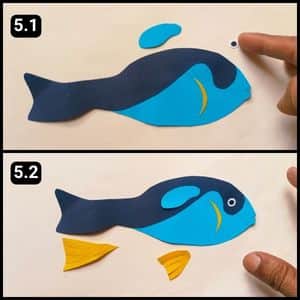
I added a few contrasting body parts to the Dory Fish.
Starting with the assembly of the yellow curvy gill shape, I then applied glue to the designated area for the eye and placed the shape accordingly.
Next, I attached the blue and yellow fin shapes in their positions.
Finally, the yellow shape was used to highlight the Dory’s tail fin (This yellow accent is what distinguishes the Dory Fish).
Step 6: Assembling the Large Fins
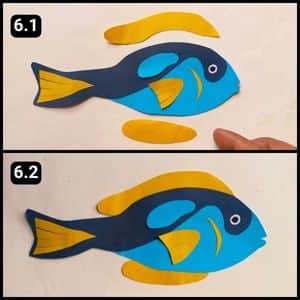
We have now moved to the final step of the paper Dory craft which is to assemble the large fins.
There were two yellow shapes, one longer than the other.
The longer shape was attached to the top portion of the structure, and the smaller one to the bottom.
I applied glue to their edges and secured them behind the Dory’s body structure.
The vibrant shades in the final structure, as seen in step 6.2 above, make it simply amazing.
Video Walkthrough of Paper Dory Fish Craft for Kids
Final Thoughts
This paper Dory project is a perfect activity for children or adults looking to enhance their fine motor skills and creativity.
Hopefully, this step-by-step guide is clear and concise, making it easy to follow.
I recommend using this craft as an educational tool to teach about marine life or as a fun activity during movie nights featuring “Finding Nemo” or “Finding Dory.”
For sustainability, I suggest using recycled paper when possible.
This craft could be expanded into a series of sea creature paper crafts, creating an entire underwater scene.
Overall, it’s a fantastic way to engage in hands-on learning and artistic expression.
Note: To further assist you I have shared the complete video tutorial of the paper Dory Fish on our official YouTube channel.


