Today I’m going to share a simple and easy project that kids will love i.e. a paper dragonfly.
This simple yet engaging Paper DragonFly Craft project has become a staple in our household, perfect for rainy days or creative afternoons.
In just 8 minutes, you can help your children create colorful dragonflies using basic materials like paper, scissors, and glue.
Not only is this craft fun, but it also helps develop fine motor skills and encourages artistic expression.
Whether you’re a seasoned crafter or new to DIY projects, this step-by-step guide will make the process easy and enjoyable.
But first let’s take a quick look at the list of things you’ll need for this simple cut and paste dragonfly project.
Step 1: Things You’ll Need For Paper Dragonfly Craft
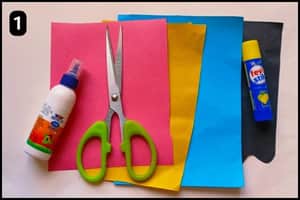
- Craft Papers: To cut the shapes of the Paper fly you can use colorful craft papers or simply cut the colorful shapes from the ready template. (The details of the ready template are mentioned below).
- Scissor: To cut the shapes from the template or the colorful craft papers you’ll need a scissor.
- Glue: To stick the shapes of the structure you will need glue.
- Marker/Highlighter Pen: To highlight the paper Fly’s body you’ll need a marker pen or a highlighter.
Estimated Time to Complete the paper Dragonfly: It took 8 minutes for me to complete the paper Dragonfly craft using the ready template from our website.
Step 2: Downloading The Dragon Fly Template
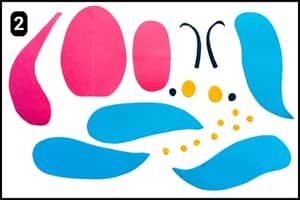
If you look at the image above, you’ll see what the paper dragonfly template looks like.
The dragonfly template includes all the shapes you need i.e. the dragonfly’s body, wings, tail, head, eyes, antennae, and other parts.
Once you’ve downloaded and printed it, grab some scissors and carefully cut out each shape to get ready for assembly.
If you prefer to add your own colors, you can use the template as a guide and cut the shapes from different colorful papers.
Step 3: Assembling The Cutouts
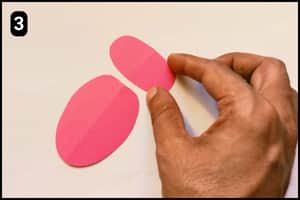
With the shapes perfectly cut from the template, it’s time to assemble the paper fly.
Start by attaching the head to the lower body (You can refer to the image above to ensure you’re using the correct shapes from the template).
Step 4: Prepare and Fix the Eyes
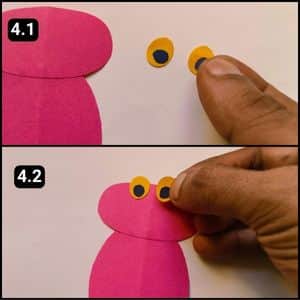
From all the yellow circles, there are two slightly larger ones meant for the eyes.
I grabbed these larger yellow circles and paired them with two small black ones to create the eyes for the paper fly.
If you look at image 4.1 above, you’ll get a better idea of what to do.
Next, I placed the completed eyes on the fly’s head and stuck them firmly in place.
Step 5: Fixing the Antennas, Wings, and Tail
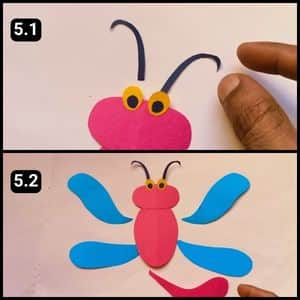
It’s time to assemble the remaining parts of the paper dragonfly, so I started by aligning and sticking the antennas.
I positioned them right behind the eyes and glued the edges together.
Next, I attached the wings, using the four blue cutouts, ensuring they were evenly aligned from the back of the structure.
Finally, I added the long pink shape for the tail, attaching it below the dragonfly’s lower body.
Step 6: Shading the Fly’s Body
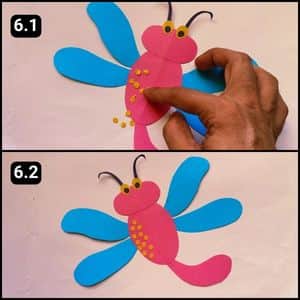
Next, I added some detail to the body by sticking small yellow circles onto it.
Here’s a tip: I used a basic paper punch to create these tiny yellow circles easily. I aligned them along the left side of the lower body, but you can place them wherever you like.
This completes the basic structure of the paper dragonfly, finishing up the cutting and gluing. Now, let’s move on to adding some shades to the main structure in the next step.
Step 7: Highlighting The Dragonfly Structure
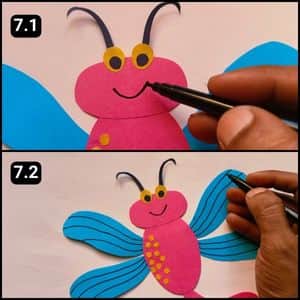
The paper dragonfly structure is complete but looks a bit plain.
It’s time to add some final touches to the paper dragonfly.
I started by drawing its mouth with a black marker, as shown in image 7.1 above.
Next, I added long, curving lines on the wings and small curves on the tail.
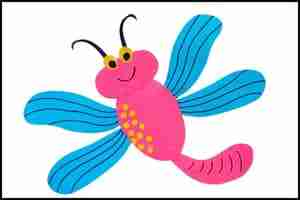
Now, the paper dragonfly is ready and looks complete (just look at the image of completed project below)
Video Walkthrough Of Paper Dragonfly craft for KIDS
Final Thoughts
Watching children’s faces light up as they bring these colorful insects to life is truly rewarding.
I encourage you to experiment with different paper types, colors, and even sizes to create your own unique dragonfly variations.
Don’t hesitate to add your personal touch (perhaps some glitter for a sparkly effect or textured paper for an interesting feel).
I hope this craft brings hours of fun and creativity to your home or classroom.
Note: For your reference, I have also shared the complete video walkthrough of the paper dragonfly craft on our official YouTube channel.


