Sometimes, finding a unique way to surprise our loved ones can be tricky, especially when we want to make it memorable.
With Mother’s Day just around the corner, I wanted to create something heartfelt and handmade for my mom.
That’s when I came up with the idea for a Paper Heart Mothers Day Craft for Kids.

This craft involves creating a pair of paper hands cradling a heart with a special message tucked inside.
In this article, I’ve laid out easy step-by-step instructions to help you craft this beautiful gesture.
Let’s grab our supplies and get started on this delightful project to show your mom just how much she means to you this Mother’s Day.
Step 1: The Making of Mother’s Day Paper Template
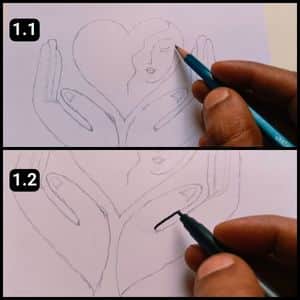
I started by sketching out the shapes we need for our Mother’s Day theme i.e. a pair of palms and a heart (with a pencil).
After I was happy with how they looked, I went over the outlines with a black marker to define them clearly.
You’re welcome to draw your own shapes to personalize your craft if you like, but if you prefer a quicker start, I would recommend downloading this template.
Step 2: Downloading The Mother’s Day Paper Craft Template
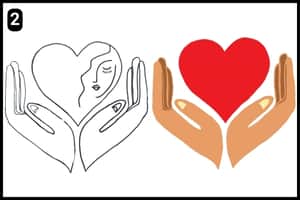
If you check out the image above, you’ll see that I’ve made the templates available on our website in two versions i.e. one is a blank outline, and the other is pre-filled with colors.
You can easily download and print whichever you prefer with just a few clicks, and then move on to the main steps of our Mother’s Day paper craft activity.
If you want to add a personal touch to your project, you can choose the blank outline template and color it as you like.
This is a great option for adding a bit of creativity to the craft.
On the other hand, if you’re organizing this activity for a group of kids, you might find it easier to use the pre-colored template.
Just print as many copies as you need and they’re ready to go.
Step 3: Cutting the Template Shapes
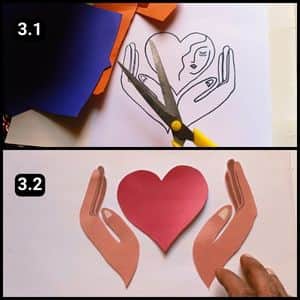
It’s time to start cutting out the shapes from your chosen templates.
I used the colorful template, as you can see in the image 3.2 above.
Cutting the shapes accurately is crucial because it ensures that the final assembly looks neat and appealing.
You’ll likely need to help the kids with this step, as achieving perfect cuts can be a bit tricky for little hands.
Let’s make sure each shape is cut out neatly so our craft turns out beautifully.
Step 4: Drawing the Facial Outlines
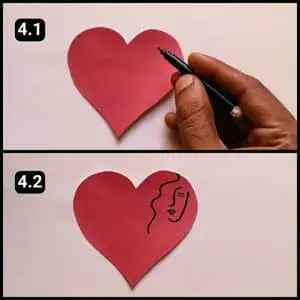
With the cutouts ready, I’ll start by writing a special message on the paper heart.
I planned to add just the wishes, but then I thought of including something extra.
So, I decided to draw a woman’s face on it to give it a more personal touch.
Using a black marker pen, I sketched out the facial outline, and it truly made a big difference, as you can see in image 4.2 above.
Step 5: Adding the Message
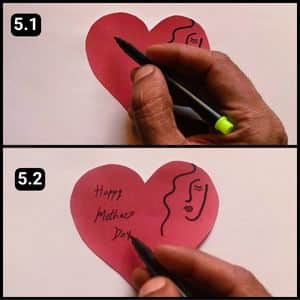
I wrote “Happy Mother’s Day” on the left side of the paper heart using a black marker pen, as shown in image 5.2 above.
You could personalize your craft with your own heartfelt message to express your love for your mom.
Options like “Best Mom in the World” or a simple “I Love Mom” are great choices (It’s all about making it special for her).
Step 6: Assembling the Heart with Palms

At last, I moved on to the assembly process of the paper craft, which involved aligning and sticking the palms onto the paper heart that holds the Mother’s Day message.
In the final structure shown in the image above, I positioned the thumbs over the heart structure and carefully aligned the fingers, gently pressing them backward as I stuck them in place.
This technique creates a wonderful 3D effect, making it appear as though hands are tenderly holding a heartfelt message.
Final Thoughts
Crafting a Paper Heart Mother’s Day gift is a meaningful way to express love.
Cutting shapes accurately is key, involve kids but supervise closely.
Start by personalizing the template, choosing between pre-filled or blank options. Also, adding facial outlines and a heartfelt message enhances the sentiment.
Assembling the craft with care ensures a beautiful 3D effect.
Remember, it’s not just about the craft, it’s the time spent together and the love poured into it that truly matters.
So, whether it’s “Happy Mother’s Day” or a personalized message, make it special.
Crafting with kids is about creating memories and showing appreciation.
Note: For your reference, I have uploaded the complete video walkthrough of the Mother’s Day craft activity on our official YouTube channel.
Frequently Asked Questions
How long will it take to craft this Mother’s Day craft?
It will take about 8 minutes to craft this Mother’s Day paper craft using the ready template from our website.
For what age range is this craft intended?
This craft is meant for children aged 3 and up, but adult supervision is recommended. Younger children may require more assistance with cutting and assembling, while older children can handle more of the project independently.
Is there a way to incorporate this craft into a Mother’s Day card?
Yes, in fact it’s an excellent idea. You can easily turn this craft into a card by attaching it to a folded piece of cardstock and adding a heartfelt message inside.


