Horses are majestic creatures, and with this easy paper horse craft, you can bring one to life right on your desk
Today, we’re crafting an adorable paper horse, and I promise you’ll love every minute of it.
Here’s why this project is a must-try:
- Limited artistic skills required: Our downloadable template makes it foolproof
- Whether you’re a kid at heart or just a kid, everyone can dive into the fun together.
- Only basic supplies needed: just paper, scissors, and glue.
- Scope for customization
So, whether you’re looking for a fun activity to do with kids or seeking a moment of artistic relaxation, this paper horse craft fits the bill.
From selecting the right papers to assembling the final touches, I’ll guide you through each step of the process.
Before we start, let’s take a look at the key supplies you’ll need for this paper horse craft project.
Step 1: Things You’ll Need For Paper Horse Craft
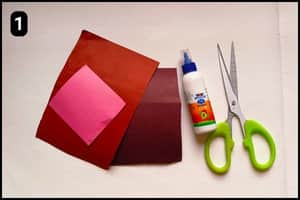
- Craft Papers: You’ll need thick craft papers to cut the shapes of the horse structure. I have used shades of light and dark brown for the body, hair, tail, and feet. Also, I used a pink paper sheet to shade the top of the head and the chin.
- Scissors: You can use regular scissors to cut the template shapes.
- Glue: I have used a multipurpose glue to stick the shapes together, however you can use glue stick or standard craft glue.
- Horse Template: I have uploaded the paper horse template that includes the shapes of the horse body parts. Download and print the paper horse template directly from the link provided in step 2.
Difficulty level: Beginner-friendly
Step 2: Paper Horse Template Source
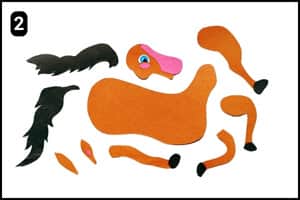
You can download the horse template and print it by clicking here.
Using this ready-made template simplifies the project, as it eliminates the need for colorful papers.
However, you can also use the template as a reference or to assist with more challenging shapes.
If you don’t have specific colored paper, this template will be especially useful.
With all the required materials ready, let’s dive into the core steps of creating the paper horse craft.
Step 3: The Assembling Process

If you’re using colorful craft papers, place it on top of it and cut out the parts of the horse’s body.
If you’re using the horse template, simply print it on thick paper.
You’ll need to cut out the head, body, 4 legs, tail, and hair of the horse.
Cut the horse shape carefully and slowly to get even shapes.
Step 4: Fixing the Ears and Hair
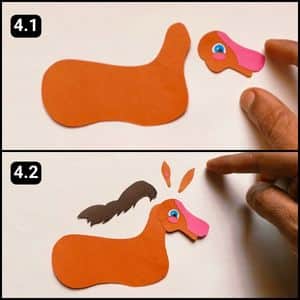
With the horse’s face securely in place, it’s time to add the ears and hair.
First, align and stick the hair on the horse’s head, as one ear will be attached over it.
Once you’ve positioned and secured the horse’s hair in place, attach the pink ear to the front and the other ear to the back of the head.
Step 5: Fixing the Legs and Tail
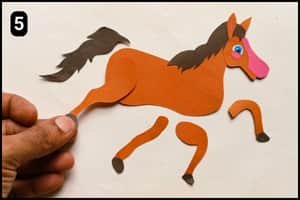
Now that the hair and ears are properly aligned and attached, let’s move to the final step i.e. assembling the legs and tail.
First, position the legs where they should be followed by attaching one front leg and one back leg to the front of the structure, and the other two legs to the back.
Finally, apply glue to the edge of the tail and stick it to the back of the horse.
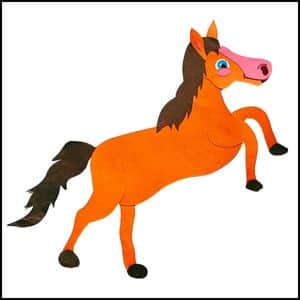
Once the project is completed, this is how our paper horse should look like:

Final Thoughts
To be honest, I believe this paper horse project is excellent for beginners and children.
The use of a downloadable template is particularly helpful, making it accessible to those without specific colored papers or advanced cutting skills.
I suggest experimenting with various color combinations to craft your own unique horse.
Adding googly eyes or drawing facial features could bring more personality to the craft.
For a more advanced version, consider using textured papers or adding small embellishments like ribbons or glitter.
To extend the learning experience, I suggest pairing this craft with horse-related stories or facts about different horse breeds.
This could turn a simple paper horse craft into an educational activity.
Note: To assist you further I have uploaded the complete video walkthrough of the paper horse craft on our official YouTube channel.
