Remember those charming houses with peaked roofs and cozy chimneys we used to draw in school?
The kind you see in storybooks? This project will bring those nostalgic homes to life.
We’ll be crafting a vintage paper house together, perfect for a fun activity with the whole family.
In this article, I’ll guide you through the simple steps to create your own paper house craft for kids.
I’ve included clear instructions with pictures for each step, making it easy for crafters of all ages to join in.
So, gather your supplies and let’s build a little piece of vintage charm together.
Things You’ll Need For This Paper House Craft
- Construction paper (various colors)
- Scissors
- Glue stick
- Markers (optional)
- Downloadable template of paper house project
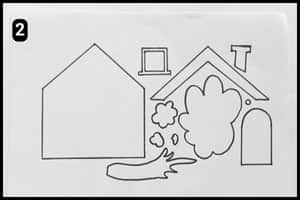
Step 1: The Making of Paper House Template
To make this paper house project extra easy for you, I created a downloadable template.
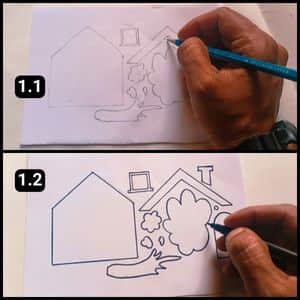
I started by sketching out the different shapes needed for the house with a pencil.
This allowed me to fine-tune the design before finalizing everything with a black marker (Just like that, the template was ready).
This approach has helped me create all sorts of fun and unique paper crafts in the past.
Step 2: Free Template Source
To make things easier, I’ve created a downloadable paper house template available on our website.
Feel free to download and print it out to get started on your crafting adventure.
And the best part? This template is just a jumping-off point.
Get creative and customize the shapes to design your own one-of-a-kind paper house.
Step 3: Cutting the Shapes
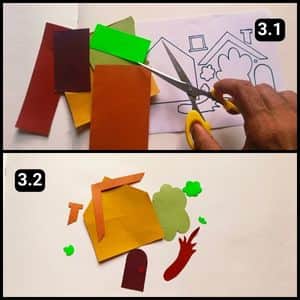
Now comes the fun part i.e. cutting out the house pieces.
Grab your favorite colored paper sheets and get ready to snip.
Feel free to copy my color scheme, or unleash your creativity and design a house that’s uniquely yours.
Tip: Use bright colors for a playful house or earthy tones for a cozy cottage.
Step 4: Let’s construct the house
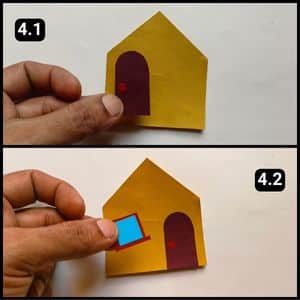
Once you have all the shapes cut out, it’s time to bring the paper house to life so I started by assembling the front wall.
Take the yellow cutout (our front wall) and use glue to attach the door shape, creating a welcoming entrance.
For some fresh air, I added the window next to the door.
Step 5: The Roof and Chimney Outlet
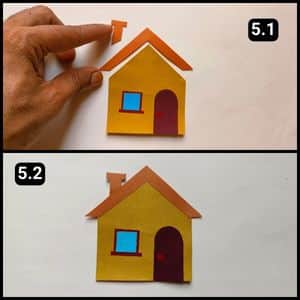
To keep things cozy inside our paper house, we’ll need a roof.
So, I grabbed the light brown paper that I used for the chimney and roof.
The roof will shield our little house from the sun and rain.
And don’t forget the chimney, it’ll let any (pretend) smoke escape from the house, just like a real one.
Step 6: Assembling the Tree Parts
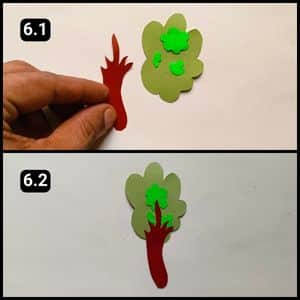
I wanted to add a touch of nature to my creation, so I placed a tree beside the house.
To make the tree, I first glued the light green leaves onto the green background.
Then, I attached the stem and branches to complete the tree.
Now, my miniature world had the perfect finishing touch.
Step 7: Fixing the Tree

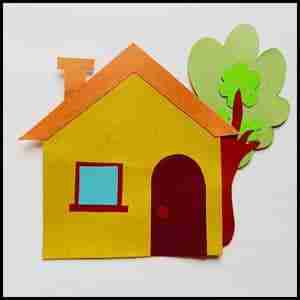
With the tree firmly in place beside the house (on the right side), my paper house craft was complete.
This charming little vintage house is ready for its new residents.
Let your child’s imagination run wild! They can pretend it’s their very own farmhouse and tell you all about their dream vacations spent there.
Video walkthrough of paper house craft for KIDS
Final Thoughts
The beauty of this paper house craft project lies in its simplicity.
The downloadable template provides a foundation, but the real magic happens when your child personalizes it.
Do they envision a bright and playful house with mismatched windows? Or perhaps a cozy cottage nestled amongst a forest of trees (made with construction paper scraps)?
This paper house craft activity is a delightful opportunity for you to connect with your child.
Work together, share stories about your dream houses, and watch their creativity blossom.
Remember, there’s no right or wrong way to build a paper house, the most important ingredient is a sprinkle of imagination.
So, download the template, gather your supplies, and get ready to craft something amazing together.
Note: I have shared the complete video tutorial of the paper house craft on our official YouTube channel.
Frequently Asked Questions
How long will it take to make the house paper craft?
It will take approximately 10 to 15 minutes to make the paper house craft using the ready template from our blog.
Can I use materials other than construction paper for this paper house craft?
Yes, cardboard, felt, or even recycled materials like cereal boxes can be used to create the house. Just be sure the material is thick enough for the paper house to stand upright.
What other decorations can I add to my paper house?
The possibilities are endless! Here are some ideas:
– Buttons for door knobs
– Stickers for windows or doors
– Glitter or sequins for a sparkly touch
– Fabric scraps for curtains or a roof texture
– Pipe cleaners for fencing or a clothesline
– Small paper cutouts for flowers, trees, or pets
Can I paint the paper house instead of using colored construction paper?
Yes, you can paint the house with acrylic or tempera paints. For younger children, washable paints might be a better option to avoid messes.