Feeling the summer heat but stuck indoors?
Don’t worry, I’ve got the perfect solution to beat the heat and unleash your kids’ creativity, all without the mess of real ice cream (because let’s be honest, half of it ends up on their faces anyway, right?).
This paper ice cream craft for kids is the answer to your prayers.
It’s super easy to make, uses minimal supplies, and is guaranteed to provide hours of fun.
So, grab some construction paper, scissors, and glue, and let’s get crafting.
And hey, if the craft session gets a little out of hand with enthusiastic scooping sounds and sticky fingers, well, at least you won’t have a puddle of melted vanilla melting all over the floor.
Let’s create some cool paper treats that are mess-free and endlessly customizable.
Key Takeaways:
- Download the free paper ice cream template to get clean cuts.
- Get the paper ice cream template printed.
- Stick the template cutouts in order.
- Watch the video walkthrough if you prefer more visual instructions.
List of Items Required:
- Paper Ice cream template
- Construction paper (various colors)
- Scissors
- Glue
Step 1: The Making of Ice Cream Template
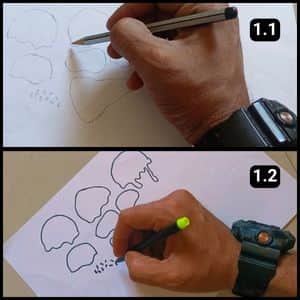
Like most of my paper craft projects, I started by sketching the outlines for the cutouts on a blank sheet of paper with a pencil.
Then, I traced over those outlines with a dark marker pen to get the shapes just right (The designs for my paper ice cream cutouts turned out perfectly).
Step 2: Paper Ice Cream Template Source
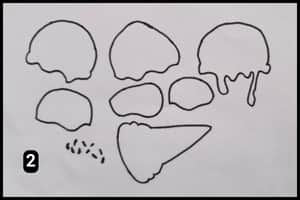
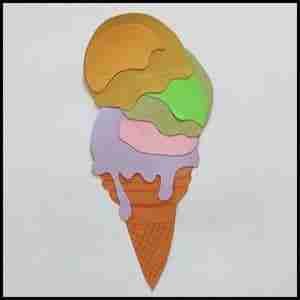
See the image above for a sneak peek of the finished paper ice cream craft.
Want to skip the cutting and get crafting faster? I’ve made your life easier by providing a free, downloadable template on our website.
Just download and print the template, and you’ll be ready to follow the next steps.
Step 3: Cutting the Shapes
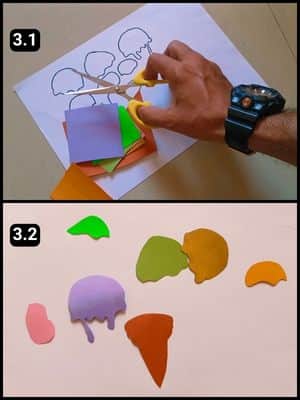
To create the ice cream, I used a variety of colorful papers.
The base cone is a classic brown, while the scoops come in playful shades of yellow, green, and light purple.
To add depth to the ice cream, I incorporated lighter shades of pink, green, and yellow to accentuate the individual scoops.
But feel free to unleash your creativity and choose your own color palette.
With all the pieces cut out, let’s move on to assembling our delicious paper treats.
Step 4: Shading the flavors
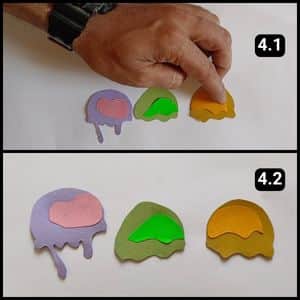
First, let’s add some depth to our scoops.
I layered the lighter colored papers on top of the main scoop colors.
For your crafty crew, be sure to match the lighter shades to their base colors i.e. pink on purple, light green on green, and light yellow on your “muddy yellow” (love that name).
Once these are securely glued, we can start building our ice cream masterpiece.
Step 5: Assembling the Cutouts
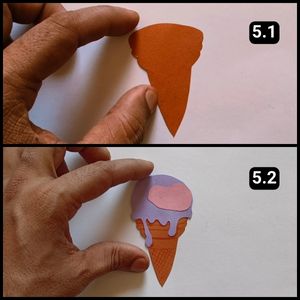
With our colorful layers planned (contrasting colors look fantastic), it’s time to assemble them.
First, I used the brown cone cutout as the base of our ice cream creation.
Next, I layered the first scoop flavor on top of the cone.
For a touch of extra realism (like in image 5.2), I added some light brown pencil shading around the base of the cone.
Remember, these little details can really make your paper cutouts pop.
Step 6: Fixing the second layer
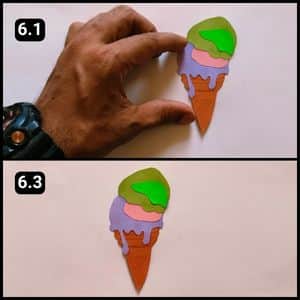
Now, let’s add the second scoop to our paper ice cream.
I carefully layered the green scoop on top of the pink and purple flavors.
For a more realistic touch, I tilted the green scoop slightly to the right, mimicking the way a real ice cream scooper would place it.
Step 7: Assembling the final final scoop
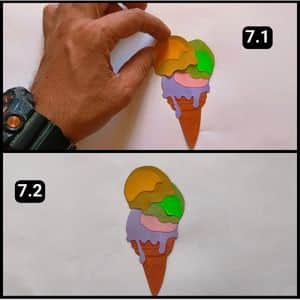
Last but not least, it’s time for the crowning glory (the final scoop).
Just like a real ice cream cone, I added a third scoop with a delightful new flavor.
Next, I tilted and adhered the final scoop slightly to the left for a realistic placement.
The layered scoops look just like a delicious, multi-flavored ice cream treat.
Check out the image below to see the finished masterpiece, you’ll be amazed at how fantastic your paper creation looks.
Video Walkthrough of Paper Ice Cream Craft For Kids
Final Thoughts
This craft requires minimal supplies and uses a downloadable template, making it achievable for crafters of all ages and skill levels.
Kids can personalize their ice cream with a vast array of colors and even add details like sprinkles or a cherry on top.
Beyond fun, this craft can subtly introduce concepts like color theory (through contrasting colors) and spatial awareness (during assembly).
Also, consider incorporating additional textures into the craft.
For example, glitter glue could be used to add sparkle to the ice cream scoops, or textured construction paper could add a more realistic dimension.
It’s a low-mess activity that sparks creativity and provides a delightful finished product.
With a little extra effort, it can be transformed into an engaging storytelling experience, making it a fantastic summertime activity for kids of all ages.
Note: I have also uploaded a complete video walkthrough of this paper ice cream craft on our YouTube channel just in case you prefer a visual guidance.
Frequently Asked Questions
How long will it take to make this paper ice cream craft?
It will take 10 minutes to craft this paper ice cream craft using the ready template from our website.
How can I make this paper ice cream look even more realistic?
Add details like sprinkles, use tiny confetti or sequins glued onto the ice cream scoops. If possible, draw chocolate syrup dripping down the sides with a brown marker. Also, try creating a cherry on top using red construction paper cut into a circle and a green pipe cleaner as the stem.
How can I encourage storytelling through this craft?
Once the ice cream creations are complete, have your child imagine what flavors they made and create a story about their unique ice cream shop or the adventures of their ice cream characters.
How can I adapt this craft for older children who might find it too simple?
For older children, challenge them to create more complex ice cream flavors with intricate details. They can experiment with layering different colored papers or drawing designs on the scoops. Encourage them to design a whole ice cream stand scene complete with a backdrop and paper cut-out customers.