Imagine your little one’s face lighting up as they create their very own furry (well, papery!) friend who can hang around the house, join story time adventures, or even become a trusty sidekick for playtime.
These paper monkey crafts are a breeze to make, perfect for keeping busy hands occupied and imaginations soaring.
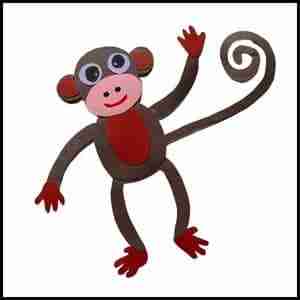
No fancy trips to the craft store needed, all you have to do is download our free template, grab some paper and scissors, and get ready to unleash your inner monkey business.
Let’s dive right into it and create some monkey magic together.
Step 1: The Making of Paper Template
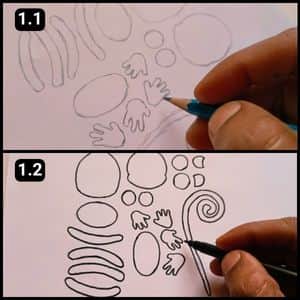
This paper monkey template? It all started with a sprinkle of imagination.
I sketched out the shapes with a pencil, then brought them to life with a bold black marker outline, just like the first step in most of our template based craft projects.
Step 2: Download The paper Monkey Template
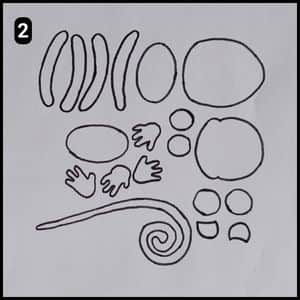
Ready to bring your paper monkey to life? We’ve got a free downloadable template waiting for you right here on our website.
Print it out (the monkey template), and you’re ready to start crafting.
Feeling creative? Don’t be afraid to tweak the shapes a bit and make your monkey truly one-of-a-kind.
Step 3: Cutting the Shapes for Assembling
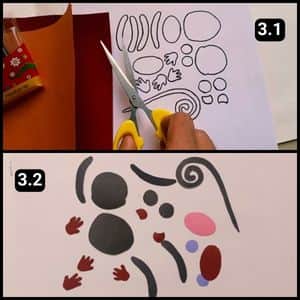
With your free template downloaded and printed, the monkey magic can begin.
Now, the choice is yours, grab some colorful construction paper and cut out the shapes like we did in image 3.2 above, or get creative and color the template before cutting for a truly unique monkey.
Channel your inner artist and pick a color scheme inspired by your favorite cartoon character, the possibilities are endless.
Step 4: The Assembling of the Shapes
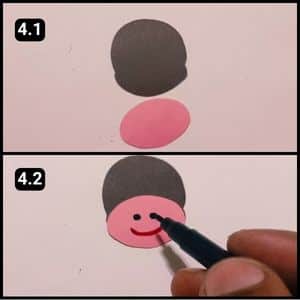
Time to put those cutouts together and watch your monkey come to life.
Once you have your cutouts ready, you can start putting together your paper monkey craft.
I crafted the face of the monkey, highlighting its distinct shape and those adorable wide pink cheeks. Then, I took a black marker to dot the nose and used a red marker to draw its cheeky smile.
Step 5: Assembling the Ears, Eyes, and Lower Body
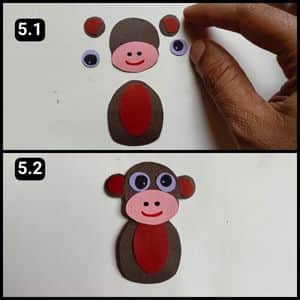
For the ears, I used dark brown circles and added a semicircular shape on top.
For the eyes, I cut two circles from light purple paper and I shaded the eyes with a black marker.
Next up, I attached the ears to the back of the structure and the eyes to the front, as shown in image 5.2 above.
Finally, I’ll attach the lower body, which I made using dark brown paper, and shaded the front with dark red paper.
Step 6: Assembling the Arms, Legs, and Tail
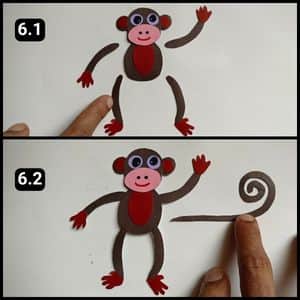
We’ve reached the final step of our monkey craft i.e. attaching the arms, legs, and tail.
First, I attached the palms to the hands and the feet to the legs, as these were separate pieces.
It can be tricky to differentiate because the shapes of the arms and legs are similar.
Make sure to pair them correctly before attaching them to the body.
Finally, I added the long, curly tail, which completes our craft.

If you look at the final structure in the image above you’ll see that this paper monkey looks adorable and playful.
Video walkthrough of paper monkey craft for kids
Final Thoughts
Once you are done creating this craft, take a moment to admire your creation (it’s adorable, right?).
This little primate isn’t just a craft, it’s a testament to your creativity.
The beauty of this project lies in its simplicity and endless potential.
These monkeys can be playful companions, storybook buddies, or charming room decorations.
So grab your construction paper, scissors, and a dash of imagination, the jungle (or zoo) awaits.
Bonus Tip: Feeling the creative spark? Why not craft a whole paper animal kingdom? Lions, tigers, and even mischievous elephants are just a few possibilities waiting to be brought to life.
Note: I have also posted a detailed walkthrough of Monkey craft project on our official Youtube Channel.
Frequently Asked Questions
How long will it take to craft the paper monkey?
It took 7 to 8 minutes for me to craft the paper monkey using the ready template from our website.
What other tools might I need besides scissors and glue for this monkey craft project?
Depending on how you want to decorate your monkey, you might find crayons, markers, glitter glue, or stickers useful.
Is there a way to adapt this craft for children with limited dexterity?
Yes, there are ways to make this craft more inclusive:
– Adult assistance: Adults can pre-cut the shapes and help children with the gluing process.
– Use larger pieces: Consider using simpler, larger shapes for the monkey’s body parts.
– Focus on decorating: If cutting is a challenge, focus on decorating the pre-cut shapes with markers, crayons, or stickers.
What other materials can I use for the eyes besides paper or markers?
Get creative with your Paper Monkey’s eyes, you can use:
– Beads: Small black or brown beads glued on make simple yet effective eyes.
– Buttons: Tiny buttons add a charming touch to the monkey’s face.
– Sewn eyes: For a more traditional approach, sew on small black buttons or beads for eyes.


