Octopuses, with their eight wiggly arms and clever camouflage, are pretty darn cool creatures, wouldn’t you agree?
They might not be cuddly (yet!), but that doesn’t mean we can’t bring a touch of the ocean into our homes with a fun and easy craft project.
Today, we’re diving deep (okay, maybe just grabbing some construction paper) to create a super cute Paper Octopus Craft for Kids.
This project is perfect for all ages, and it’s a fantastic way to spark some creativity and learn a little something about these fascinating sea dwellers.
In this post, I will walk you through the process to create an adorable paper octopus including the images.
Let’s take a quick look at the steps to craft the outline (ignore if you prefer downloading the ready made template).
Step 1: Making The Paper Octopus Template
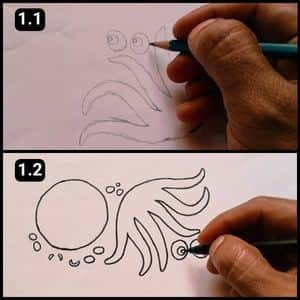
Before we continue, allow me to walk you through the steps I took to create this paper Octopus template.
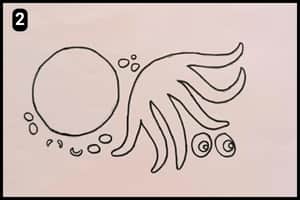
In all my craft projects, I sketch the necessary shapes as cutouts using a pencil (in this case resembling the structure of a paper Octopus).
As seen in the image 1.2 above, I completed the paper octopus template by outlining these shapes with a black marker pen.
Step 2: The Paper Octopus Template Source
This paper Octopus template is now accessible on my home life chic blog for your convenience.
It’s completely free to download and print, allowing you to proceed to the next steps while saving both time and effort.
Step 3: Cutting the colorful Shapes

Next up, it’s time to cut the shapes of the paper Octopus on colorful paper sheets.
I used shades of purple and violet for mine, but the possibilities are endless.
Pick your favorite colors to make your paper octopus truly unique.
Step 4: Sticking the head with Cephalopods

With the cutouts prepared using the chosen craft paper color, it was time to start assembling.
First, I attached the head and lower body of the octopus.
Typically, octopuses have eight arms called cephalopods under their head (though in our case, we’ve used only 6 arms as ours is playful and kid-friendly).
This establishes the basic structure of the paper Octopus.
Step 5: Facial Impressions

Next up, let’s stick the facial features of the paper Octopus in their designated spots, including its eyes and chin shades.
For the eyes, I’ve cut out circular shapes from white paper and outlined them in black using a marker pen.
Carefully, I affixed them in place, followed by attaching the pink shades for its chin in an oval shape.
Step 6: Applying The Body Shades

I cut out a smiling mouth from red paper and placed it between the octopus’s eyes.
Then, I used a black marker pen to draw eyebrows to complete the facial expressions.
For the body shades, I cut out shapes from light violet paper.
It required patience and precision to attach the small shapes like the violet body shades and mouth, but I managed to stick them perfectly.
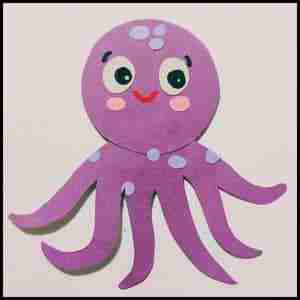
Take a look at the image above, it showcases the finished paper Octopus, truly remarkable.
In my case, children found this activity immensely enjoyable, making it one of their most delightful moments.
Make this paper octopus craft a learning tool
Here are some ways to transform your octopus craft session into a mini ocean lesson:
- Amazing Adapters: While crafting the octopus’ arms (cephalopods), discuss how these eight limbs help octopuses camouflage, grip objects, and even taste.
- Squirty Superpower: After attaching the smiling mouth, talk about how octopuses squirt ink to confuse predators. You can even create a pretend ink cloud using black construction paper.
- Underwater Homes: As you assemble the octopus, explain how these creatures live in underwater caves or dens. Let your kids decorate their paper octopus’ home with seaweed (green paper strips) or pebbles (circles cut from brown paper).
By incorporating these fun facts, you’ll turn crafting time into a memorable learning experience fostering curiosity and sparking a love for the ocean and its incredible inhabitants.
Video Walkthrough of paper octopus craft for kids
Final Thoughts
With the free downloadable template, you can skip the sketching and jump right into the creative part i.e. choosing vibrant colors, adding silly expressions, and making this octopus truly your own.
From attaching its playful arms to creating its expressive face, each step fosters attention to detail and imagination.
Assembling the octopus’s colorful parts not only develops fine motor skills but also allows for personalization and artistic expression.
Remember, there’s no right or wrong way to create your paper octopus.
Note: I have uploaded the complete video walkthrough of this paper Octopus craft on our official YouTube channel for your reference.
Frequently Asked Questions
How long will it take to make the Octopus paper craft?
It took 10 minutes for me to craft and assemble the paper Octopus using the ready template from our website.
Is there a way to make the octopus hang on the wall?
Yes, before assembling the final pieces, use a hole punch to create a small hole at the top of the octopus’ head. Thread some yarn or string through the hole and tie a loop for easily hanging the octopus.
My child struggles with cutting. What can I do?
Pre-cut the Octopus’s shape for younger children or use child-safe scissors and also consider practicing cutting skills with simple shapes beforehand.