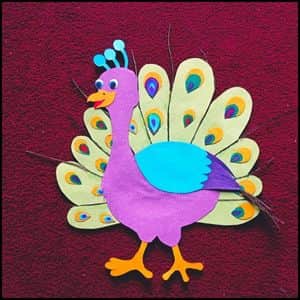
Today, I’m excited to share with you a stunning paper peacock craft that’s sure to dazzle.
Why you’ll love this peacock project:
- It’s visually captivating: Bold, vibrant colors and intricate details make this majestic bird come alive
- It’s versatile: Use our template or customize with your own designs
- It’s educational: Perfect for teaching about peacocks and their habitats
From cutting intricate feather patterns to assembling the regal crest, every step of this craft is exciting.
The best part? The result will be a stunning peacock decoration that highlights your craftsmanship and infuses any room with a touch of exotic elegance.
Before we begin, let’s take a quick look at the basic craft supplies you’ll need for the paper peacock project in step 1 below.
Step 1: Things You’ll Need For Paper Peacock Craft
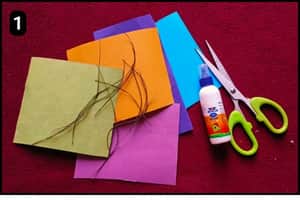
- Craft Papers: You can use craft papers with shades that resemble the peacock structure. I’ve incorporated shades of green, pink, purple, and yellow into the design.
- Scissor: To cut the shapes of the Peacock’s structure on colorful papers you’ll need a scissor.
- Glue: To stick the shapes (paper cutouts) you can use a glue stick or a standard craft glue. I have used a multipurpose glue so that the elements stick firmly.
- Peacock Feather Hair (Optional): I had some peacock feathers stored in an old book so I thought of using it in this craft project (It is optional and I just used it as toppings)..
- Peacock Template: To eliminate the efforts of arranging colorful papers and cutting them separately you can use the ready template. The template includes the required shapes and in desired colors so that you can print and cut the shapes directly from it. To access the template move to step 2.
Step 2: Paper Peacock Template Source
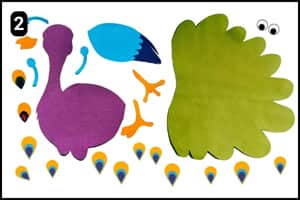
If you look at the image above this is what the paper peacock template looks like.
You can download and print this ready peacock template and instantly get Crafting with kids.
The template includes the body details, legs, and the large feather with patterns (You can customize a few shapes as per your preferences).
In case you are short on time to arrange colorful papers simply use the template and grab your scissors and glue to get the job done.
Step 3: Cutting The Peacock Shapes
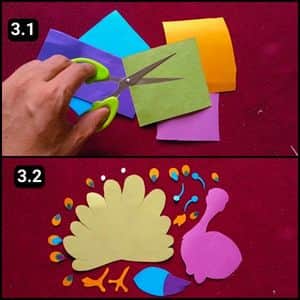
Once you’ve downloaded the peacock template make sure to cut the shapes with precision, especially the small ones.
For the designs on the large feather (the green cutout), you can also draw them using markers or watercolors.
Step 4: Assembling the Large Feather
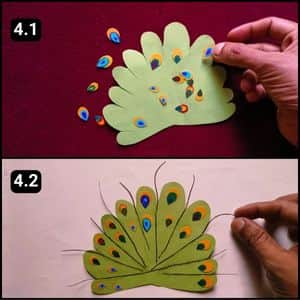
With the shapes ready, it’s time to assemble them, starting with the large feather of the peacock.
First, I applied glue and stuck the small designs onto the large feather, as shown in image 4.1 above.
You don’t need to use too many, just cover the edges, as the peacock’s body will hide the center later on.
Once I’ve attached enough designs, I moved on to the peacock’s feather hair.
I aligned and stuck them between each curve from the top to the center.
To be honest, the real feather hair of a peacock really makes a difference.
Now, let’s assemble the rest of the peacock’s body below.
Step 5: Adjusting The Peacock’s Crest And Refining Facial Features
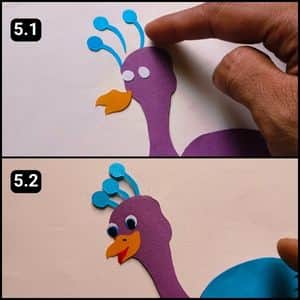
Next up, It was time to assemble the crest, eyes, and beak.
I started by aligning and sticking the blue shapes that formed the peacock’s crest over its head.
Then, I highlighted the eye and beak shapes with markers and then stuck them to its face.
Step 6: Assembling the Wings and Legs
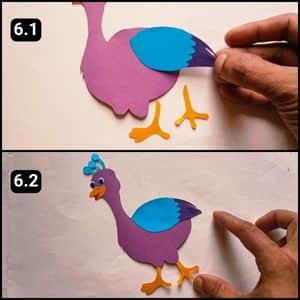
I then assembled the peacock’s wing by gluing it in place.
Next, I aligned and stuck the leg shapes one by one to the bottom of the peacock’s structure.
This completed the entire body structure of the paper peacock.
Step 7: Assembling The Large Wings And The Body Of Peacock
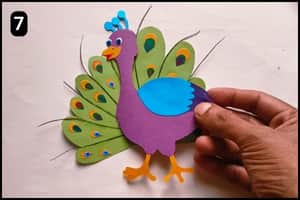
With this, we moved to the final step of the paper peacock craft i.e. assembling its body with the large spreaded wings.
After applying glue and carefully attaching the pieces together, I finished crafting the dancing paper peacock.
Video Walkthrough Of Dancing Paper Peacock Craft For Kids
Final Thoughts
While this craft becomes a breeze by using the template I still believe we can take this craft further.
Adding textures such as glitter or sequins can enhance depth and realism to your creation.
This project also presents an opportunity to discuss peacock conservation and their ecological role.
You can expand the activity by researching peacock habitats and behaviors, turning it into a more comprehensive learning experience.
For younger crafters, simplifying the design or using pre-cut shapes might be beneficial.
I’d recommend exploring variations of this craft with different bird species to broaden children’s ornithological knowledge.
Note: To assist you further I have shared the complete video walkthrough of the paper peacock craft on our official YouTube channel.