Crafting with paper isn’t just a hobby, it’s a journey back to those carefree childhood days.
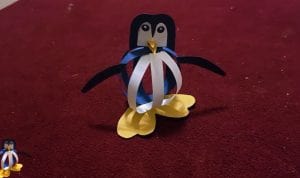
Today, let’s bring a bit of that joy into our lives by making a DIY paper penguin that actually bounces..
This origami craft is not only simple and enjoyable but also a fantastic way to decorate your space or spend quality time with family.
Whether you’re a seasoned crafter or picking up a piece of paper for the first time, this guide is for you.
Let’s create something beautiful together, step by step.
Step 1: Arrange the supplies

Things I have used to make this adorable paper penguin are as follows:
- Craft paper: I’ve used dark gray, white, and muddy orange origami papers to match with the Penguins theme.
- Pencil and a Scale ruler: To mark and draw the required figures you will need a pencil and a ruler.
- Scissor or cutter: I’ve used a scissor and cutter both in this DIY project.
- Glue: You will need glue to stick the craft elements.
Step 2: Cutting the Paper Strips

I started with white and gray paper, cutting them into strips for our penguin’s body.
Folding the paper slightly under a centimeter helped me measure before cutting.
That being said, I must say that a cutter and a ruler made the job easier than scissors.
Now, the strips are all set, just so you know, I used five gray strips and three white ones.
Step 3: Sticking the Paper Strips

I began attaching the strips together, one after another.
It’s crucial to keep the white strips aligned side by side, and do the same with the gray.
Simply put, keep the colors from mixing up.
Next, I applied glue along the edges of the strips, sticking them together as shown in the images above.
Once I am done applying the glue, I let them dry completely before moving on to the next step (this is crucial).
Step 4: Drawing the feet

I chose cheerful yellow paper for the penguin’s feet.
By folding it in half, I could draw the shape on one side, making it super easy to get both feet looking just right.
Step 5: Cut it out

After drawing, I cut along the lines to achieve the perfect feet shape.
Now, these feet are ready to serve as the sturdy base for our paper penguin. I set them aside, ready to attach later, and moved on to the next step i.e., to craft the body.
Step 6: Crafting the main body

Now that the main body, left to dry earlier, is completely dry and firm, it’s time to bring it all together.
I gently pulled the ends of each strip, applying glue to their edges to join them.
For extra clarity, the images above are a great guide.
Ensuring an even application of glue on each strip’s edge was key to a smooth finish.
And just like that, the main structure of our penguin is ready. It’s amazing to see how bouncy it turned out, just like in image 6.4 above.
Step 7: Fixing the body and feet

With the glue dry, it’s time to attach the body to the feet.
I dabbed some glue in the center of the feet for a balanced support to the penguin’s upper body.
Carefully, I placed the body on the glued area, holding it steady to ensure a strong bond.
It’s important that the white strip section of the body faces forward, just like in image 7.3.
The body and feet are now securely joined, and I’m excited to move on to crafting its face.
Step 8: Crafting the facial structure

For the penguin’s face, I picked out a piece of gray paper.
Folding it in half, I sketched a curve on one end.
This trick ensures the face is symmetrical once cut.
After cutting along the drawn line, the face was ready.
A little tip: leave the facial piece a bit longer at the bottom. This extra length makes it easier to fold over and attach securely to the body.
Step 9: White facial shades

Just like with the face, I took a slightly smaller white sheet for the penguin’s facial highlights.
Folding the paper in half, I drew the desired shape on one side.
Then, carefully cutting along my drawing, I ended up with the perfect highlights.
Step 10: Sticking the shades and eyes

Next, I attached the white highlights to the penguin’s face, bringing it to life.
For the eyes, I added two small circles.
I found a puncher, typically used for punching holes in the paper, perfect for cutting out these circles.
Feel free to draw or find another method that suits you.
With the highlights and eyes in place, all that was left was adding a quirky beak for a final touch.
A little note: position the white highlight just above the base of the face, leaving room at the bottom to fold and attach it securely.
Step 11: Shaping the beak

Crafting the tiny beak was a bit tricky, but not impossible.
I opted for a yellow shade to create the penguin’s beak.
Folding a small piece of paper in half, I carefully cut out the desired shape.
Once done, I applied glue and secured it in place.
Step 12: Fixing the head to its body

To attach the head, I cut the space below and folded it both to the front and back.
This maintains the facial balance once attached.
Ensuring a fold on both sides prevents it from leaning in the opposite direction.
With the head securely in place, the penguin is nearly complete. The final touch remaining is adding the wings.
Step 13: Fixing the arm

For the wings, I folded a piece of gray paper in half and cut it with a slight curve on both sides, as shown in images 13.1 and 13.2.
Folding one edge and applying glue, I attached them to the body.
Pushing the glued part behind the strip secures them in place, as demonstrated in image 13.3.
Now, the penguin is ready to waddle and show off its cool new look.

If you push them they won’t fall instead they’ll bounce back to their feet (that’s cool).
Just incase you need a video handholding of paper penguin craft here’s one:
Final Thoughts
Crafting paper penguins offers more than just a creative outlet, it reconnects us with the carefree joy of childhood.
This DIY project not only enhances bonding time with family but also adds a whimsical touch to any space.
For optimal results, ensure precise measurements and secure glue application for a sturdy structure.
Experiment with different paper colors to customize your penguin’s appearance.
Consider placing these charming creations strategically, such as on your car’s dashboard, for a delightful, bouncing companion on the go.
Frequently Asked Questions
How long did it take to make the paper penguin?
It took 30 minutes and the majority of the time was consumed by its main body structure that’s crafted by sticking the paper strips.
Can I increase the paper penguins size?
You can slightly increase the size of the paper penguin by using longer pieces of paper strips. However, making it too big may not give you the desired results as longer strips will not hold and balance the overall structure.
How durable are the paper penguins once completed?
While paper penguins may not withstand rough handling, they are surprisingly resilient and can withstand gentle play and display. Using quality craft paper and ensuring thorough glue application enhances their durability.
Can I customize the appearance of the paper penguin?
Yes, the paper penguin craft offers ample opportunities for customization. Experiment with different paper colors, sizes, and facial expressions to create a unique and personalized penguin that reflects your style.


