When we say ‘Oink’, kids immediately think of chubby pigs, associating the sound with these adorable animals.
Pigs are a hit in cartoons and animations, captivating children with their small tails, legs, and big noses, not to mention their playful personalities.
Inspired by their charm, I decided to incorporate pigs into a fun paper craft activity for kids.
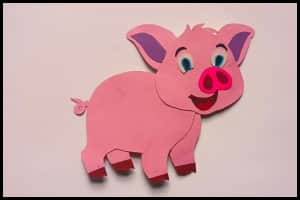
It turned out to be a delightful project, sparking joy in children as they crafted their own paper pigs.
In this article, I’ll walk you through the simple steps to create an adorable paper pig craft for kids, complete with images for reference.
So, gather your basic craft supplies, join me in crafting these paper pigs, and let’s make some memories with our little ones!
Step 1: Making The Paper Pig Template
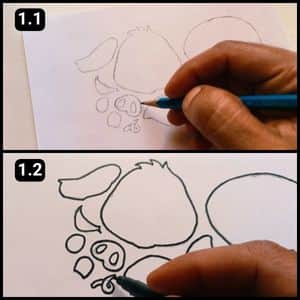
To begin, you’ll need a template featuring the cutout shapes of the structure.
I typically create my own templates, ensuring precise shapes for cutting and assembling later on.
As seen in the image above, I start by sketching the outlines of the shapes with a pencil, outlining the parts of the pig’s body structure.
Once satisfied with the shapes, I trace over the outlines with a black marker pen.
You don’t have to draw the shapes yourself, I’ve provided the template for free. Simply proceed to the next step to access it.
Step 2: Download The Paper Pig Template
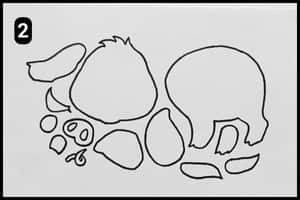
Take a glance at the image above to see how the paper pig template appears.
You can easily access it on my blog for your convenience.
Just download and print it to proceed with the next steps.
If you wish to customize the shapes, you can adjust the printing settings to accommodate various paper sizes.
Step 3: Cutting the Shapes with Perfection
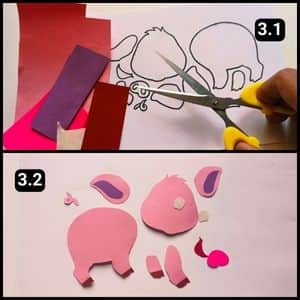
Once you’ve downloaded and printed the template, it’s time to precisely cut out the shapes on colorful paper sheets.
Ensuring clean cuts will facilitate easy assembly later on.
While I opted for standard pig shades, feel free to select your preferred color schemes to personalize your paper pig craft.
Step 4: Assembling of the Shapes
Once you’ve cut out the structure shapes, it’s time to align them for assembly.
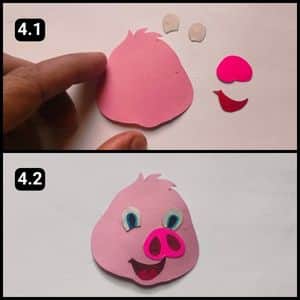
Let’s start by focusing on the facial features of our paper pig.
Begin by creating the eyes, nose, and mouth, as shown in image 4.1 above.
For the eyes, use white paper and enhance them with blue and black markers, as demonstrated in image 4.2. Cut the mouth shape from red paper and add detail with a brown marker.
Then, craft the nose from bright pink paper, accentuating it with a brown marker.
Position the facial structure as the foundation, and carefully adhere the mouth shape in place.
Once secured, align the nose just above the mouth, slightly to the upper right.
Finally, affix the eyes with precision (The result is a stunning paper pig with charming facial details).
Step 5: Assembling the Legs
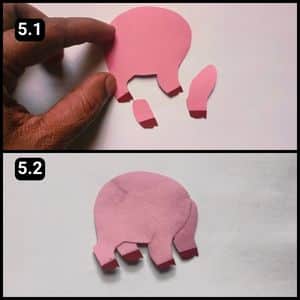
Next Up, I carefully attached the legs to the lower body of the paper pig.
The longer leg shape should be affixed to the front of the body, while the shorter one goes between the hind leg.
Step 6: Assembling the Body and Face
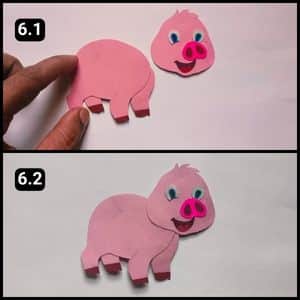
Now, let’s connect the body of the paper pig to its face by adhering them together.
Apply glue to the edges of the facial structure from the back.
Then, align it carefully over the body structure and affix them securely.
Step 7: Assembling the Ears and Tail
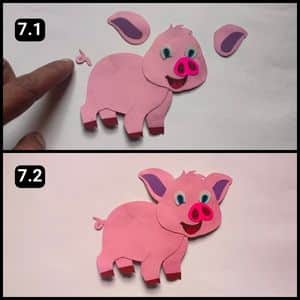
We’ve reached the last step of the paper pig craft: attaching the large ears and the tiny tail.
I started by affixing the small, curving tail to the back of the paper pig, creating a lifelike appearance.
Then, I secured the ears from the back of the facial structure.
With all the shapes assembled, the paper pig looks incredibly adorable and realistic.
Final Thoughts
Remember, crafting this paper pig or any craft for that matter is about the process, not just the end result.
So, encourage your kids to experiment with colors and shapes, fostering their confidence and decision-making abilities.
Additionally, crafting together provides quality time for families to connect and share laughter.
With the step-by-step guide and ready made template, crafting a paper pig becomes effortless and enjoyable.
Note: To assist you further, I have also uploaded the complete video walkthrough of making the paper pig on our official YouTube channel.
Frequently Asked Questions
How long will it take to craft the paper pig?
It will take about 10 minutes of your time to craft the paper pig using the ready template from our website.
What else can I use instead of colorful papers for this paper pig craft?
You can print the template on white paper and color the shapes as desired before cutting the shapes for assembling purposes.
This craft seems a bit too simple, are there ways to make it more challenging?
Sure, Here are some ideas to make this paper pig craft a little challenging:
– Make a whole pig family by creating different sized templates for parent and baby pigs.
– Design a background scenery for the pig, like a barn or a field.
– Use the pig template as a base and add other farm animals like cows, sheep, or chickens.


