Get ready to bring some spooky craft fun to your Halloween celebrations with this adorable paper plate bat craft for Halloween’s day.
As a crafty parent always on the lookout for easy and entertaining kids craft ideas, I can’t wait to share this delightfully simple animal craft that doubles as a bird craft.
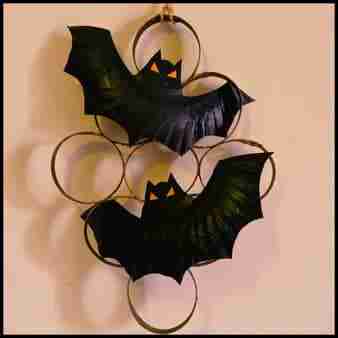
With just a few basic supplies, your little ones can transform an ordinary paper plate into an absolutely batty decoration that will have them flapping with excitement.
Trust me, this Halloween craft idea is a real wing-ding! So gather your little vampires and get ready to let their creativity take flight with this hauntingly cute paper plate bat buddy.
Let’s begin with the things you’ll need to craft similar paper plate bats for Halloween.
Step 1: Things Required for The Paper Plate Halloween Bat Craft
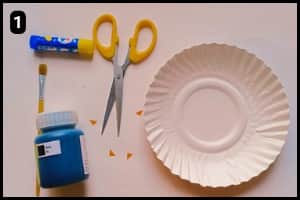
- Paper Plate: I have used a regular paper plate to shape it like a Bat’s Structure. You can use any paper plate be it patterned, colorful or plain. It doesn’t matter after all you’ll need to paint it in black as per the theme.
- Craft paper: You will need a yellow craft paper to craft tiny triangular shapes as the eyes of the Paper Plate Bat.
- Paint and a paintbrush: To apply color to the paper plate as per the Halloween’s Day theme, I have used black acrylic color and a paintbrush.
- Glue and scissor: To form the Bat’s shape you will need to customize the paper plate and hence a scissor is required. You will need glue to stick the triangular eye shapes to the Bat’s facial structure.
Step 2: Cutting the Paper Plate

I used a standard paper plate, which was medium-sized, or slightly bigger than my palm.
To start the craft activity, I cut the paper plate into two roughly equal parts.
Then, I drew the bat’s structure using a pencil on both plate halves, just like in the images provided.
Step 3: Cutting the Bat Outlines
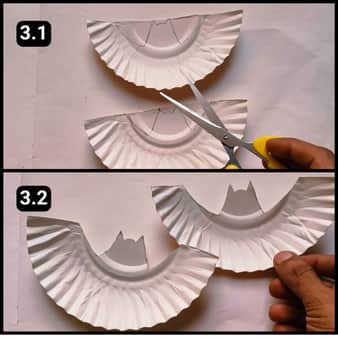
Next up, I cut the paper plate to mold it into the shape of the bat’s structure.
Following that, I proceeded to cut the other part of the plate along the outlines marked with the pencil.
The upper shapes turned out just right, and it was time to shape the bottom of the plates to resemble the bat’s wings.
Step 4: Shaping the Paper Plate Bat Wings
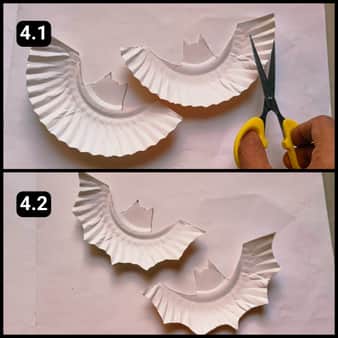
With the upper section prepared, I trimmed the lower sides using scissors.
Then, I cut the lower section of the structures into curves, following the pattern in image 4.2 above.
I made six curves on both parts of the paper plate. It’s advisable to begin cutting the curves from the middle and then work your way to the sides.
Step 5: Paint the Bat Dark
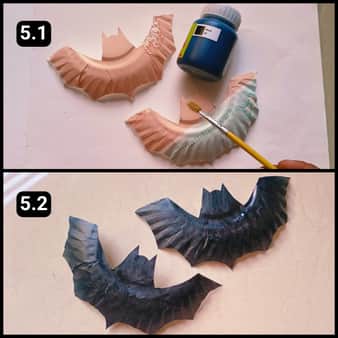
Now that the paper plate has been shaped into bat structures, it’s time to apply black color to them.
I opted for black acrylic paint and used a regular paint brush for shading.
Although you can use regular watercolors for painting them black, acrylic colors provide a glossy, prime look.
Afterward, I allowed the paint to dry, which took about 3 to 4 minutes under a running fan.
However, it’s important to ensure that the fan isn’t on the highest settings, as it could blow away the paper plate and create a messy surrounding.
Step 6: Assembling the Bat’s Triangular Eye Shapes
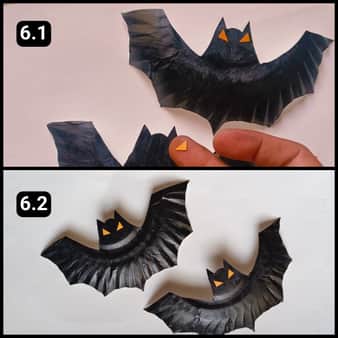
Now, we’ve reached the final step of the paper plate Bat Craft for Halloween’s Day, which involves assembling the eye shapes of the bats.
I cut tiny triangular shapes from yellow origami paper to use as their eyes.
Applying glue to these tiny shapes and sticking them evenly can be challenging, but patience and attention are key.
A small clip used for working on fine details can be helpful in holding and sticking them properly.
At last, the paper plate bats’ construction is finished, boasting a lifelike 3D presence.

I mounted them on a hanging decoration in my living room, and they looked incredibly stunning.
Final Thoughts
This paper plate bat craft is such a fun and easy way to get into the Halloween spirit! The step-by-step instructions make it simple enough for even young kids to craft these adorable bats.
As a parent, I love crafts that encourage creativity while being inexpensive and using household materials.
My advice would be to let your little ones get creative with the decorating – maybe use different colors besides black, add glitter, or use markers to draw fun designs.
The possibilities are endless! Most importantly, focus on the process over the product and have fun bonding over this delightfully spooky craft.
I guarantee these bats will be beloved Halloween decorations you’ll cherish for years to come.
Note: To assist you further I have shared the complete video walkthrough of the Paper Plate Bat craft on our official YouTube channel.


