Looking for a fun and easy paper plate bumble bee craft for kids? You’re in the right place.
This delightful kids craft is perfect for little hands and brings the magic of the humble bee right into your home.
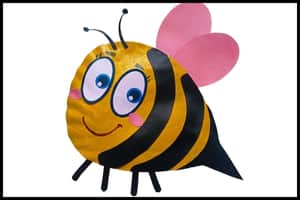
Whether you’re crafting on a rainy afternoon or planning a classroom insect craft, creating a fuzzy bee is always a hit.
Not only is this paper plate kids craft simple to make, but it’s also a fantastic way to teach kids about the importance of our favorite pollinator.
Ready to dive into this bumblebee project? Let’s get buzzing with our adorable paper bumble bee craft for kids.
Step 1: Things I’ve Used (Materials I’ve used for this paper bumble bee craft)
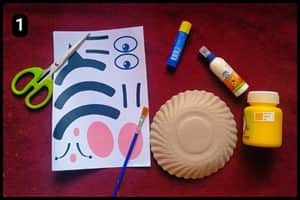
Before we proceed with the craft activity let’s take a quick look at the things I’ve used to make this Paper Plate Bumblebee.
- Paper Plate: I have used a medium sized paper plate, however, you can use slightly larger or smaller ones as per availability.
- Paint and Paintbrush: I have used acrylic paint and a standard brush to paint the Paper Plate.
- Glue: After cutting out the shapes from the template you will need to, glue them onto the paper plate.
- Scissor: To cut the shapes of the Bumblebee from the printed template.
- Template: You will need to download and print the template of the Bumblebee for the Cutouts. For the template simply move on to the below step.
Step 2: Preparing OR Downloading The Bumble Bee Template
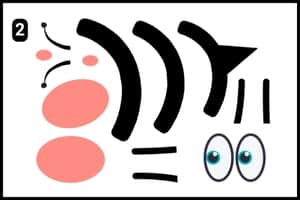
I’ve created a unique template for the paper plate bumble bee that includes all the shapes you need.
This template features the body stripes, eyes, antennas, wings, legs, and cheeks.
You can easily download and print it on A4 size paper or adjust it to the size you need.
Step 3: Cutting The Bumble Bee Template
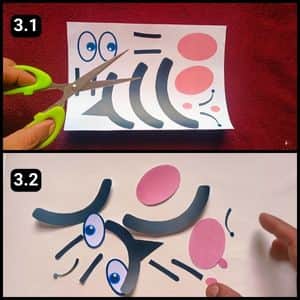
Now that all the elements are ready, it’s time to cut out the shapes from the printed bumble bee template.
Be sure to cut carefully and precisely to ensure each piece fits together perfectly.
Step 4: Painting the Paper Plate
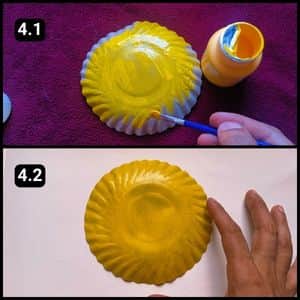
To shade the paper plate in yellow, I applied paint to its back (which is where I would stick the cutouts).
I used acrylic paint for this, but standard watercolors also work well.
Just make sure not to wet the paper plate too much and leave it to dry for a while. Alternatively, you could stick yellow craft paper instead of using paint.
Step 5: Shaping the Paper Plate
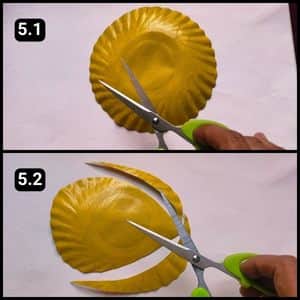
Once the paint had dried, it was time to shape the paper plate into a bumblebee’s body. I carefully trimmed the edges to ensure the cutouts fit perfectly.
Step 6: Assembling the Cutouts
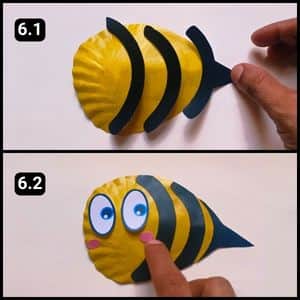
With the paper plate trimmed and the cutouts ready, I began assembling the bumblebee’s structure.
First, I aligned the black stripes over the body, sticking them one by one.
If any portions of the stripes appeared too large, I trimmed them from the edges after attaching them.
Next, I added the eyes and the pink cheeks beneath them, as seen in image 6.2 above.
My fuzzy bee was starting to take shape, resembling the humble bee and its fellow pollinators.
Step 7: Assemble the Antennas, Legs, and Wings
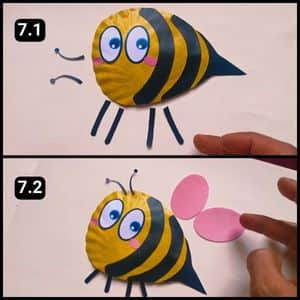
With the main body structure ready, I began assembling the legs, antennas, and wings.
I attached the antennas to the top, just above the eyes, securing them from the front.
Then, I aligned the legs at the bottom of the structure and adhered them from behind.
Next, I positioned the two wings, joining their edges together, and finally attached them to the back of the bumblebee’s body.
Step 8: Adding Final Touch Ups To Our paper plate bumble bee
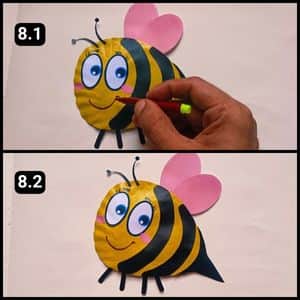
It’s time for the final touches: drawing the eye shades, eyebrows, and mouth.
I used a black marker to shade the eyelids and eyebrows of the bumblebee.
Then, with a maroon marker, I drew a smiling, curved line for the mouth.
The paper plate bumblebee was finally complete, and it looks absolutely adorable (as seen above).
Video Walkthrough of Paper Plate Bumble bee craft for KIDS
Final Thoughts
As a parent, I love crafts that are not only fun but also educational.
By teaching kids about the importance of pollinators like bumblebees, this project sparks their curiosity about nature and the environment.
I highly recommend incorporating this craft into classroom activities or summer camps, as it’s a fantastic way to promote creativity, fine motor skills, and environmental awareness in young minds.
Additionally, personalizing the bumble bees with unique patterns or adding interactive elements like movable wings could make this project even more engaging.
Overall, this simple yet meaningful craft is a buzzing success that will leave both kids and adults buzzing with joy
Note: I have also shared the complete video walkthrough of this paper plate Bumble Bee craft on our official YouTube channel. The video provides a clear step-by-step guide that can make this paper plate bumble bee project even easier.
Frequently Asked Questions
How long did it take to make the Paper Plate Bumble Bee craft?
It took 10 minutes for me to complete the paper plate Bumble Bee craft using the ready template from the website.
Can I use a different color for the bee’s body instead of yellow?
Yes, you can customize your bumble bee with any color you like as the template used can go with most colors. Brown, orange, or even black and white with stripes painted on can create a different kind of bee.
What other materials can I use to make this paper plate bee fuzzy?
For a fuzzy bee body, you can glue on cotton balls, yarn scraps, or yellow pom poms.


