Prepare to flap your wings and get ready for a paper plate chicken craft for kids that’ll have you clucking with joy.
Imagine transforming a simple paper plate into a feathery friend that’ll bring your room to life.

With just a few snips and a sprinkle of creativity, you’ll create a paper plate rooster that’ll strut its stuff on your shelves.
This kids craft is the perfect way to unleash your inner artist and learn about the fascinating world of bird craft.
Plus, we’ve got a free chicken template to make your paper craft adventure even easier.
So, grab your scissors and get ready to ruffle some feathers.
Editor’s Note: I have also crafted an amazing paper rooster without a paper plate and that is also an easy craft. You can find the paper rooster craft instructions here and for video walkthrough you can check out the paper rooster video walkthrough here.
Things You’ll Need for this paper plate chicken craft for KIDS
- Paper Plate: You will need a paper plate as the main facial structure of the rooster.
- Scissor and Glue: To trim the paper plate and to cut the shapes from the template you will need a scissor. And, to stick the paper Cutouts to the paper plate you will need a standard or a multipurpose glue.
- Rooster Template: You will need the shapes of the Rooster’s facial structure for assembling purposes. Hence, you can access the template containing the shapes in the step below.
Step 1: Downloading The Rooster Template

Here’s the image of the template with various shapes for the rooster’s facial expressions.
You can use this template to create the rooster’s face without needing a paper plate.
This gives you the freedom to craft the rooster in unique and different ways. If you do decide to use a paper plate, the large facial shape is optional.
Step 2: Cutting the Chicken Template Shapes

With the template ready, it’s time to cut out the rooster’s shapes with scissors.
I’ve downloaded and printed the template on standard A4 paper, but I’ve resized it to fit the paper plate I’m using.
Step 3: Shaping the Paper Plate To Form Chicken Face
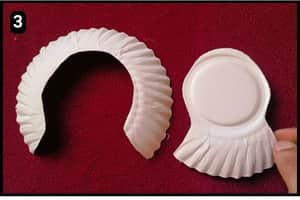
Before assembling the cutouts, I shaded the paper plate to match the rooster’s facial structure.
The bottom of the plate resembles the rooster’s neck feathers.
Step 4: Assembling the Paper Plate Rooster

With the paper plate trimmed and the cutouts ready, it’s time to assemble the rooster.
I started by attaching the red cutout, known as the comb, to the top of the rooster’s head.
Next, I positioned and stuck the wattle beneath the rooster’s beak.
Step 5: Fixing the Rooster’s Beak

It was time to align and stick the beak shape over the wattle, as shown in image 5 above.
This step nearly completed the rooster’s structure, leaving only the eyes to be assembled.
Step 6: Assembling the Rooster’s Eyes

Finally, I aligned the eye shapes and applied glue to attach them in place.
I made sure to position them correctly before sticking them down (As an alternative to the paper eye shapes, googly eyes could also be used).
Step 7: The Final Rooster Structure

Here’s the final structure of the paper plate Rooster and it looks amazing.
Final Thoughts
Not only does this paper plate chicken craft sparks creativity, but it also teaches them about the captivating world of birds.
I highly recommend embracing this activity as a fun family bonding experience.
Encourage your little ones to add their personal touches, whether it’s decorating the rooster with vibrant colors or experimenting with different materials.
Who knows? This craft might even inspire them to learn more about chickens and their fascinating behaviors.
Embrace the joy of hands-on learning and let their imaginations soar with this delightful paper plate creation.
Note: I have also posted a complete video walkthrough of this paper plate chicken craft on our official YouTube Channel.
Frequently Asked Questions
How long did it take to make the paper plate chicken craft?
It took 5 minutes for me to make the paper plate chicken craft using the ready template from our website.
Can I use something other than a paper plate for this chicken craft?
Absolutely! You can use a similar sized piece of colored construction paper or cardboard as your base. These rooster template shapes can be used on any crafting background.
How can I make my paper plate chicken look more like a chick?
Use a smaller paper plate or cut a larger one in half and then skip the comb and wattle pieces from the template. Use yellow paint or construction paper for the body that resembles a chick’s body. You can even add a tiny cracked eggshell glued to the bottom of the chick.


