Looking for a fun and easy paper plate craft that will have your little ones trumpeting with joy? Our paper plate elephant craft for kids may well be the perfect activity that you are looking for.

Imagine turning a simple paper plate into a mammoth creation, complete with tusks and big floppy ears.
This animal craft is not only a creative way to spend an afternoon but also an educational adventure into the world of these gentle giants.
Whether you’re crafting with toddlers or older kids, this paper plate elephant craft for kids will spark their imagination and love for animals.
So, without wasting any more time, let’s take a quick look at the list of items required to craft this paper plate animal.
Step 1: Things I’ve Used For Paper Plate Elephant

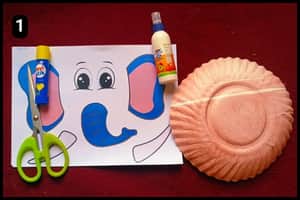
Check out the image above for a list of materials I’ve used to make the paper plate elephant craft. I’ve also listed the items below for your convenience.
- Paper Plate: I have used a regular paper plate as the main base of this particular craft activity.
- Scissor: I’ve used regular craft scissors to cut the shapes and to trim the paper plate as required.
- Glue: To stick the Cutouts to the Paper Plate I’ve used multipurpose glue.
- Template (Printout): I’ve used the template that includes the shapes of the elephant’s face. To access the free template created by me you can download it here.
Step 2: Preparing/Downloading The Elephant Template

The image above shows what the elephant template will look like.
Simply download and print the paper plate elephant template to get started on the craft.
That being said, it’s important to note that it’s designed for standard A4 size paper, but you can adjust the size before printing.
With the craft materials and template ready, let’s dive right into the fun craft activity of making the paper plate elephant.
Step 3: Cutting the Elephant Shapes

Once you have all the basic elements ready, the first step is to cut out the elephant shapes.
As shown in the images above, I printed the template and carefully cut out the shapes of elephants using scissors.
Step 4: Cutting the Paper plate

I started by trimming the edges of the paper plate to give it the shape of an elephant’s face.
Even without trimming, the structure would still have a unique appearance (So, this step was optional).
However, if you’re crafting multiple shapes, trimming a few of them can create unique structures.
Step 5: The Assembling Process

After trimming the paper plate and preparing the cutouts, it was time to assemble them precisely.
I started by using the paper plate as the base for the craft activity.
Then, I aligned and stuck the large ear shapes to the sides of the plate.
Next, I positioned the eyes to find the best spots before gluing them into place.
Finally, I applied glue and secured the eyes onto the paper plate.
Step 6: Aligning the Elephant’s Trunk and Teeth

When assembling the trunk onto the paper plate, it’s best to align it with the teeth first.
As shown in the images above, I carefully aligned and glued them together.
Step 7: Adding The Final Touch

We’ve come to the last step of the paper plate elephant craft i.e. assembling the trunk and teeth combination and adding the eyebrows.
I aligned and glued the trunk just below the eyes and in the middle of the structure.
And there you have it, the gentle giant is now ready to stomp around joyfully with the little ones.
Video Walkthrough of this paper plate elephant craft for kids
Final Thoughts
Out of all the crafts on my list, this has to be one of the easiest and most satisfying.
This paper plate elephant craft is a delightful and effortless way to spark creativity in kids while also teaching them about these majestic animals.
I would highly recommend incorporating elements like painting, coloring, or using textured materials to add depth and personality to the elephant.
Additionally, you could turn it into an educational experience by discussing the elephant’s habitat, behavior, and conservation efforts.
Overall, this engaging craft not only fosters imagination but also promotes a love for nature and wildlife in young minds.
It’s a perfect blend of fun and learning that parents and educators should definitely consider for their little ones.
Note: I have also shared the complete video walkthrough of this paper plate elephant craft on our official YouTube channel for your reference (for more visual).
Frequently Asked Questions
How long did it take to make the paper plate elephant?
It took only 10 minutes for me to make the paper plate elephant craft using the ready template from the website.
How can I make this paper plate elephant unique?
In order to make your paper plate elephant craft look unique and stand out try and paint the paper plate before assembling the craft in different colors (may be gray, blue, or even polka dots). If possible, use different colored construction paper for the ears, trunk, and tusks. Additionally, you could also add details with markers or crayons i.e. fur texture, eyelashes, or a heart on its belly.
What age group is this paper plate elephant craft suitable for?
This paper plate elephant craft is perfect for toddlers and preschoolers with adult supervision and older kids can handle more intricate details.


