Parents often seek fun activities like arts and crafts to engage their kids.
Beyond regular crafts, special occasions call for something unique.
That’s why I’ve created a delightful paper plate Fathers Day craft that will truly make Dad feel special.
Using a simple paper plate and a printable template, I’ve created a handsome Dad’s face.
This project delights both kids and dads alike, allowing children to explore their imagination while celebrating the most special man in their lives.
Before we start, let’s quickly review the materials needed for crafting this Father’s Day masterpiece.
Step 1: Things You’ll Need for Paper Plate Fathers Day Craft
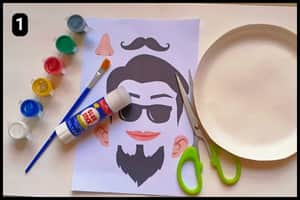
- Paper Plate: I have used a biodegradable paper plate for this particular craft activity because it offers a plain surface. However, you can also use standard paper plates or as per your preferences. The Paper plate will be used as the Facial Structure of the Father’s day craft where I will assemble the Cutout shapes.
- Paint and Paintbrush: To shade the paper plate as human skin color I have used water color and a paintbrush.
- Scissor and Glue: You will need a scissor to cut the shapes from the printed template and a multipurpose or regular glue to stick the shapes.
- Father’s Day Template: For the Cutouts or the shapes for assembling purposes you will need a template with required designs and hence I have made a template that you can download and print it in the following step.
Estimated Time To Complete This Father’s Day Craft: It took 10 minutes for me to craft the father’s Day special craft structure using the ready template from the website. The total time also includes the painting and drying of the paint over the plate.
Step 2: Father’s Day Template Source
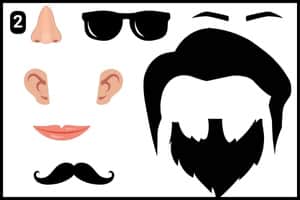
This is the visual representation of the Father’s Day special template shown in the image above, showcasing its design and features
You can download it for free from our blog to cut out and assemble the shapes in the next steps.
The template features eyebrows, sunglasses, a nose, lips, ears, hairstyle, mustache, and beard (all ready for you to cut out and put together).
Adjust the template size based on your paper plate’s dimensions before printing.
Step 3: Cutting the Template Shapes
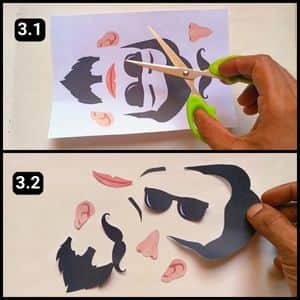
As seen in the image 3.1 above, I’ve downloaded and printed the Father’s Day special template.
Then, I carefully cut out the template shapes with a standard craft scissor, ensuring precision.
It was important to cut the small shapes carefully to achieve an even structure in the end.
If any errors were made while cutting some of the shapes, I could print another copy of the template as needed.
Step 4: Painting the Paper Plate
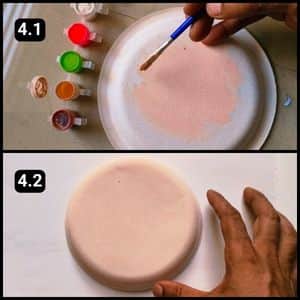
With the cutouts and basic craft supplies ready, it was time to proceed with the activity.
I have grabbed the paper plate and applied skin-colored watercolor paint to the back as seen in image 4.1 and 4.2 above.
Next, after the paint dried I cut the borders of the paper plate, as shown in the image 4.2 above.
The color looks well set on the paper plate so it’s now time to assemble the facial impressions.
Step 5: Assembling the Shapes
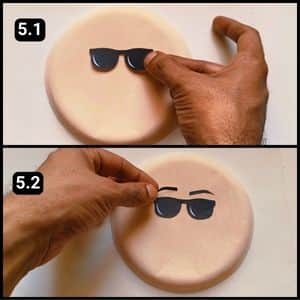
It is ideal to start by aligning and sticking the sunglasses first.
This ensures that the other facial details are positioned evenly.
Next, once the sunglasses were firmly in place, I aligned and stuck the eyebrow shapes just above them.
The glue adhered well because the paint had dried completely, otherwise, it would have been challenging to stick the shapes onto the plate.
Step 6: Assembling the Nose and Lips
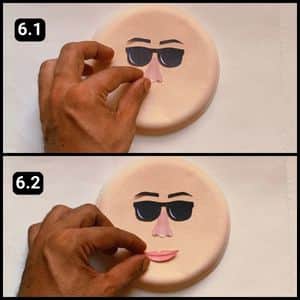
Next up, I proceeded to assemble the other facial features, including the nose and lips shapes.
I started by aligning the shape of the man’s nose between the sunglasses and ensuring they were stuck evenly.
Afterward, I positioned the shape of the lips below the nose, leaving space for the mustache.
Step 7: Assembling the Mustache and Beard

Now it was time to achieve the perfect male look by assembling the beard and mustache shapes.
These shapes are designed to reflect a typical and standard look for men.
They can be customized to match your preferences or your father’s beard style.
I aligned and stuck the mustache shape between the nose and the lips.
Then, I positioned the beard shape to ensure the correct placement and stuck it below the lips, as shown in image 7 above.
Step 8: Assembling the Hair and Ear Shapes
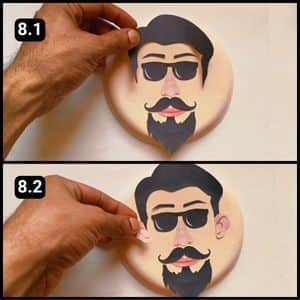
With this, we’ve moved onto the final step of the Father’s Day special craft activity, which involves assembling the hair and ear shapes.
So, I began by aligning the hair shape or paper wig over the paper plate to determine the optimal position.
Once the hair shape was fixed in place, it facilitated the positioning of the ear shapes.
After ensuring they were aligned correctly, I applied glue to the ear shapes and secured them to complete the man’s facial structure on the paper plate.
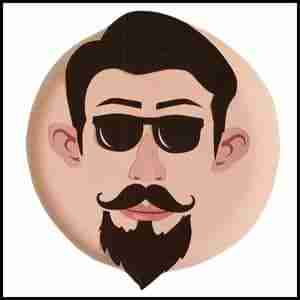
If you look at the image above, you’ll see a handsome facial structure of a father figure, which is undeniably special.
Each facial feature on the shaded paper plate carries a unique significance.
Video Walkthrough of Paper plate Father’s Day Craft (Handsome Father Face)
Final Thoughts
As a parent, I can confidently say that this delightful paper plate fathers day craft is an absolute must-try.
Not only does it foster creativity and imagination in our little ones, but it also creates a cherished keepsake that will bring a smile to Dad’s face year after year.
I highly recommend engaging your kids in this fun activity, as it provides a wonderful opportunity for quality bonding time.
Note: I have also shared the complete video walkthrough of this paper plate Father’s Day craft on our official YouTube channel for your reference.


