Creating a paper plate hippopotamus craft for kids is an absolute blast.
Imagine the joy on their faces as they transform simple materials like paper plates, paint, and construction paper into a delightful hippo.

This craft isn’t just about putting pieces together, it’s about sparking creativity and honing those little skills like cutting, pasting, and painting.
Plus, with an easy-to-follow template, even the youngest crafters can join in with minimal help.
To start with, let’s take a quick look at the list of things required to craft this paper plate hippo.
Step 1: Things I’ve Used For This Paper Plate Hippopotamus

- Paper Plate: I used a regular paper plate as the base for the hippo craft.
- Paint and a paintbrush: To give the paper plate the perfect hippo color, I opted for traditional watercolors and a trusty paintbrush.
- Glue and scissor: To cut the Hippo’s template shapes and other required elements I have used a scissor. Glue is required to stick the elements together and it’s best to use a multipurpose glue.
- Hippo Template: You will need to download and print the template which includes the shapes of the Hippo. To obtain the template shapes for Assembling purposes you can move to the below step.
Step 2: Downloading The Hippopotamus Template

Take a quick look at the image above to see the Hippo template I made. The hippopotamus template is available in two versions
One’s already colored, making things easy, while the other’s a blank canvas for your imagination to run wild.
You can download this free hippopotamus template here.
Step 3: Cutting the Hippopotamus Shapes

I selected the vibrant Hippo template as seen in image 3.1 above.
After preparing the template, it was time to cut out the shapes with precision.
With standard scissors in hand, I carefully cut each shape.
Once the cutting was completed, it was time to assemble the pieces onto the paper plate.
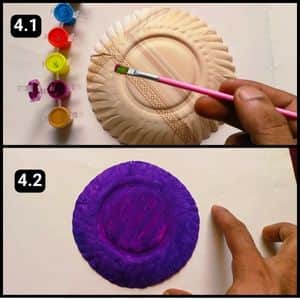
Step 4: Painting the Paper Plate

With the template shapes all set, it was time to work on the base, which meant coloring the paper plate.
I painted the plate with a lovely purple shade using watercolor and a paintbrush (After applying the paint, I allowed it to dry).
While waiting, I started assembling the Hippo’s facial structure in the next step.
Step 5: Assemble the Hippo’s Face

I aligned and stuck together the upper head, mouth, and lower head shapes of the hippo.
It was crucial to position the mouth shape at the front and stick the upper and lower parts from behind the structure, just like you see in the image 5.2 above.
Step 6: Fixing The Hippo’s Ears

It was time to attach the ears to the facial structure of the Hippo, securing them from behind.
Once firmly in place, I carefully aligned the Hippo’s facial structure over the paper plate.
Step 7: Fixing the Hippo’s Head and Legs over Plate

The facial structure was perfectly aligned and adhered to the paper plate.
Now, the paper plate resembled the Hippo’s body concealed behind its sizable head.
Lastly, I assembled the leg shapes beneath the Hippo’s facial structure and at the bottom of the paper plate, just like you see in the image above.
Here’s how the final completed paper plate hippopotamus craft project looks like.

Video walkthrough of paper plate hippopotamus craft for kids
Final Thoughts
I absolutely love how this paper plate hippopotamus craft for kids turns a few simple supplies into a delightful work of art.
As you’ve seen, the process is easy enough for little hands with the premade template.
But don’t be afraid to let your child’s creativity run wild and encourage them to choose their own hippo colors or even add fun embellishments.
The real magic happens when you see that sense of pride and accomplishment on their face after crafting their very own hippo friend.
So clear off a work space, stock up on supplies, and get ready to make some wonderful memories.
Note: For your reference, I have also shared the complete video walkthrough of this paper plate Hippo craft on our official YouTube channel.
Frequently Asked Questions
How long did it take to make the paper plate Hippopotamus craft for kids?
It took 10 minutes for me to craft the paper plate Hippopotamus structure using the ready template from the website.
What if I don’t have watercolors? Can I use something else to paint the hippo?
Absolutely, Acrylic paint, tempera paint, or even markers can be used to color the paper plate.
How can I make the hippo more 3D?
For a more three-dimensional effect, you can crumple up some tissue paper and glue it underneath the hippo’s facial features to create a puffy snout.
Can I make this paper plate hippopotamus craft with different colored paper plates?
Absolutely! Use a pink paper plate for a pink hippo or a brown one for a chocolate hippo. You can even paint stripes or spots on a white paper plate for a zebra-inspired hippo. In fact, we have two types of templates: one is colored and the other one is black and white. You can easily color the black and white template that compliments the paper plate color.


