Ladybugs are one of nature’s most delightful creatures, capturing the hearts of children with their vibrant red shells and adorable black spots.
Imagine the joy on your little one’s face as they craft their very own ladybug masterpiece.
This paper plate ladybug craft is a fun and easy way to unleash your child’s creativity while teaching them about these fascinating insects.
With just a few simple materials and our step-by-step guide, your little artist will transform an ordinary paper plate into a whimsical ladybug sculpture.
Not only is this craft a great way to spend quality time together, but it also fosters their fine motor skills, hand-eye coordination, and artistic expression.
Let’s dive right into the crafting process by gathering easily available supplies.
Materials required for paper plate ladybug craft
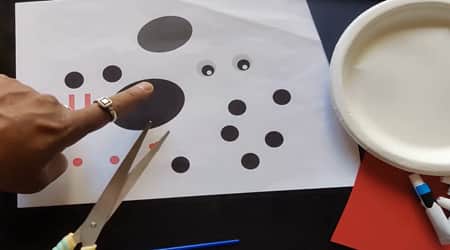
For the paper plate ladybug craft, you’ll need:
- Paper Plate: You’ll need a regular-sized paper plate as the base for your ladybug craft (Opt for a sturdy one, it really helps).
- Red Acrylic Paint: Acrylic paint works best for this project due to its vibrant color and quick drying time. Choose red to give your ladybug that classic look, but feel free to get creative with other colors if you’d like.
- Printable Template: Using a printable template makes it easier to cut out the various shapes needed for your ladybug’s spots, eyes, and antennae (Download the template from here).
- Glue: A strong, multipurpose glue will be your best friend for assembling your ladybug. Make sure it’s suitable for paper and dries clear for a neat finish.
Steps to craft this paper plate ladybug
Once you have the template and the paper plate handy, crafting a ladybug is fairly straightforward.
Here’s how to get the perfect ladybug shape:
Step 1: Either Download OR Make your own template

First things first, we need some shapes to bring our ladybug to life.
You have two options here i.e. you can either make your own template or download the one I’ve prepared for you.
If you’re feeling creative and want to design your own template, grab some paper (color of your choice) and sketch out an oval circle for the face, some smaller circles for the spots, and round shapes for the eyes and antennae.
Once you’re happy with your designs, simply cut them out (more on that on step 2), and you’re good to go.
Now, if you prefer to save some time (and maybe a few hand cramps), you can download the template I’ve created for this project.
Step 2: Cutting the ladybug template
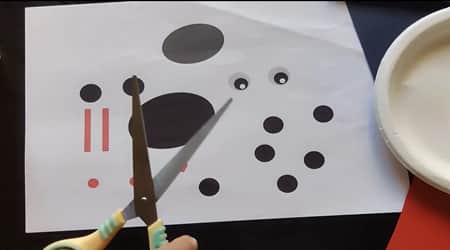
Alright, now that we have our template ready, it’s time to start cutting out the shapes.
I like to lay my template flat on the table and use a pair of sharp scissors to carefully cut along the lines.
First up, we have the face, you’ll notice we have two black oval shape cutouts for the face.
The larger one is for the main part of the face, while the smaller one will go on top to add some dimension.
Make sure to cut these out neatly so our ladybug’s face looks just right.
Next, we have the eyes, antennae, and nose, these are smaller shapes, so take your time to cut them out precisely.
The eyes will give our ladybug that cute, bug-eyed look, while the antennae add a touch of whimsy.
Don’t forget the heart-shaped nose and small red spots for some extra charm.
Lastly, we have the spots for the body – Our template includes six round black spots that will really make our ladybug pop.
Cut these out carefully, as they’ll be scattered across the ladybug to give it that classic spotted look.
With all our shapes cut out and ready to go, we’re one step closer to bringing our paper plate ladybug to life.
Step 3: Painting the Paper Plate
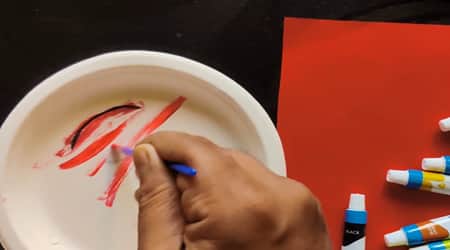
Now that we have our shapes all cut out and ready, it’s time to give our paper plate a vibrant makeover.
Using broad strokes, I evenly coat the entire surface of the paper plate with the red paint.
Make sure to cover every inch, including the edges, so our ladybug has a bold and consistent color.
Don’t worry if the first coat looks a bit streaky, acrylic paint tends to dry darker and more opaque.
Once the first coat is dry, you can apply a second coat for a smoother finish if needed.
Remember to let each coat dry completely before adding another layer or moving on to the next step.
With our paper plate beautifully painted in red, our ladybug is starting to take shape.
Step 4: Assembling the Ladybug
Let’s bring our paper plate ladybug to life by sticking on all those adorable elements we cut out earlier.
Here’s the order that I followed and you too can do the same:
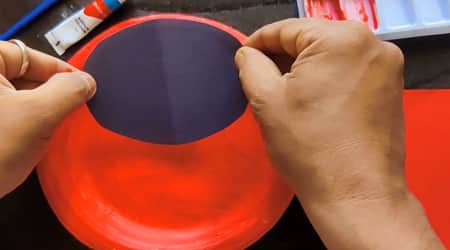
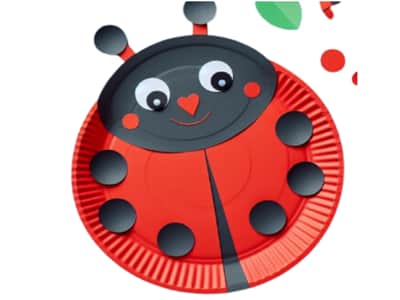
First up, grab the large black oval shape cutout for the face and carefully stick it onto the colored paper plate (This will be the main part of our ladybug’s face).
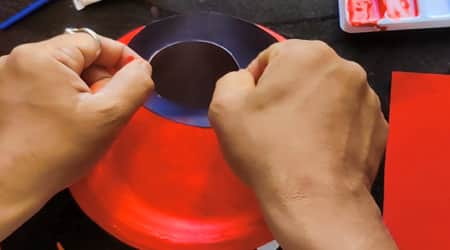
Then, add a touch of dimension by placing the smaller oval shape on top of the larger one (as shown in above image).
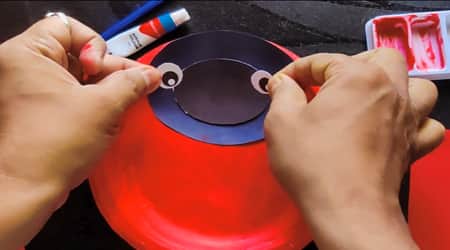
Next, stick on the eyes as seen in the above image to give her that cute, bug-eyed look.
Now, it’s time for the finishing touches on the face.
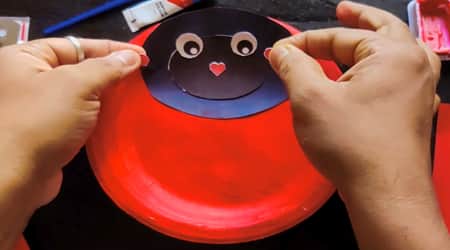
Stick on the heart-shaped nose and add a pop of color with the red round shape cutout for the cheeks (Check out the above image for reference).
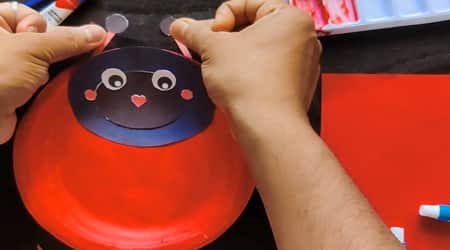
Moving on to the antennae, I carefully attached them to the top of the ladybug’s head. These little details will really make her come to life!
With the face complete, let’s focus on the body, take those six small black spots we cut out earlier and scatter them across the ladybug’s back.
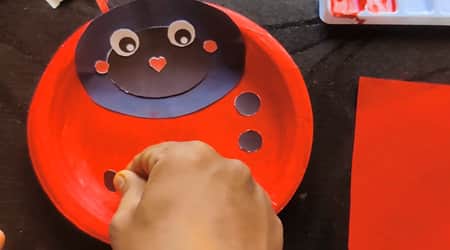
This will give her that classic spotted look we all know and love.
Lastly, let’s add a little extra detail by cutting a thin black strip of paper and sticking it in the middle of the plate.
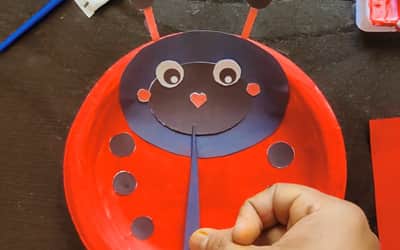
This will give our ladybug a defined body segment and add a touch of realism.
Here’s how our final completed paper plate ladybug craft project looks like:
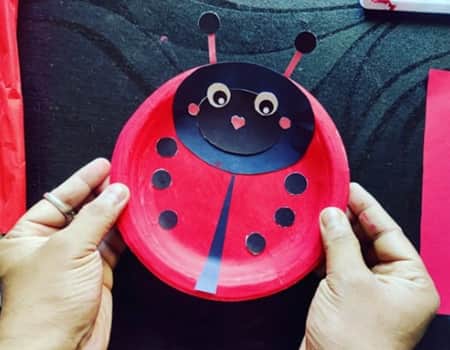
Video Walkthrough of paper plate ladybug craft for KIDS
Note: I’ve also posted this video walkthrough of our paper plate ladybug craft on our official YouTube channel.
Final Thoughts
This paper plate ladybug craft is an absolute delight for both children and adults alike.
As a parent, I highly recommend trying this paper plate ladybug craft with your little ones.
My top tip would be to let your child take the lead in decorating their ladybug, encouraging them to experiment with different color combinations and patterns.
Don’t be afraid to get a little messy, that’s half the fun.
Bottom line is, embrace the imperfections and celebrate their unique creation.
This craft is a gentle reminder to slow down, appreciate the simple joys in life, and cherish the precious moments with our loved ones.
So, gather your supplies, and let the ladybug crafting session begin.


