Previously I had crafted a paper turtle and this time I have enhanced the structure by adding a paper plate as the main body structure.
Get ready to unleash your artistic skills and bring a delightful sea animal craft to life with this paper plate turtle craft for kids.

Imagine transforming a humble paper plate into an adorable tortoise, ready to swim through the vibrant ocean waves.
This kids craft is not just a fun activity, but a gateway to exploring the wonders of the deep blue.
With a few simple materials and a sprinkle of imagination, you’ll craft a charming ocean craft that will have you dreaming of underwater adventures.
But first let’s take a quick look at the list of items I’ve used to craft this paper plate turtle.
Step 1: Materials You’ll Need For This Paper Plate Turtle Craft

If you look at the image above I’ve arranged the craft items to make the paper plate Turtle.
However, I’ve listed the craft items you’ll need below.
- Paper Plate: Our turtle friend will need a paper plate for its shell.
- Watercolor and paintbrush: To shade the paper plate you’ll need watercolor and a paintbrush.
- Glue and Scissors: To cut the shapes and to trim the paper plate you’ll need a scissor. And, to stick the cutouts to the paper plate you’ll need glue.
- Turtle Template: You’ll finally need the shapes of the turtle’s structure design which I have made available for you.
Step 2: Preparing OR Downloading The Turtle Template

I’ve created a unique turtle template in two versions i.e. one turtle template is blank and the other one is pre-colored.
Use the blank template to customize your turtle with your own colors or simply download, print and cut out the colorful turtle template to start your craft activity right away.
Step 3: Cutting the Template Shapes
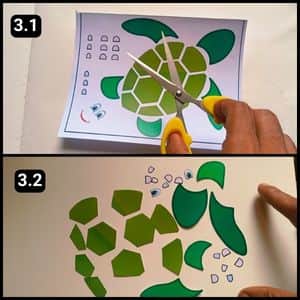
I used the colorful template of the paper plate turtle, as seen in image 3.1 above and then, I cut the shapes for assembly with scissors.
For tiny shapes like the turtle’s nails and eyes, I made sure to cut them with precision, taking my time and being patient.
Step 4: Sticking The Turtle’s Nail Shapes

I prepared the shapes by assembling a few cutouts together, like attaching the nails to the legs and arms, and the eyes to the face.
First, I stuck the nail shapes to the turtle’s hands and legs, one by one.
Initially, I planned to stick only two nails on each hand and leg, but I managed to fit three, so I did.
Next, I aligned and attached the eye shapes to their places, as shown in image 4.2 above.
Step 5: Shape and Paint the Paper Plate

I trimmed the paper plate slightly to form a pointy edge, making it look like the tail end of the turtle’s shell.
You can refer to image 5.1 above to see how I trimmed the paper plate.
Next, I painted the shell with green watercolor using a paintbrush, as shown in image 5.2 above.
I used dark green for the base of the shell since the shades I planned to stick over it were lighter.
Step 6: Sticking the Shell Shades

Once the watercolor dried, I picked up the shapes for the turtle’s shell.
I made sure to align and stick the shapes perfectly for an even appearance.
I placed the proper pentagon shapes in the center and then surrounded them with the remaining shapes.
Step 7: Fixing the Turtles Head, Hands, and the Legs

With this, I moved to the final step of the paper plate turtle craft i.e. attaching the head, legs, and arms.
I started by aligning and sticking the long arms to the main structure of the turtle.
Next, I attached the legs and head from underneath the paper plate. Now, the paper plate turtle is ready to swim across the ocean.
Video Walkthrough of Paper Plate Turtle Craft for KIDS
Final Thoughts
This delightful paper plate turtle craft is an absolute must-try for any kid who loves getting creative.
I highly recommend letting your little ones take the lead and exercise their imagination to the fullest.
Try and encourage them to experiment with different color combinations or even add unique embellishments like googly eyes or sequins to make their turtle truly one-of-a-kind.
Furthermore, don’t be afraid to get a little messy, the process is just as fun as the final product.
Once complete, these adorable paper plate turtles would make for fantastic decorations or cherished gifts.
Most importantly, embrace the sense of accomplishment and joy that comes with creating something special with your own two hands.
Trust me, this paper plate kids craft is a surefire way to make lasting memories.
Note: I have shared the complete video walkthrough of this paper plate Turtle craft on our official YouTube channel for your reference (just in case you like more visual guidance).
Frequently Asked Questions
How long did it take to make the paper plate Turtle craft?
It took 12 minutes for me to make the paper plate Turtle craft using the ready template.
What are some other embellishments I can use for this paper plate turtle besides those mentioned in the article?
For this paper plate turtle craft you can use buttons, pipe cleaners, markers, glitter, yarn, or even fabric scraps can add fun textures and details to your craft.
How can I make my paper plate craft into a learning activity?
When making this paper plate turtle, discuss turtle shells, habitats, or even different types of turtles. You can do similar activities with other sea creatures too.

