Did you know quails can hide in plain sight with their amazing camouflage feathers? How cool is that?
Today, we’re going to turn some paper into our very own covey with a super easy paper quail craft for kids tutorial.
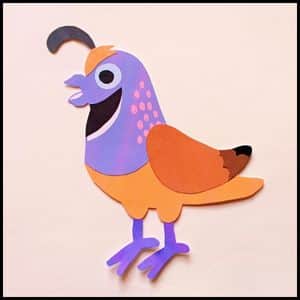
Quail birds are found everywhere in the world and are interesting animals with special traits that make them important to nature.
This paper quail craft aims to teach children about these birds in a fun and engaging way.
I have made an amazing paper Quail whilst educating children about this species throughout the process and you too can do this.
I’ve created a wonderful paper quail and taught kids about this bird while doing it and you can make one too.
In this article, I’ll show you how to create a paper quail step by step, with pictures included.
First, let’s start with step 1 i.e. creating the paper quail template.
Step 1: Making The Paper Quail Template
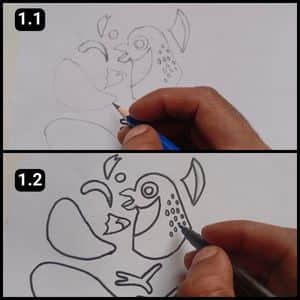
Create your own template (optional):
For a personalized touch, you can make your quail’s template! Here’s what you’ll need:
- Sketch it out: Grab a pencil and paper, then lightly sketch the shapes that make up the quail’s body, wings, etc.
- Sharpen the lines: Once you’re happy with the shapes, use a black marker to trace over the pencil lines, creating a crisp and defined template.
Skip the sketch:
Short on time? No worries! You can use a premade paper quail template instead (below)
Step 2: Downloading Paper Quail Template
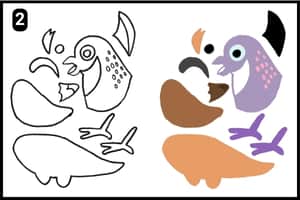
I’ve posted the paper quail templates on my blog.
If you check out the image above, you can see what they look like.
So, I’ve provided two templates, one blank template with quail outlines (this will help you to choose custom colors) and the other one is a colored version, allowing (just cut the shapes and paste it).
You can easily download it here and print them with just a few clicks to get started.
Step 3: Cutting the Shapes for Assembling
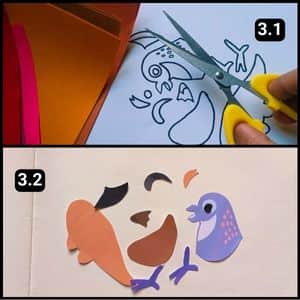
It’s time to cut out the quail shapes from colorful paper, as shown in image 3.1 above.
As I said earlier, I’ve uploaded two versions of the template for your convenience.
One has just the outlines, while the other is a full-color print-and-cut template to make assembling the quail easier.
If you’d like to personalize your paper quail, use the outline template and color it in yourself.
For group activities, you can print multiple copies of the colorful template for the children to use.
Step 4: Assembling the Shapes
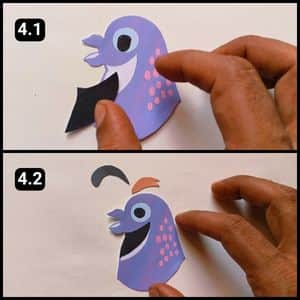
After preparing the cutouts, it’s time to align them correctly to build the quail’s structure accurately.
I began by using the facial structure as the foundation for assembly, then added the details. For this, I used the colorful template with pre-designed shades.
First, I attached the black cutout around its neck, creating the neck patch. Next, I placed the brown patch over its head, known as the cap patch.
Finally, I assembled the iconic crest above the cap patch using the black cutout.
Step 5: Assembling the Body Structure
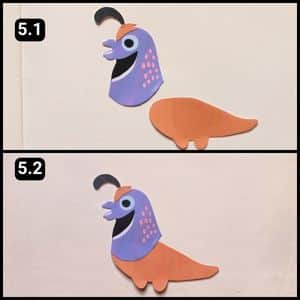
The facial structure is now finished, so let’s proceed to attach the quail’s body.
To do this, I’ve applied glue to the edges of the upper body structure and carefully adhered it to the lower body.
Step 6: Assembling the Wings
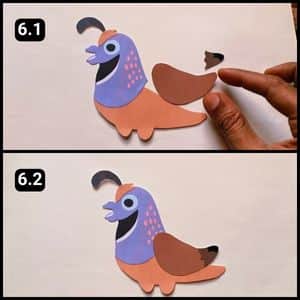
This small bird can fly at speeds of approximately 30 to 40 miles per hour, so it requires wings with strong feathers.
For the wings, I’ve chosen a mix of slightly darker brown shades.
To attach them, I’ve applied glue to the cutout and affixed it onto the quail’s body structure, as shown in image 6.2 above.
Step 7: Assembling the Quail’s Legs
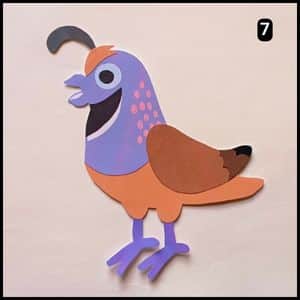
Now, we’ve reached the last step of the paper quail craft i.e. attaching its tiny legs.
I applied glue to the top edges of the quail’s leg shapes and attached them from the back of its structure.
After allowing the glue to dry, the paper quail craft is complete.
Now, let’s take a look at the educational aspect of the activity and learn more about quails as birds (While crafting, the information below about quail will inject some knowledge in a playful manner ).
Interesting facts about Quail for kids
- Quail birds are typically small in size and are ground-dwelling birds that belong to the family Phasianidae which is also called the pheasant family.
- They are found almost all around the world with different species inhabiting various regions.
- Quails are known for their distinctive appearance due to their plump bodies, round heads, and short tails.
- When we talk about their diet, they are primarily herbivores, feeding on a diet of fruits, seeds, and grains. However, they also prefer to eat insects and small reptiles on occasion.
- Quails are social in nature and they prefer living in groups called coveys, their numbers can range from a few to over 100 birds.
- Quails are able to fly short distances at a speed ranging between 30 to 40 miles per hour, however, they prefer to run on the ground due to their body shape and size and their speed can range between 15 to 20 miles an hour.
- They are preyed upon by a variety of animals such as foxes, snakes, and hawks.
- Another amazing fact about Quails is their unique reproductive strategy, the female lays her eggs in a shallow depression on the ground, however, both male and female take turns incubating them.
Video walkthrough of paper quail craft for kids
Final Thoughts
This paper quail craft offers a delightful blend of creativity and learning, making it a perfect activity for children of various ages.
The beauty of this craft lies in its adaptability.
Younger children can enjoy the pre-colored templates and focus on cutting and gluing, while older kids can create their own templates and personalize their quails.
I would say use this paper quail craft as a springboard for further exploration.
Look up pictures of real quails, listen to bird sounds, or even visit a local farm (if possible) to see these fascinating creatures in person.
Lastly, don’t just stick to the instructions. Instead, encourage children to experiment with different colors, textures (like felt for the beak), and add details like googly eyes for a whimsical touch.
Remember, the key is to have fun and foster a love for learning and crafting in children.
Note: For your reference, I have also uploaded the complete video walkthrough of the paper Quail craft on our official YouTube channel.
Frequently Asked Questions
How long will it take to craft the paper Quail?
With our website’s template, creating the Quail paper can take approximately 10 minutes. For a faster approach, consider using the vibrant Quail template as an alternative to the standard one.
In what order should I assemble the quail pieces?
Here’s the suggested order to assemble the paper quail: 1. Neck patch (black cutout around the neck) 2. Cap patch (brown patch over the head) 3. Crest (black cutout on top of the cap patch) 4. Upper body glued to the lower body 5. Wings glued to the body 6. Legs glued to the back of the body.
Can I add other bird species to this paper craft concept?
Absolutely! This paper quail craft can be a springboard for creating paper versions of other birds. You can find templates online for various bird species such as paper crow, Owl, paper rooster, kite and more at this blog.
Can I turn this paper quail craft into a puppet?
Yes, attach a craft stick or popsicle stick to the back of the quail for a simple puppet. Children can use it to act out stories or reenact interesting quail behaviors.


