Crafting a paper shark with your kids is both fun and educational, and it starts with a few simple supplies you likely already have at home.
In this article, I’ll guide you step-by-step through creating your own paper shark, from cutting out the shapes to adding intricate details like fins and teeth.
It’s a great way to spend quality time with your little ones while exploring creativity and learning about marine life.
Ready to get started with paper shark craft?
Let’s take a quick look at the list of items required to craft this amazing shark in step 1 below.
Step 1: Things You’ll Need For Paper Shark Craft
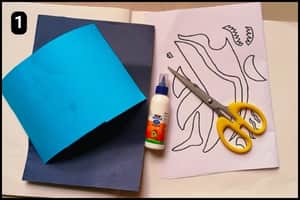
- Craft Papers: You can use thick craft papers such as cardstocks and origami. Make sure to choose the colors that resemble a shark’s structure (I have used light and dark shades of blue).
- Scissor: You can use standard craft scissors ideal for cutting papers so that you can cut the shapes of the paper Shark.
- Glue: To stick the paper shark cutouts you will need glue.
- Shark Template: For the shapes of the paper Shark structure you will need a template with the ready design. I have a ready template for you which can be accessed from step 2 below.
Estimated Time taken to craft the paper Shark: It took 8 minutes for me to craft the paper Shark structure using the ready template from our website.
Step 2: Downloading The Paper Shark Template
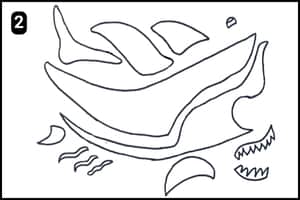
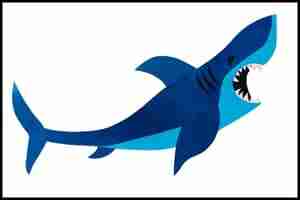
If you look at the image above, you’ll see what the paper shark template looks like.
The template includes all the shark shapes you’ll need i.e. the upper and lower body, fins, tail, and facial details.
You can easily download and print this template from our website.
With your basic craft supplies and the template in hand, let’s dive into the paper shark activity.
Step 3: Preparing/Cutting the Shapes

Now that I have the shark template and craft papers ready it’s time to cut them.
I chose dark and light shades of blue to match the shark’s appearance.
For the lower body, I used light blue paper since sharks typically have lighter undersides.
Dark blue was used for the upper body, fins, and tail.
To craft the mouth, eye, and gills, I combined white and black papers.
The template I’ve shared includes outlined shapes, allowing you to fill in your own colors and customize the design.
Step 4: Preparing the Shark’s main Body
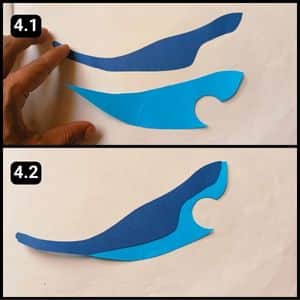
With the shark shapes ready, it’s time to assemble them using glue.
Start by putting together the main body first.
Align the dark blue piece over the light blue one and glue them properly, as shown in the images above.
Step 5: Fixing the Gills, Eye, and Mouth

Now, it’s time to add the facial details to the paper shark.
Start by attaching the mouth from the back with proper alignment.
Next, position the eye and glue it in place, followed by the gills, which should be aligned behind the eye.
To create the open mouth, cut a semicircle from black paper and add the teeth around it.
Step 6: Fixing the Fins
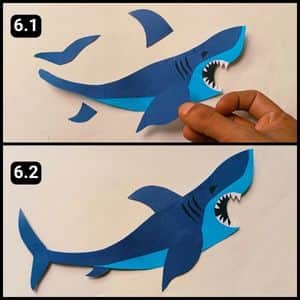
We’ve reached the final step of the paper shark craft i.e. attaching its fins and tail.
These elements are crucial for giving your paper shark its swimming form.
Begin by assembling the large fin below the gills.
Then, attach the pointed fins i.e. one at the top and a smaller one near the tail.
Finally, align and stick the tail fin, as shown in image 6.2 above.

Take a look at the final structure, it appears both fierce and captivating.
It’s a great example of how thoughtful design and color choices can bring paper crafts to life.
Video Walkthrough Of Cut & Paste Paper Shark Craft for KIDS
Final Thoughts
Creating paper crafts like this shark can be a rewarding experience, blending creativity with precision.
As you complete your shark, consider personalizing it further (perhaps adding additional details like texture or experimenting with different color schemes).
Encourage others to explore their creativity by adapting the template or trying variations in paper types and sizes.
Additionally, documenting your crafting process with photos or videos can inspire and guide others who work on similar projects.
Note: I have also shared the complete video walkthrough of the paper Shark activity on our official YouTube channel.


