Remember those childhood rackets made by tapping rulers on desks? Today, we’re taking things up a notch.
Have you ever dreamt of crafting your own instrument with your kids? Well, get ready to unleash your inner musician (without any actual noise complaints from the neighbors).
This paper xylophone craft is the perfect rainy day activity, bursting with color, creativity, and a sprinkle of musical exploration.
Let’s turn those construction paper dreams into a vibrant, hand-made masterpiece that will spark pure joy (and maybe a silent symphony) in your little one’s heart.
Let’s take a quick look at the step by step instructions to craft a Xylophone from paper.
Step 1: Designing the Template
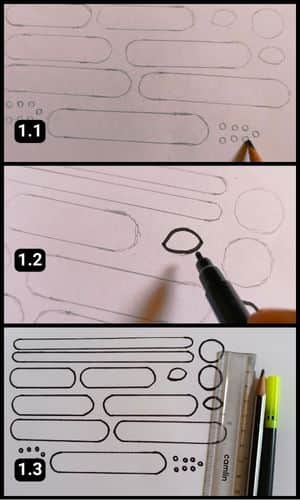
During the process of creating cutouts from the template, I utilized a geometric ruler to accurately measure and draw straight lines.
Before measuring and drawing, I first designed the necessary shapes to ensure their availability as cutouts from the template.
With the aid of a geometric ruler, I measured and drew straight lines to create the shapes of the sound bars and the two long base panels of the paper Xylophone.
I began by sketching the outlines with a pencil and subsequently traced the final shapes using a black marker pen, resulting in the completion of the Xylophone template.
To obtain the finished template, you can simply proceed to the subsequent step below.
Step 2: Create Or Download The Xylophone Template
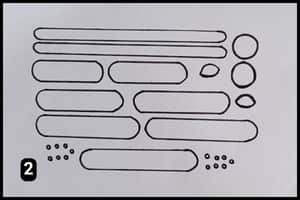
The image above shows the ready template for the paper xylophone.
It is available on our blog just download the paper xylophone template from here.
Step 3: Use Colorful Papers for the shapes
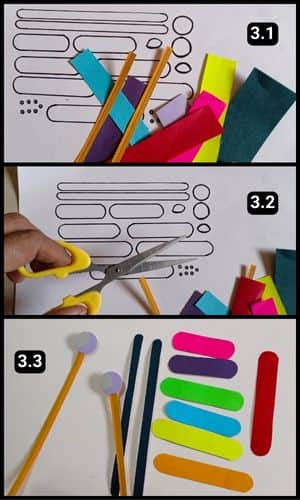
To make the musical panels, select vibrant and contrasting colored papers.
For the sound bar panels, I used a combination of bright and some dull and dark shades.
As you can see in image 3.3, I have cut the desired shapes on colored paper sheets.
Ensure precise cutting, as the colorful sound bar strips vary in size.
Step 4: The Assembling process
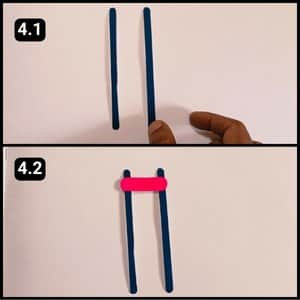
To create the base of our paper xylophone, I used two long black paper strips, as you can see in the pictures above.
I started by laying these strips down side-by-side.
It’s important to make sure they’re perfectly aligned so the shortest sound bar will fit comfortably on top later.
With everything looking good, I attached the first pink sound bar panel to the black base strips as seen in image 4.2 above.
Step 5: Assembling the Sound-bar panels Evenly
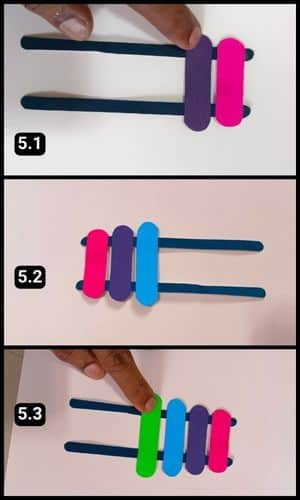
Now for the fun part, attaching the sound bars.
We’ll want to create a nice gradient of sound, so let’s start with the smallest panel.
Make sure to double-check the sizes as you go, lining them up one by one from shortest to longest.
For a clean look, be sure to center each panel as you secure it to the base.
Step 6: Assemble them
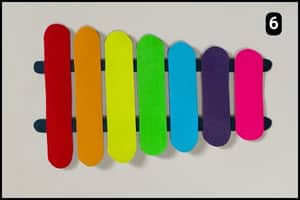
If you look at the image above, I have stuck all the sound panels in an even manner. The bright colors really pop, creating a visually stunning mini xylophone.
While the glue dries completely, let’s move on to crafting the mallet sticks for our musical masterpiece.
Step 7: The Mallets or the Mallet Sticks
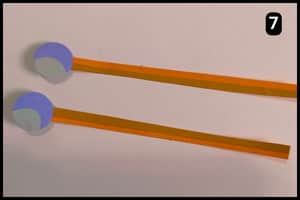
In real life, xylophone mallets are made of wood with soft rubber or plastic tips to produce a pleasant sound.
For our paper xylophone, we employed a simplified approach. We utilized long, rectangular pieces of paper to simulate wooden handles and cut out circular shapes for the mallet tips.
Using the picture above as inspiration you can craft a similar mallet.
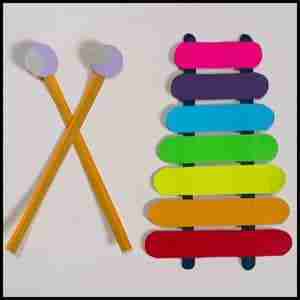
If you look at the final image above, the paper xylophone structure looks amazing and real.
Video Walkthrough of paper xylophone craft for kids
Final Thoughts
While this paper xylophone might not fill the room with music, it ignites a spark of musical imagination in children.
In our case kids loved it and they had demands of crafting other musical instruments which I will be posting going forward as a craft activity for coming weekends (if possible).
I have also uploaded the complete video of the paper xylophone craft on our YouTube channel for your reference.
Frequently Asked Questions
How long did it take to craft the paper xylophone?
It took 15 minutes for me to make this paper xylophone craft using the template. For beginners, it may take more time to align and stick each sound bar panel carefully.
What else can I use instead of paper to make the xylophone craft?
You can use popsicle sticks to make the xylophone craft strings as an alternative to paper. Also, you can use bamboo sticks to make the base and the tumblers.
What are some alternative materials I can use to make a paper xylophone?
Cardboard or cereal boxes can be used for the base instead of paper, creating a more robust instrument. On the other hand, popsicle sticks can be a good substitute for the paper sound bars. Experiment with different materials like thin wooden dowels or craft straws for a variety of sounds. And for mallet sticks use wooden spoons, pencils, or even pipe cleaners instead of paper.
Is there a way to make the paper xylophone more visually appealing for adults to create with children?
Yes, there are ways to elevate the look while maintaining its kid-friendly nature for instance, patterned construction paper or scrapbook paper can be used for a more polished look. Likewise, instead of regular tape, use decorative washi tape to secure the sound bars and mallets for a unique touch. Furthermore, metallic markers or paint can add a sophisticated touch to the xylophone.


