Today we’re setting sail on a paper crafting adventure, and guess what? You’re in charge of building your very own paper yacht.

All you need is a trusty pair of scissors, some colorful paper (or markers to decorate), and a downloadable template that’s easy as pie to follow.
So, grab your crew (or maybe a grown-up to help) and let’s get ready to conquer the high seas.
Key Takeaways
- Either draw/create your own outline or download the ready made template.
- Place it over colorful construction paper and cut the shapes according to the template.
- Assemble the parts of yachts and stick it with glue.
- Estimated time to get this craft project completed is between 7 to 10 minutes if you have the template in hand.
Step 1: The Making of Paper Yacht Template

Before we start with our paper yacht craft, let’s take a quick look at how I prepared the template in the first place.
First, I sketched out the individual pieces of the yacht, thinking about how they would fit together.
I began with a pencil for its flexibility in making adjustments until I was satisfied with the shapes.
Then, I switched to a black marker pen to trace over the final outlines, resulting in a sharp template ready for your use.
Step 2: The Paper Yacht Template Source

For your reference, I have made the paper Yacht template available on my blog and it’s free.
Simply download the paper yacht template and print it on A4 size paper or adjust to your liking. This template will assist you in cutting precise shapes for the yacht’s parts.
Once you have the yacht template prepared, you can proceed to the following steps.
Step 3: Cutting the Shapes
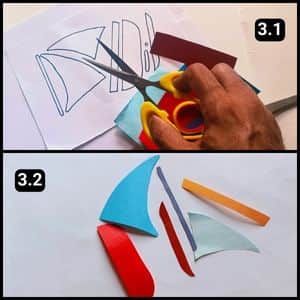
With our template ready, it was time to cut the shapes of the paper yacht on colorful paper sheets.
I opted for red, yellow, and blue shades for this craft project, but you could choose your own color schemes based on availability or for customization.
In this case, once the cutouts were ready, I proceeded to the assembling process.
Step 4: Assembling the Hull

I started off by assembling the Hull of the Yacht which is the base.
I used the yellow, red, and dark red cutouts together to form the base as seen in image 4.2 above.
I kept the larger panel of the base (which is in light red) into the middle.
Next up, I stuck the yellow shape (the long strip) over the top and let it dry.
And then, I stuck the smallest panel (which is the dark red strip) to the bottom of the base.
This completes step 4, which also means I have the Hull of the yacht ready! yay!!
Step 5: Assembling the Mainsail
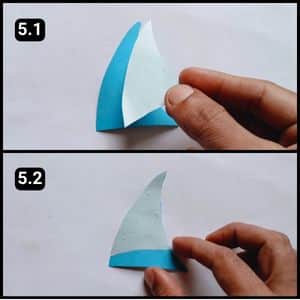
The mainsail, a significant panel, plays a crucial role in guiding the yacht in the desired direction.
I’ve cut shapes in various shades of blue and affixed the lighter shade onto the large shape.
With that, the mainsail of my paper yacht is now complete.
Step 6: Fixing Mainsail with Mast

A mast in a yacht is a pole attached to the base, responsible for holding the mainsail in place.
These components facilitate the yacht’s navigation on water and its ability to change direction with its movements.
Therefore, I cut the mast shape out of gray paper and affixed the mainsail to its edges.
Now, it’s prepared to be assembled with the base of the paper yacht.
Step 7: Assemble All The Components

With a flourish (and a dab of glue), I’ve reached the final step.
The mast has been carefully glued to the hull, completing our magnificent paper yacht.
Now, this seaworthy vessel is ready to set sail on epic adventures, will it explore uncharted bathtub waters or navigate the mighty kitchen sink? The choice, captain, is yours!!
Video Walkthrough of paper Yacht craft for KIDS
Final Thoughts
While the template provides a solid base, experiment with your own mast and sail designs for a truly unique vessel.
In other words go beyond the templates, I would say use it as a starting point.
If possible, craft a paper dock for your yacht to “park” or create a paper island for it to “discover.”
Let your creativity guide playtime and encourage kids to come up with innovative ideas.
Note: For your reference I have also uploaded the complete video walkthrough of paper Yacht craft on our official YouTube channel.
Frequently Asked Questions
How long will it take to make the Yacht paper craft?
It took 15 minutes for me to make this paper Yacht craft using the ready template from my blog.
What type of paper is best for a paper yacht?
While construction paper works well for this paper yacht project, consider using thicker cardstock for increased durability..
How can I make a double-masted paper yacht?
You’ll need to modify the paper yacht template to include an additional mast piece. Ensure both masts are spaced evenly and securely attached to the hull for balanced sailing. You can even design sails of different sizes for each mast.


