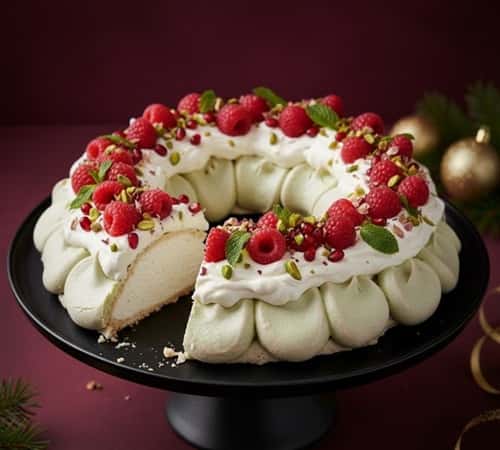
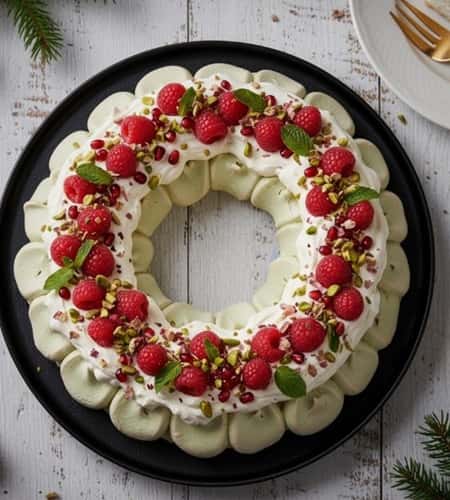
Look, I’ve torched my share of holiday desserts. But this Pistachio Rose Christmas Pavlova Wreath? It’s the one that made my mother-in-law actually ask for the recipe.
And trust me, that woman doesn’t hand out compliments like candy canes.

This gluten-free Christmas centerpiece looks like you hired a pastry chef, but here’s the secret – it’s more forgiving than you think.
Why This Pistachio Rose Christmas Pavlova Wreath Changed My Holiday Game
I used to dread Christmas dessert duty. You know the pressure – everyone’s stuffed from dinner, judging your every move, and suddenly you’re supposed to produce something Instagram-worthy.
Then I discovered this elegant Christmas wreath last year when my daughter announced she was bringing her new boyfriend home for the holidays.
The beauty of this meringue dessert is simple: you make it the day before.
No last-minute panic. No oven disasters while Aunt Carol tells you about her cruise for the fifteenth time.
The crispy exterior shatters perfectly while the inside stays cloud-soft, and those pistachios? They’re not just pretty – they bring an earthy richness that cuts through the sweetness like a knife through butter.
What makes this different from every other pavlova recipe floating around is the technique I stumbled onto by accident.
Most recipes tell you to pipe one continuous wreath. Wrong move. I build mine in segments – individual meringue mounds that merge together during baking.
This creates natural valleys for the rose-scented cream, and if one section cracks (they will, it’s pavlova), it just looks rustic instead of ruined.
Ingredients Needed To Make Pistachio Rose Christmas Pavlova Wreath
For the Meringue Base
- 6 large egg whites (room temperature, and yes, it matters this time)
- 1½ cups superfine sugar (also called caster sugar – grind regular sugar in your food processor for 30 seconds if you can’t find it)
- 1½ teaspoons white vinegar (sounds weird, works perfectly)
- 1½ teaspoons cornstarch
- ½ cup shelled pistachios, finely ground (use a spice grinder or food processor)
- 1 teaspoon vanilla extract
- Pinch of salt (the amount you’d grab between three fingers)
For the Rose Cream and Toppings
- 2 cups heavy whipping cream (cold from the fridge)
- 3 tablespoons powdered sugar
- 1-2 teaspoons rosewater (start with 1, taste, then decide – this stuff is potent)
- ½ cup shelled pistachios, roughly chopped
- Fresh raspberries (about 2 cups)
- Pomegranate arils (seeds from one large pomegranate)
- Dried rose petals (find them in the tea section or order online)
- Fresh mint leaves for garnish
- Edible gold leaf (optional, but come on, it’s Christmas)
Equipment That Actually Matters
You need a stand mixer or a hand mixer with serious stamina.
Your arm will fall off trying to whip egg whites by hand, and this isn’t the 1950s. Grab parchment paper, a baking sheet, and if you want to get fancy, a piping bag with a large star tip. No piping bag? A zip-lock bag with the corner snipped off works fine – I’ve done it dozens of times.
Instructions To Make Pistachio Rose Christmas Pavlova Wreath
Step 1: Set Up Your Station
Preheat your oven to 250°F (120°C). This is low and slow territory.
Draw a 9-inch circle on parchment paper, then flip it over so the pencil marks are on the bottom (you don’t want graphite in your Christmas pavlova). Place it on your baking sheet.
Here’s where I differ from every other recipe: lightly grease the parchment with butter or oil spray. Controversial? Maybe. But it helps release the pavlova later without cracking the base.
Step 2: Prep Your Pistachios
Grind half a cup of shelled pistachios until they’re fine but not powder – you want texture, not pistachio dust. I pulse mine about 15-20 times in a spice grinder.
Set these aside. This is your secret weapon for that subtle nutty flavor running through every bite.
Roughly chop another half cup for topping later. These provide the contrast – the crunch factor that makes each forkful interesting.
Step 3: The Egg White Situation
This is where guys usually mess up. Your bowl needs to be absolutely clean – not “looks clean” but actually clean. Any fat residue and your whites won’t whip properly.
I run mine through the dishwasher, then wipe it down with a paper towel soaked in white vinegar.
Separate your eggs carefully. One speck of yolk will ruin everything. I crack each egg into a small bowl first, then transfer the white to my mixing bowl.
That way, if I break a yolk, I’ve only wasted one egg instead of contaminating the whole batch.
Let those whites sit at room temperature for 20-30 minutes. I usually do this while I’m getting everything else ready. Cold eggs don’t whip up as voluminous.
Step 4: Start Whipping
Add your pinch of salt to the egg whites. Start mixing on medium speed until they get foamy – about a minute. You’ll see them go from liquid to sudsy, like dish soap.
Once foamy, increase to medium-high speed. Beat until they form soft peaks.
This means when you lift the beater, the peaks flop over like a sad little wave. Takes about 2-3 minutes.
Step 5: Add Sugar Gradually (Don’t Rush This)
Here’s where patience pays off. Add your superfine sugar one tablespoon at a time while the mixer runs. I’m serious – one tablespoon, wait 30 seconds, add another. This gradual addition is what creates that glossy, stable meringue.
The mixture should look shiny and thick, like marshmallow fluff.
When you rub a bit between your fingers, you shouldn’t feel sugar granules. If you do, keep beating. This takes about 8-10 minutes total.
Your arm might get tired holding the hand mixer. Push through.
Step 6: Add the Magic Ingredients
Once your meringue is glossy and holds stiff peaks (they stand straight up without flopping), turn the mixer to low.
Add your vanilla extract, white vinegar, and cornstarch. Beat for just 30 seconds to combine.
Now fold in those ground pistachios using a spatula. Don’t stir vigorously – you want to maintain all those air bubbles you just spent ten minutes creating.
Use a gentle folding motion, like you’re tucking in a blanket. The mixture will turn a beautiful pale green with darker green specks.
Step 7: Shape Your Wreath
Spoon or pipe the meringue onto your prepared parchment circle. I make about 12-14 individual mounds that touch each other, creating a wreath shape. Each mound should be about the size of a baseball, maybe slightly smaller.
Leave the center empty – that’s where the drama happens later with your toppings.
Use the back of a spoon to create swoops and peaks on top of each mound. These will turn golden and crispy during baking, creating texture contrast.
Some recipes tell you to smooth everything perfectly. Forget that. The rough, swooped surface is what gives you those delicious crispy bits and creates visual interest in your festive dessert.
Step 8: The Long Bake
Slide your meringue wreath into the preheated oven. Set a timer for 90 minutes. Do not open the oven door. Not even to peek. Not even once.
After 90 minutes, turn off the oven but leave the pavlova inside. Let it cool completely in the oven with the door closed.
This usually takes 2-3 hours, but I typically make mine at night and just leave it in there until morning.
This gradual cooling is crucial. It’s what prevents massive cracking (some cracks are inevitable and add character).
When I’m impatient and take it out early, it collapses like a poorly pitched tent.
Step 9: The Rose Cream
When you’re about an hour away from serving, make your rose-flavored cream.
Pour cold heavy cream into a chilled bowl. Add powdered sugar and start with one teaspoon of rosewater.
Whip until you get stiff peaks i.e. about 3 to 4 minutes. Taste it. The rose should whisper, not shout. If you can’t detect it, add another half teaspoon. Too much rosewater tastes like eating your grandmother’s soap, so err on the side of less.
I learned this the hard way when I added a full tablespoon my first attempt. My kids said it tasted like “fancy bathroom.” Not the compliment I was looking for.
Step 10: Assembly Time
Carefully transfer your cooled pavlova to your serving platter.
This is nerve-wracking the first time. Slide a large spatula or cake lifter underneath, support it with your other hand, and move deliberately. If a piece breaks off, nobody will notice once you pile on the toppings.
Spoon generous dollops of rose cream into the center of the wreath and in the valleys between meringue mounds.
Don’t overthink the placement – make it look abundant, like you weren’t stingy.
Step 11: Top Like You Mean It
Scatter fresh raspberries across the cream. These add tartness that balances the sweet meringue. Then sprinkle pomegranate arils everywhere – they catch the light and pop in your mouth like little flavor bombs.
Add your chopped pistachios, focusing on areas where the cream is exposed.
Tuck in some fresh mint leaves. If you’re using dried rose petals, sprinkle them last so they sit on top like confetti.
The gold leaf, if you’re going there, should be applied with tweezers in small pieces. Less is more – just a few strategic flakes make it look expensive.
Step 12: Serve Immediately
Here’s the thing about holiday meringue desserts, once assembled, they start softening from the cream. This isn’t bad – it’s actually delicious – but you lose some of that textural contrast after a few hours.
I assemble mine about 30-60 minutes before serving. The meringue is still crispy on the outside, marshmallowy inside, and the cream hasn’t had time to soak in too much.
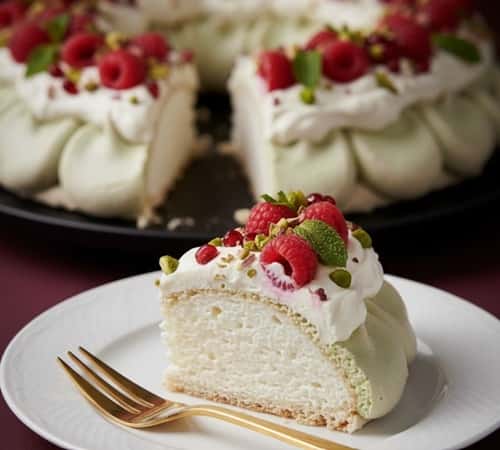
Cut it with a serrated knife, using a gentle sawing motion. Serve each piece with a mix of meringue, cream, and toppings.
Watch your guests’ faces when they get that first bite of crispy shell giving way to soft interior, with the bright fruit and rich pistachio flavor hitting at the same time.
Flavor Variations That’s Worth Every Penny
I’ve experimented with this pistachio dessert more times than I care to admit. Some variations worked, others didn’t make it past my wife’s taste test.
What works: Swap raspberries for blackberries or sliced strawberries. Replace half the pistachios with blanched almonds.
Use orange blossom water instead of rosewater (use even less – it’s stronger). Add a tablespoon of matcha powder to the meringue with the ground pistachios for a more intense green color and earthy flavor.
What doesn’t work: Adding chocolate (it overwhelms the delicate flavors). Using lemon curd instead of rose cream (too tart against the sweet meringue). Trying to make individual servings (they dry out too quickly).
The pomegranate seeds can be replaced with dried cranberries if you’re desperate, but fresh pom arils have this juicy burst that’s worth the effort of extracting them.
Final Thoughts
The real magic of this Christmas pavlova wreath isn’t just the taste or the looks.
It’s that it’s genuinely impressive while being surprisingly forgiving. Cracks? They’re rustic character.
Slight collapse in one area? Fill it with extra cream and berries. Uneven browning? That’s artisanal.
I’ve made this enough times now that I can do it while slightly buzzed on Christmas Eve (not recommended, but possible).
The technique becomes muscle memory. The first time, you’ll be nervous.
The second time, you’ll be confident. By the third, you’ll be wondering why you ever bothered with traditional Christmas pudding.
The pistachio and rose combination isn’t traditional Christmas flavoring, and that’s precisely why it works. Everyone expects peppermint, ginger, or eggnog.
They don’t expect this sophisticated, Middle Eastern-inspired holiday centerpiece that tastes like you traveled somewhere exotic to learn it.