Look, I’ve torched enough pita bread in my kitchen to know the frustration.
You follow some Pita Bread Recipe online, and what do you get? Dense flatbread that won’t pocket.
But here’s what changed everything for me: understanding that the dough hydration and your oven’s actual temperature (not what the dial says) make or break that magical puff.
Why Your Pitas Keep Failing (And Mine Used To)
Most homemade pita attempts fall flat – literally.
The pocket formation depends on steam, and steam needs three things working together: proper gluten development, the right dough consistency, and genuine high heat.
I used to think my oven was hot enough. Wrong. Get yourself an oven thermometer because that 500°F you set? It’s probably 425°F, and that 75-degree difference murders your pita pocket. This isn’t some minor detail – it’s the whole game.
Ingredients Needed To Make Pita Bread (Stop Overcomplicating This)
Here’s what you actually need for authentic pita bread:
For the Dough:
- 3 cups bread flour (not all-purpose, the protein content matters)
- 1 ½ cups warm water (100-110°F)
- 2 teaspoons instant yeast
- 2 teaspoons kosher salt
- 1 tablespoon olive oil
- 1 teaspoon sugar
That’s it. No milk powder, no fancy Middle Eastern spices in the dough itself. Those traditional pita recipes from actual Lebanese and Greek grandmothers? They keep it simple because the technique does the heavy lifting.
Instructions To Make Pita Bread
Step 1: Mix Like You Mean It
Dump your dry ingredients into a bowl – flour, yeast, sugar, salt. Make a well in the center like you’re building a volcano in third grade.
Pour in the warm water and oil. Now here’s where most people wimp out: you need to mix this until it comes together, then let it rest for 10 minutes. This autolyse period lets the flour fully hydrate before you start kneading.
Step 2: Knead With Purpose (But Not Anger)
I knead for 8-10 minutes by hand. You’re building gluten structure here, which creates the stretchy walls that trap steam and puff.
The dough should be smooth, slightly tacky but not sticky. If it’s clinging to your hands like a toddler on the first day of daycare, add flour one tablespoon at a time.
The dough texture should pass the windowpane test – stretch a small piece thin enough to see light through without tearing.
Step 3: The First Rise (Don’t Rush This)
Oil your bowl. Place the dough ball in it, turn to coat, cover with a damp towel. Let it rise for 60-90 minutes until doubled. I know you want to speed this up. Don’t.
The fermentation here develops flavor that separates homemade from store-bought cardboard.
Step 4: Divide and Shape
Punch down the dough – actually satisfying after a long day.
Divide into 8 equal pieces (roughly 100g each if you’re weighing). Roll each into a smooth ball using the cupping method: hand over the dough, circular motions on an unfloured counter. The tension you create on the surface helps the puff later.
Step 5: Roll Out (Thickness Matters More Than You Think)
Let those dough balls rest for 20 minutes under a towel. This resting time relaxes the gluten so you’re not wrestling the dough.
Roll each ball into a 6-7 inch circle, about ¼ inch thick. Too thin? No pocket. Too thick? Dense and doughy. Quarter-inch is the sweet spot I’ve tested dozens of times.
Step 6: The Second Rest (Patience, Grasshopper)
Let your rolled pita rounds rest for another 15-20 minutes. They’ll puff slightly. This final rest ensures the dough is relaxed enough to expand rather than contract when heat hits.
Step 7: Crank the Heat to Maximum
Preheat your oven to 500°F with a baking stone or inverted baking sheet on the middle rack for at least 30 minutes. This is non-negotiable.
That thermal mass is what gives you the instant bottom heat that jumpstarts the puffing process.
Step 8: Bake Fast and Furious
Slide 2-3 pitas onto your preheated surface.
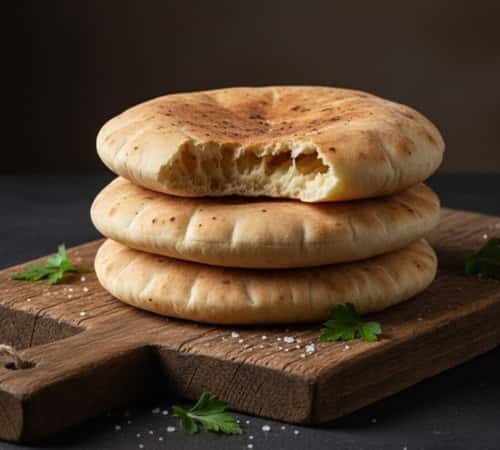
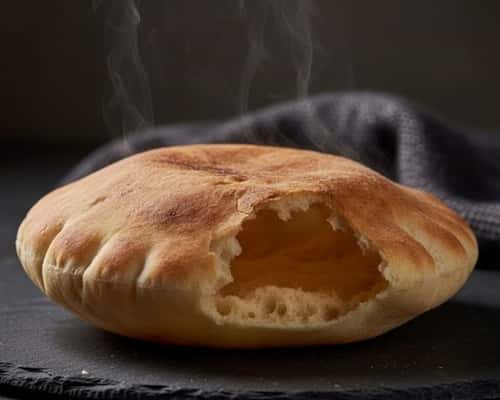
They’ll start puffing within 60 seconds if everything’s right. Bake for 3 to 4 minutes total i.e. they should balloon up like little bread pillows and show light golden brown spots. Don’t overbake. Brown pitas are hard pitas.
Step 9: The Steam Trick
Some swear by a cast-iron skillet method, flipping once. I’ve found that works too, but the oven gives more consistent results once you nail the temperature.
If you’re doing stovetop, use a heavy-bottomed pan over medium-high heat, 2 minutes per side.
What Makes This Pita Bread Recipe Different From Every Other Recipe
Most pita bread recipes tell you to use all-purpose flour and don’t emphasize the resting periods. The bread flour gives you stronger gluten, which means better structure.
Those two rest periods – one after shaping, one after rolling – are what professional Middle Eastern bakeries do and home recipes skip.
I learned this from screwing up batch after batch and finally asking my neighbor who’s from Beirut.
She laughed at my technique and showed me how her mother made them. The difference? She wasn’t in a rush, and she knew her oven lied about temperature.
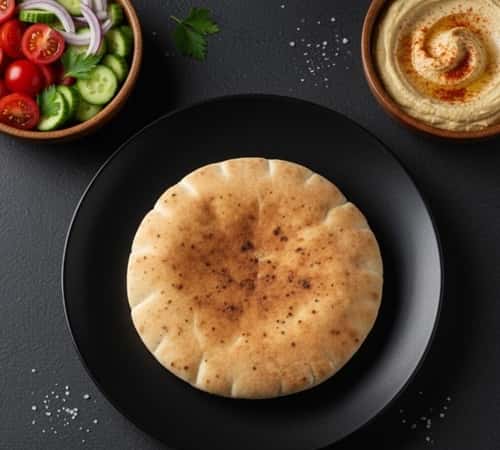
Pita Bread Serving Suggestions That Actually Work
Fresh pita pockets are incredible with hummus, falafel, or grilled chicken. I stuff mine with leftover steak, pickled onions, and a yogurt sauce when I’m feeling fancy. On lazy nights? Peanut butter and honey. Don’t judge.
You can also brush these with garlic butter right out of the oven and tear them into pieces for a Mediterranean appetizer situation. Kids demolish these, especially if you let them help shape the dough balls.
Storing and Reheating Your Pita Bread
Stack your cooled pitas in a zip-top bag. They’ll keep at room temperature for 2 days, refrigerated for a week, or frozen for 3 months.
To reheat, wrap in foil and warm in a 350°F oven for 10 minutes, or microwave for 20 seconds wrapped in a damp paper towel.
The microwave method brings back the softness surprisingly well.
Troubleshooting the Common Pita Bread Disasters
Pitas won’t puff? Your oven isn’t hot enough, or your dough was rolled unevenly. One thick spot prevents the whole thing from ballooning.
Too crispy? You overbaked them. These should be soft and pliable, not chips.
Dense and heavy? Underdeveloped gluten or you didn’t let them rest enough between steps.
Sticking to the pan? Your surface wasn’t hot enough before adding the dough.
The Real Win Here
Once you nail this homemade pita bread technique, you’ll never want the store-bought stuff again.
The fresh bread smell alone is worth it, but having warm pita that actually pockets and tastes like something? That’s dad victory material.
I make a double batch most weekends now. Half for dinner, half for the freezer. My kids request these over any sandwich bread, and honestly, I get it.
There’s something about bread you made yourself that just hits different.
Final Thoughts
The biggest lesson I learned making pita bread wasn’t about the recipe itself – it was about trusting the process over the timer.
You’ll develop an eye for when the dough feels right in your hands, when it’s risen enough, when the oven’s actually ready.
That tactile knowledge separates people who cook from people who follow instructions blindly.
Your first batch might not be perfect, but by the third or fourth, you’ll understand why artisan bread costs what it does.