Plastic Cup Shrinky Dink sounds fancy, but it’s actually one of the simplest and most satisfying crafts I’ve tried with kids. The idea is basic.
Take a clear plastic cup, draw on it, bake it, and watch it shrink into a thick little piece of art. But the magic? That never gets old.
I love this craft because it turns everyday trash into something meaningful. No special kits. No pressure to be perfect.
Kids stay engaged, adults get curious, and everyone crowds around the oven waiting for that curl-and-flatten moment.
What started as a recycled version of classic shrinky dinks has turned into ornaments, tags, keepsakes, and gifts. Once you try it, you’ll keep finding new ways to use it.
What Plastic Cup Shrinky Dink Really Means
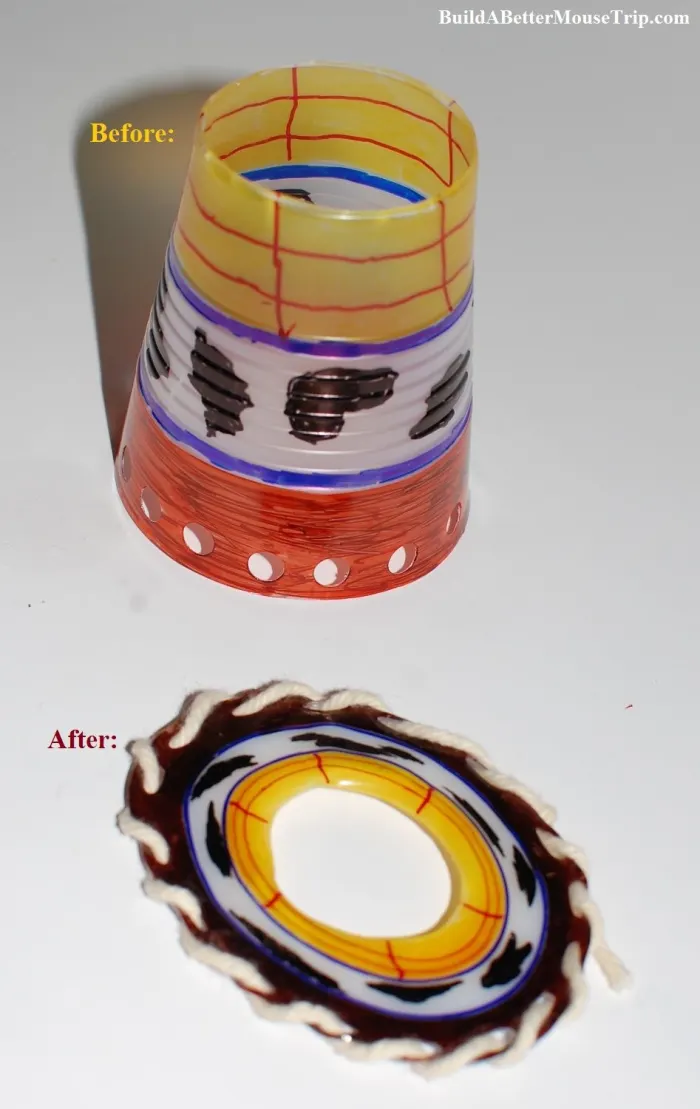
Shrinky Dinks started as this 70s/80s craft where polystyrene sheets shrink and thicken when heated.
You draw, cut, bake, and watch the magic happen – tiny charm art from big drawings.
Now people are taking that idea off the shelf and using #6 plastic cups – you know, those flimsy clear cups – drawing with sharpies, baking them, and turning them into mini art pieces just like classic Shrinky Dinks but with stuff from the recycle bin.
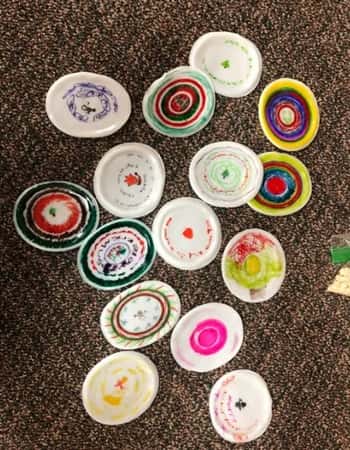
11 Unique Plastic Cup Shrinky Dink Ideas
Here are 14 Unique Plastic Cup Shrinky Dink ideas curated from different sources, that’s super unique.
1. Christmas Cup Ornaments
Credit: @misssabath Via Instagram
I keep coming back to this during holidays. These ornaments feel nostalgic and modern at the same time.
Instagram creators are using cup bottoms to draw snowflakes, names, dates, even paw prints. After baking, they flatten perfectly and look like acrylic ornaments. I like how lightweight they are.
No fear of breaking. Great for kids, teachers, and grandparents. The best part? You can punch holes before baking, which saves so much effort later.
Watching the reels helps because timing matters here. Too long and they curl weird. Too short and they won’t flatten.
2. Dog Mama’s Magic Ornament
Credit: @agirlandagluegun Via Instagram
This is one of those crafts that looks almost too simple until you try it. I spotted this on Instagram and instantly saved it.
You take a clear plastic cup, cut the bottom, flatten it, and let kids (or let’s be honest… yourself) draw a name, paw print, or little message.
Then it goes into the oven and shrinks down into a thick, glossy ornament. No special tools. No fancy supplies.
Just draw, bake, and hang. It’s perfect for dog moms, pet lovers, or anyone wanting a quick keepsake that actually feels personal. Watching the shrink happen is half the fun.
3. Teacher Craft Ornament
This one feels like it was tested in real chaos, and I love that. I found this idea in a Facebook video shared by a teacher who actually made shrink cup ornaments with a full classroom.
That alone tells you it works. Kids decorate plastic cup pieces with markers, teachers handle the baking, and everything shrinks down into neat little ornaments. No special kits. No expensive supplies.
Just cups, markers, and an oven. What I like most is how forgiving this craft is.
Even imperfect drawings look adorable once they shrink. It’s perfect for classroom parties, teacher gifts, or group activities where simple matters.
Watch the full plastic cup shrinky dink craft here.
4. YouTube Cup Shrinky Dink Ornaments
Sometimes you just need to see it happen, and this YouTube video does exactly that.
It takes regular clear party cups and turns them into flat, sturdy shapes that look perfect as holiday ornaments or gift tags.
I like this one because the creator shows the full process in real time, including the curling and flattening part that usually makes people nervous.
You can actually see how long to bake and when to pull them out.
It’s great for beginners who want visual confidence before trying it at home. After watching once, the whole process feels way less intimidating.
5. Holiday Tag Crafts
Credit: @lovedby2mom Via Instagram
This idea feels old-school in the best way. I came across it on Instagram and instantly thought, why don’t we do this more? People are using the bottoms of plastic cups to create reusable holiday gift tags.
Just simple shapes. Hearts, stars, initials, names. You draw, bake, shrink, and suddenly you have thick little tags that feel almost like acrylic.
What I love is that they’re not one-time use. You can bring them out every year. It’s a small craft, but it adds so much personality to gifts.
If you want something quick that still feels thoughtful, this one really works.
6. Facebook Kid Group Shrinky Cups
Credit: Meghan Christensen via Facebook
This one feels very real, and that’s why I trust it.
In a parent craft group on Facebook, someone shared photos and videos of kids making shrink cup art at home. Markers everywhere. Cups cut a little uneven. Big smiles when the plastic starts curling in the oven.
I love ideas like this because they aren’t perfect, and they’re not meant to be.
Parents talk in the comments about what worked, what didn’t, and how their kids reacted.
It’s messy, loud, and full of excitement. If you want a craft that feels like actual family time instead of a polished tutorial, this is it.
Real home vibe and messy fun at Facebook
7. YouTube Shrinky Dink Ornament Tutorial
This YouTube tutorial is great if you like clear steps and no guessing. The creator walks through patterns, cutting tips, and exact heat times, but instead of using store-bought Shrinky Dink sheets, they use plastic cup material.
That’s what makes it so useful. You get to see how cup plastic behaves differently in the oven.
I like that they show mistakes too, like what happens when it curls too much or bakes too long.
If you’re a visual learner or trying this for the first time, watching someone do it from start to finish makes the whole craft feel doable and way less intimidating.
8. Pinterest Plastic Cup Shrink Ideas
Whenever I feel stuck or bored with the same designs, I head straight to Pinterest.
There are entire boards filled with plastic cup shrink ideas, and honestly, it’s like opening a craft sketchbook.
Tiny animals, holiday shapes, name tags, jewelry pieces, all made from simple cup plastic. You don’t copy one idea exactly. You mix them.
A shape from one pin, colors from another, lettering from somewhere else. That’s what makes Pinterest so useful for this craft.
If you’re a visual thinker and want endless inspiration before you start cutting cups, the full board on Pinterest is worth scrolling through.
Check out the full article here at Pinterest
9. DIY Red Solo Cup Shrinkies

Credit: craftytexasgirls.com
This one caught me off guard in the best way. A craft blog showed how the bottoms of red Solo cups can be turned into bold, wearable shrinkies.
Once baked, the red plastic becomes thick and vibrant, almost like enamel. The creator turned them into pins and small badges, and honestly, they looked store-bought.
I like this idea because it pushes the craft beyond clear plastic. It opens up color options without extra supplies.
If you’re tired of transparent designs and want something that really pops, experimenting with red Solo cups is a fun twist worth trying.
Check this craft out at craftytexasgirls.com
10. HubPages Plastic Cup Ornaments
Credit: HubPages
Sometimes you just want written instructions without jumping between videos.
That’s why this HubPages guide works so well. It walks through the entire plastic cup shrink process step by step.
From decorating the cup pieces and punching holes, to baking and flattening them at the right moment.
What I really like is that it goes beyond ornaments. They also show how to turn shrink cups into magnets and small keepsakes.
It’s practical, straightforward, and beginner-friendly. If someone reading your article wants a calm, no-rush explanation they can follow at their own pace, this is a great source to send them to.
Check out the full instructions at HubPages.
11. Teacher Science Shrinky Experiment
This idea is perfect when you want more than just a craft. A teacher shared a video showing plastic cup shrink art as a simple science experiment.
Kids draw shapes, measure them, bake the plastic, and then compare the size before and after. It’s hands-on learning without feeling like a lesson.
I love how it mixes creativity with curiosity. The kids aren’t just watching it shrink, they’re asking why it happens.
This works beautifully for classrooms, homeschool setups, or rainy-day learning at home.
If you want full instructions and real inspiration, the source linked here explains it clearly and visually.
Final Thoughts
What I really love about Plastic Cup Shrinky Dink crafts is how flexible they are.
This isn’t about following rules or copying one perfect design. It’s about experimenting. One cup shrinks perfectly. Another curls funny. Both are fine. That’s part of the charm.
These projects also create moments, not just decorations. Kids remember watching the plastic move. Adults remember the laughs and small surprises.
If you’re looking for crafts that don’t demand expensive supplies or flawless results, this is it. Start small. Test one cup. Try a new idea each time.
The real value isn’t the ornament or tag you end up with. It’s the creativity, curiosity, and confidence that come with making something from almost nothing.


