I started playing with clay because my kid wanted “tiny food for toys.” That’s how 11 Polymer Clay Food Miniatures became a thing on my craft table. No pressure. No fancy tools.
Just clay, curiosity, and a lot of “oops moments.” These mini foods look real enough to smile at, but homemade enough to feel proud.
Today we begin with Swiss roll, bread, and pastries. Slow hands. Simple steps. Anyone can do this, even if you think you can’t.
1. Polymer Clay Swiss Roll Miniature
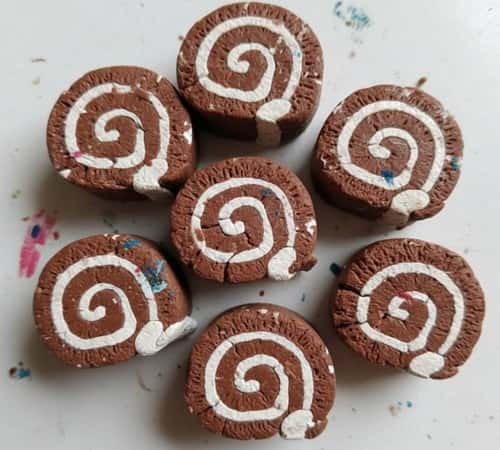
This one always looks impressive, even when done badly. That’s why I love it.
I start with two clay colors. One light cream for the cake. One brown or pink for the filling. Condition both clays well. Soft clay matters here. If it cracks, the roll will cry later.
Flatten the cake color into a thin rectangle. Not perfect. Uneven edges are fine. Then roll the filling color into a thin snake and flatten it slightly. Place it on one end of the rectangle.
Now comes the fun part. Roll slowly. Don’t rush. Use your fingers, not tools. If it squishes, it squishes. I’ve messed this up many times.
Once rolled, gently squeeze to shape it round. Cut tiny slices using a blade or old knife. You’ll see the swirl. That swirl never comes out same twice and that’s okay.
Add texture using a toothbrush. Very lightly. Poke small dots on the outer layer. For realism, I sometimes add pastel dust or scraped chalk on top. It looks baked-ish.
Bake as per clay instructions. Let it cool fully. Don’t touch hot clay, I did once and regretted it.
Is it perfect? No. Does it look edible? Kind of yes.
2. Polymer Clay Sliced Sandwich Bread Miniature
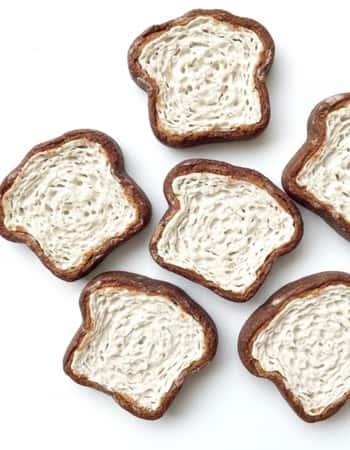
This teaches patience. And patience is hard.
Step 1: Condition light beige clay. Roll it into a short rectangle block. Slightly taller than wide.
Step 2: Round the top edges gently to form the bread dome. Keep bottom flat. Bread needs a base.
Step 3: Texture the surface using crumpled foil. Light taps only. I repeat this because it matters.
Step 4: Create crust color by mixing a darker brown. Rub lightly along the top and edges using your finger.
Step 5: Bake the loaf whole first. Let it cool completely. Cutting before baking ruins the shape.
Step 6: Once cooled, use a sharp blade to slice thin pieces. Slow cuts. One slice at a time. If it cracks, don’t panic.
Step 7: Sand lightly if needed, but I usually skip this. Homemade bread slices are never perfect.
Stack the slices slightly crooked. That’s how they look real.
3. Polymer Clay Bread Loaf Miniature
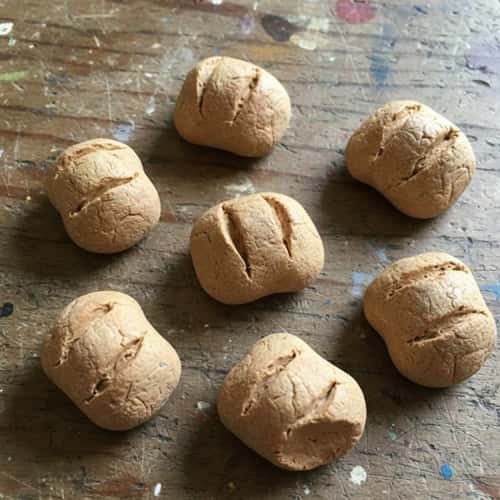
Bread is forgiving. Like really forgiving.
Take beige or light brown clay. Condition it until smooth. Roll it into a small log shape. That’s it. Already looks like bread, right?
Now shape the top slightly rounder than the bottom. Bread isn’t flat-bottom perfect in real life. Use a blade to make one long cut on top. Or three diagonal cuts. Don’t overthink. Crooked cuts look real.
Texture matters here. Dab lightly with aluminum foil. This gives that baked bread skin look. I learned this trick after ruining three loaves, so trust me.
For color depth, mix a darker brown and lightly rub it on the surface using your finger. Focus on the cuts and edges. It gives that oven-baked illusion.
Bake it. Let it cool. After cooling, you can sand lightly if needed but I rarely do. Homemade bread is not smooth anyway, why should clay be.
Sometimes the loaf leans a bit. Let it lean. Bread has personality.
4. Polymer Clay Croissant Miniature
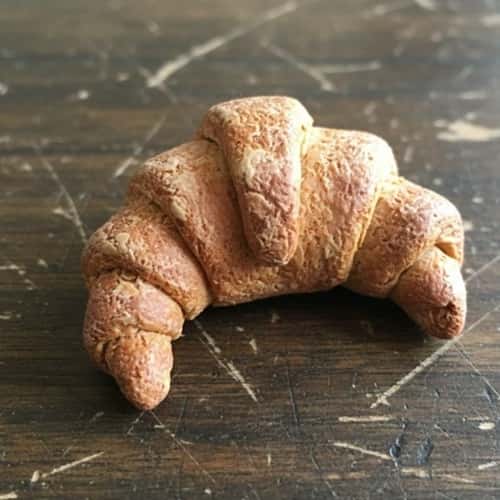
This looks scary but it’s actually very logical if you go step by step.
Step 1: Choose a light brown or beige polymer clay. Condition it until soft. If it cracks now, it will crack worse later, trust me.
Step 2: Roll the clay into a small ball. Flatten it gently into a triangle shape. The base should be wider than the tip. Don’t worry if sides are uneven, croissants are moody.
Step 3: Using a blade or toothpick, lightly score lines from the wide base toward the tip. These lines help when rolling and add texture later.
Step 4: Start rolling from the wide end. Roll slowly toward the tip. Do not pull. Just guide it. If the tip breaks, press it back. Clay forgives.
Step 5: Once rolled, bend both ends slightly inward to form that classic crescent shape. Not too perfect. Mine always lean a bit.
Step 6: Tap lightly with crumpled foil for flaky texture. Very light pressure. Heavy hand ruins it.
Step 7: Bake according to clay instructions. Let it cool fully before touching. Cooling matters more than people think.
5. Polymer Clay Pastries (Simple Bun Style)
Pastries are chaos. I love that.
Start with light brown or tan clay. Roll small balls. Flatten them just a little. That’s your base bun.
Now add layers. Take a thin snake of slightly darker clay and wrap it loosely on top in a spiral. Don’t press too hard. Gaps are good. Real pastries puff and crack.
Use a toothpick to add random lines. Not symmetrical. If it looks wrong, you’re doing it right. I always tell my kid this and myself too.
For glaze effect, you can brush a tiny bit of liquid clay on top before baking. It gives shine. If you skip it, no problem. Dry pastries exist.
After baking, use chalk pastel dust on edges to darken them. Focus on corners. That’s where baking magic happens.
These pastries look best when slightly misshapen. Overworked ones look fake.
Why aim for bakery display when home kitchen vibes are better?
6. Polymer Clay Jam-Filled Bun Miniature
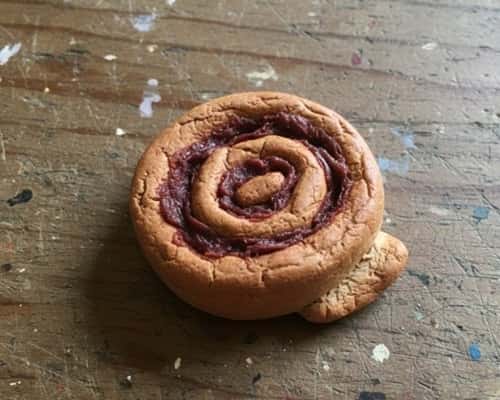
This one is fun because mistakes look intentional.
Step 1: Condition two colors: light brown for the bun and red or dark pink for jam. Soft clay is mandatory here.
Step 2: Roll the bun clay into a small ball. Flatten it slightly into a thick disc. Keep edges rounded.
Step 3: Using a dotting tool or toothpick, press a shallow hole in the center. Not all the way through. Just a dent.
Step 4: Roll a tiny ball of jam-colored clay. Place it inside the dent. Gently press so it sits flush but still visible.
Step 5: Use a toothpick to lightly swirl the jam. Don’t overmix. Jam should look messy. Real jam never behaves.
Step 6: Add texture by tapping the bun surface with a toothbrush. Avoid the jam area.
Step 7: Optional: add tiny pastel shading around the edges for baked effect. Then bake and cool completely.
Sometimes the jam spills sideways. Let it. That’s character.
7. Polymer Clay Chocolate Roll Miniature
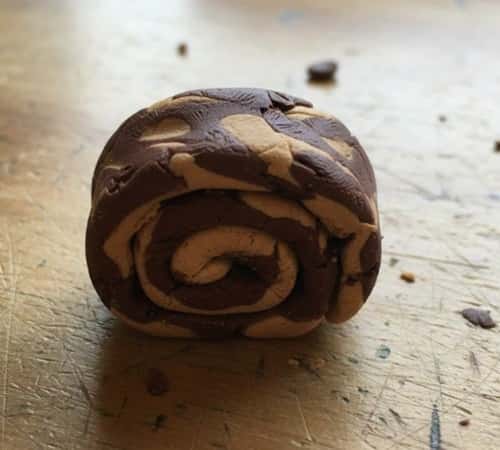
This is like the Swiss roll’s darker cousin. More forgiving, more dramatic.
Step 1: Condition dark brown clay for the cake and light brown or cream clay for the filling. Both should be soft, not sticky.
Step 2: Flatten the dark brown clay into a thin rectangle. Keep it even, but don’t chase perfection. Crooked edges are fine.
Step 3: Roll the filling clay into a thin sheet or rope. Place it along one short edge of the rectangle.
Step 4: Slowly roll the clay from the filling side. Use gentle pressure. If it squashes, pause and reshape.
Step 5: Once rolled, lightly pinch the ends to seal. You don’t want the filling popping out too much.
Step 6: Add texture using a toothbrush or needle tool on the outside. Chocolate cakes are never smooth.
Step 7: Bake and cool fully. After cooling, lightly dust with white pastel for a powdered sugar look.
I always end up with uneven spirals. That’s normal. Bakery photos lie.
8. Polymer Clay Donut Miniature
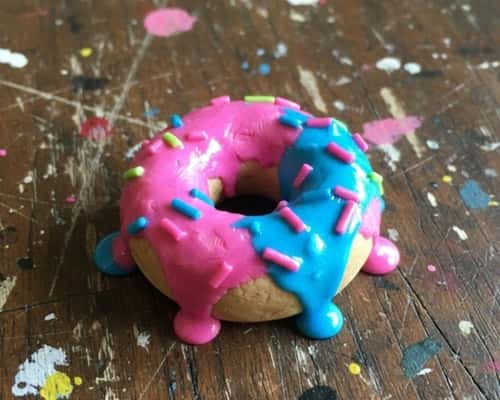
Donuts are beginner-friendly but details make them believable.
Materials & Prep
- Light brown clay (base donut)
- Dark brown or pink clay (glaze)
- Toothpick
- Blade
- Soft brush or fingertip
Step-by-Step Process
- Condition the light brown clay until smooth
- Roll into a small ball, then gently flatten
- Use a toothpick to poke a hole in the center
- Rotate the toothpick slowly to widen the hole
- Shape edges round, donuts hate sharp edges
Glazing
- Roll glaze clay into a thin sheet
- Cut a rough circle, place it on top
- Press lightly so it hugs the donut shape
- Use a toothpick to make drip marks
- Uneven drips look more real, neat ones look fake
Finishing
- Texture lightly with a toothbrush
- Bake fully and cool
- Add pastel shading if you want depth
Some donuts turn oval. Mine always do. Still donuts.
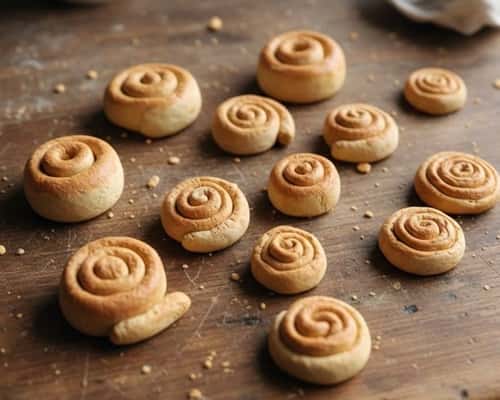
9. Polymer Clay Cinnamon Roll Miniature
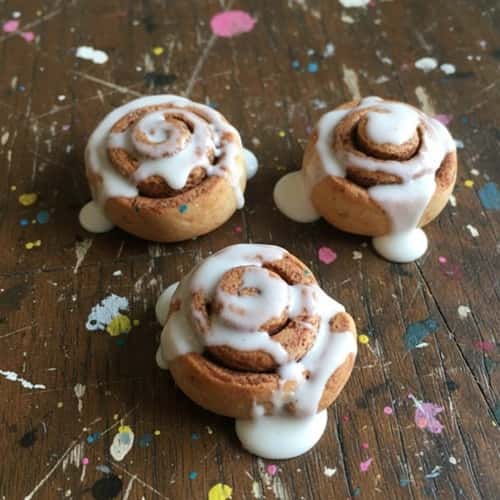
This one smells imaginary but feels real.
Step 1: Condition beige clay for dough and dark brown clay for cinnamon filling.
Step 2: Flatten the beige clay into a thin rectangle. Keep it flexible, not stiff.
Step 3: Roll the brown clay into a very thin snake. Flatten it slightly and place it across the rectangle.
Step 4: Roll the rectangle tightly from one end. Cinnamon rolls need tighter spirals than cake rolls.
Step 5: Cut small slices using a blade. Each slice becomes one roll.
Step 6: Press lightly on the top to flatten just a bit. Don’t squash the spiral.
Step 7: Optional icing: add tiny white clay drips after baking, or liquid clay before baking. I prefer messy icing, not neat.
Some rolls lean sideways after baking. I never fix it. Real ones do that too.
10. Polymer Clay Cream-Filled Pastry Miniature
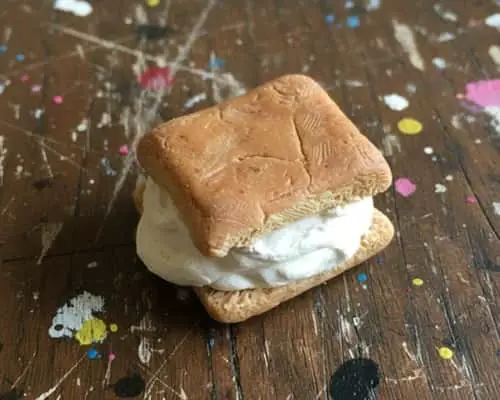
This looks fancy but is secretly simple.
Step 1: Condition light brown clay for pastry and off-white clay for cream.
Step 2: Roll the pastry clay into a small oval. Slightly flatten it.
Step 3: Using a blade, cut the oval lengthwise halfway through. Don’t cut fully. Just create an opening.
Step 4: Roll tiny cream clay into a thin snake. Tuck it into the cut opening. Let it bulge a little.
Step 5: Use a toothpick to gently texture the pastry surface. Random lines only.
Step 6: Add light shading using chalk pastels on edges. Focus on corners and cracks.
Step 7: Bake and let cool completely. Cream should look soft, not sharp.
Sometimes the cream sticks out too much. That’s okay. Overfilled pastries exist.
11. Polymer Clay Mini Pastry Slice (Cake Shop Style)
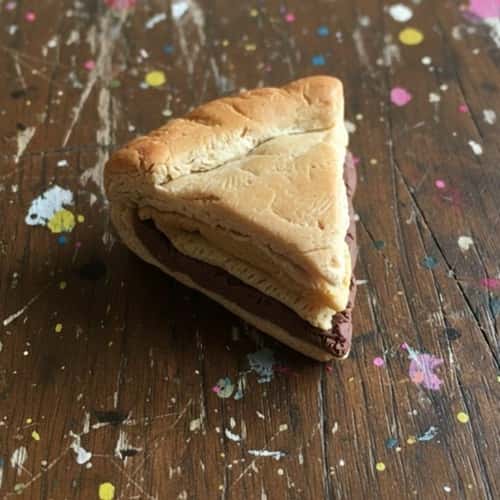
This one teaches patience. And restraint. I fail both sometimes.
Materials
- Cake color clay (yellow or beige)
- Filling color (brown, pink, cream)
- Blade
- Toothpick
Step-by-Step Construction
- Roll cake clay into a small rectangle block
- Roll filling clay into a thin sheet
- Stack cake–filling–cake like a sandwich
- Press gently to bond layers
Shaping
- Trim edges slowly using a blade
- Shape into a triangle or rectangle slice
- Round corners slightly, cakes aren’t sharp
Details
- Use toothpick to add crumb texture
- Add tiny dots for air pockets
- Optional: tiny topping ball on top
Baking
- Bake fully
- Cool completely before handling
If layers shift while baking, don’t fix it. Bakeries sell worse.
Final Thoughts
Here’s something most tutorials skip. Miniatures don’t need skill first, they need observation. Look at real food closely. Burns. Cracks. Overflows. That’s what sells realism.
Kids naturally get this because they don’t overcorrect. Adults ruin things by fixing too much. Polymer clay rewards restraint. Stop one step early. Let mistakes sit.
That’s where handmade magic lives. And honestly, the moment it looks slightly wrong is usually when it starts looking real.


