Look, I’m not going to sugarcoat this. Making sourdough bread from scratch seemed impossible until I cracked the code in my own kitchen.
You’ve probably scrolled past a dozen Sourdough bread recipe posts that promise “easy” results but leave you with a dense hockey puck.

This one’s different – I’m giving you the real deal, the artisan bread method that transformed my weekend mornings and made me the hero of family breakfast.
Why This Sourdough Bread Recipe Beats Everything Else
Here’s what nobody tells you about natural leavening: it’s not about following a rigid timeline.
Most sourdough recipes treat you like a robot, demanding you check your dough every hour on the hour. That’s garbage.
I’ve got three kids, a job, and a life – my fermentation schedule works around me, not the other way around.
The secret? Understanding your starter’s activity rather than babysitting it. I learned this after my fifth failed attempt left me with what resembled a frisbee more than bread.
My wild yeast didn’t care about the clock. It cared about temperature, feeding ratios, and getting the right hydration level. Once I figured that out, everything changed.
The Starter: Your New Sourdough Pet
You need an active sourdough starter that’s fed and bubbly. Mine’s named Gerald (yeah, I’m that guy).
Feed Gerald – or whatever you call yours – with equal parts all-purpose flour and water about 4 to 6 hours before you start.
You want it doubled in size, smelling slightly tangy, and passing the float test.
Don’t have a starter yet? You can make one in about a week, but that’s another story.
For now, borrow some from a friend or grab dried sourdough culture online. The fermentation process waits for no one, and you’ve got bread to bake.
Ingredients Needed To Make Sourdough Bread Recipe
- 100g active sourdough starter (fed and at peak)
- 500g bread flour (high protein content matters here)
- 350g water (filtered if your tap tastes like a swimming pool)
- 10g salt (don’t skip this – it controls the yeast activity)
That’s it. Four ingredients. No fancy additives, no weird dough conditioners, no nonsense.
This is rustic bread the way it’s been made for centuries, and the gluten development happens naturally through time and technique.
Instructions To Make Sourdough Bread Recipe
Step 1 : The Mix – Where Most People Screw Up
Combine your starter, water, and flour in a large bowl.
Don’t add the salt yet – this is crucial for proper autolyse. Mix until there’s no dry flour visible. It’ll look shaggy and rough. That’s exactly what you want.
Let this mixture rest for 30 to 60 minutes. This autolyse period lets the flour fully hydrate and begins gluten formation without you doing anything.
I usually set this up, then help with homework or throw in a load of laundry. See? Sourdough baking fits real life.
After the rest, sprinkle the salt over your dough and squish it in with wet hands. Pinch and fold until it’s incorporated.
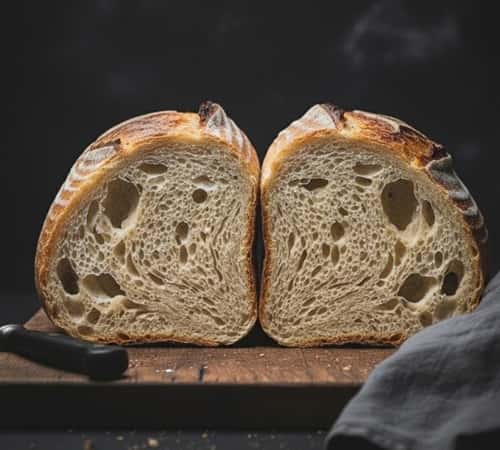
The dough will feel slippery and sticky – resist adding more flour. This wet dough is what gives you those beautiful open crumb holes everyone obsesses over.
Step 2: Bulk Fermentation – The Waiting Game Worth Playing
Transfer your dough to a clean container. Now comes the bulk rise, which takes 4-6 hours at room temperature.
But here’s my trick: I do stretch and folds every 30 minutes for the first 2 hours, then leave it alone.
For each stretch and fold, wet your hands, grab one side of the dough, stretch it up, and fold it over itself.
Rotate the bowl 90 degrees and repeat four times. You’re building gluten structure without kneading. This dough handling technique transformed my bread texture from dense to airy.
Watch the dough, not the clock. You’re looking for a 50% increase in volume, visible bubbles on the surface, and a jiggly, alive feel when you shake the container.
The fermentation speed depends on your kitchen temperature – warmer means faster, cooler means slower. I’ve done this in 4 hours during summer and 8 hours in winter.
Step 3: Shaping – The Make-or-Break Moment
Dump your dough onto a lightly floured surface.
Don’t punch it down like some maniac – you’ve spent hours creating those gas bubbles. Gently coax it into a rough rectangle.
Pre-shape by folding the edges toward the center, creating tension on the surface. Let it rest for 20 minutes under a towel. This bench rest relaxes the gluten and makes final shaping easier.
For the final shape, flip the dough seam-side up. Fold the bottom third up, then the top third down like a letter. Rotate 90 degrees and roll it toward you, creating a tight cylinder.
The goal is surface tension – that tight skin holds the shape during baking.
The Overnight Proof: Sleep While Magic Happens
Place your shaped dough seam-side up in a banneton or a bowl lined with a heavily floured towel. Cover it and stick it in the fridge for 12 to 16 hours.
This cold fermentation develops incredible flavor – those complex tangy notes that make sourdough special.
I shape mine around 9 PM and bake the next morning. The retarding process also makes the dough easier to score because it’s firmer when cold.
Plus, you can bake fresh bread for breakfast without waking up at 4 AM. Win-win.
Step 4: Baking – Hot and Fast
Preheat your oven to 500°F (260°C) with a Dutch oven inside for at least 45 minutes.
This high heat is non-negotiable for proper oven spring – that dramatic rise in the first few minutes of baking.
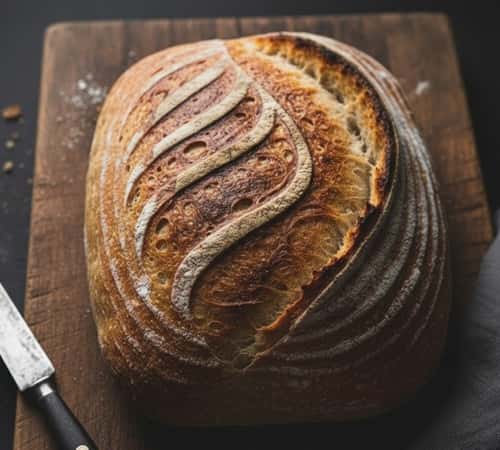
Carefully flip your dough onto parchment paper. Score it with a sharp blade or lame – one decisive slash about ½ inch deep.
This scoring pattern controls where the bread expands and looks badass.
Drop the dough (parchment and all) into your screaming-hot Dutch oven. Cover it and reduce heat to 450°F (230°C).
Bake covered for 20 minutes, then remove the lid and bake another 25-30 minutes until deep golden brown.
The crust development happens in that second phase – you want dark, not blonde.
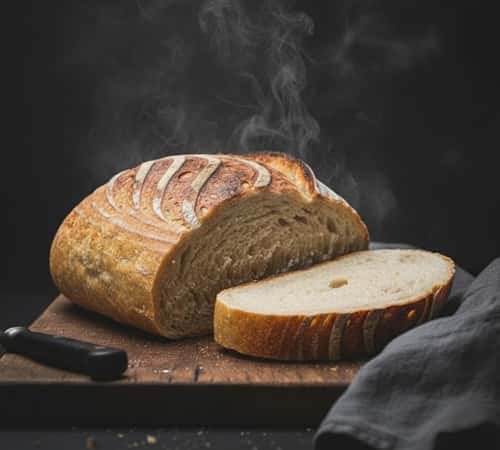
When you pull it out, the crust should sound hollow when tapped. Resist cutting into it immediately. I know it’s torture, but let it cool for at least an hour.
The crumb structure is still setting, and hot bread cuts into a gummy mess.
Troubleshooting: When Things Go Sideways
Dense bread? Your starter might be sluggish, or you didn’t ferment long enough. The yeast needs time to produce carbon dioxide that creates lift.
Dough too sticky to handle? That’s actually okay for high hydration bread. Keep your hands wet and work quickly. More flour creates a tighter, less open crumb.
No oven spring? Check your starter strength and make sure you’re creating enough surface tension during shaping. Also, your oven might not be hot enough – get an oven thermometer.
Burnt bottom? Put a baking sheet on the rack below your Dutch oven to diffuse heat. Some ovens have hot spots that’ll torch your bread before the inside cooks through.
The Variables That Matter Most
Temperature controls everything in sourdough baking. My kitchen ranges from 68°F in winter to 78°F in summer, and I’ve learned to adjust fermentation times accordingly. Warmer speeds up yeast activity, cooler slows it down.
Flour quality matters more than you think. That bargain bin flour won’t give you the same gluten strength as good bread flour.
I use King Arthur or similar – the protein content should be 12-13% for proper structure.
Water hydration is where you can experiment once you’ve mastered the basic ratio.
This recipe sits at 70% hydration (350g water to 500g flour), which is manageable for beginners but still produces an open crumb. Go higher for more holes, lower for easier handling.
Making It Your Own
Once you nail the basic Sourdough bread recipe, start playing. I’ve added whole wheat flour (swap 100g of bread flour), folded in roasted garlic and rosemary, even made sourdough boules with cheese and jalapeños. The fermentation is forgiving enough to handle mix-ins.
My kids love when I shape it into rolls instead of a single loaf. Same dough, different presentation – divide after bulk fermentation, shape into smaller portions, and reduce baking time to about 25 minutes total.
Some weekends I make two loaves at once, freeze one, and have homemade bread ready whenever.
Just let it thaw on the counter and warm it in a 350°F oven for 10 minutes. Tastes bakery-fresh.
Final Thoughts
The real victory with sourdough isn’t just the bread itself – it’s proving to yourself that you can create something legitimately impressive with your own hands.
I’ve bought fancy artisan loaves from bakeries charging $8 to $12, and honestly, mine taste better because I control every variable from starter to crust.
Your family will remember the smell of fresh bread filling the house way longer than they’ll remember another store-bought loaf.
And here’s something I didn’t expect: the patience sourdough demands actually makes you better at other things.
You learn to read the signs, adjust on the fly, and trust the process—skills that translate beyond your kitchen counter.