So, St Patrick’s Day is creeping up and you want to do something with your hands this year – something that actually feels fun and not like a chore.
That’s where a good St Patrick’s day clay craft saves the day.
Whether you’re doing this with your kids on a rainy afternoon or flying solo with some music on, clay is honestly one of the most forgiving materials to work with.
You don’t need to be an artist. You don’t need a kiln. You just need some polymer clay, a little patience, and these ten ideas to get you started.
1. Shamrock Pinch Pot
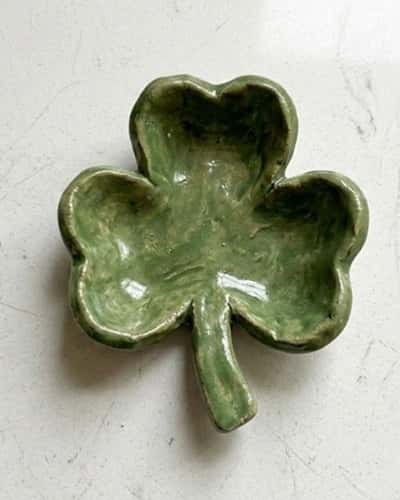
Okay, let’s start with something that feels almost too simple – but trust me, the result is adorable.
This is a tiny dish or bowl shaped like a shamrock, perfect for holding rings, small coins, or just sitting on a shelf looking festive.
What you’ll need:
- Green polymer clay (any shade – dark forest green or bright lime both work beautifully)
- A rolling pin or a smooth drinking glass
- A sharp knife or craft blade
- A pencil or toothpick for detailing
- Oven (for polymer clay) OR air-dry clay if you prefer skipping the baking step
Here’s how you do it:
Start by conditioning your green clay – that just means kneading it in your hands for a couple of minutes until it’s warm and soft.
Cold polymer clay is stiff and cracks easily, so don’t skip this part. Roll it into a ball about the size of a golf ball, maybe slightly bigger if you want a deeper dish.
Now press your thumb into the center of the ball and start pinching the walls upward and outward.
Work slowly and rotate the clay as you go, so you’re building an even thickness all around.
You’re aiming for walls that are roughly 4 to 5mm thick – thin enough to look delicate but thick enough that they won’t collapse.
Once you have a basic bowl shape, gently flatten the bottom by pressing it lightly on your work surface.
Here’s the fun part – shaping the rim into a shamrock. Use your fingers to pinch three rounded lobes around the top edge, spacing them evenly like the three leaves of a clover.
Each lobe should curve outward gently. Then use a toothpick to press a shallow vein line down the center of each lobe – this tiny detail makes it look so much more intentional and finished.
For the stem, roll a tiny thin rope of green clay, curve it slightly, and press it onto the base of the bowl on the outside. Smooth the join so it looks like it’s growing right out of the dish.
If you’re using polymer clay, bake according to the package instructions i.e. usually around 275°F (130°C) for about 15 to 20 minutes depending on thickness.
Let it cool completely before touching, because warm polymer clay is still slightly soft and you can accidentally dent it.
Once cool, you can leave it matte or add a thin coat of clear gloss varnish to give it that slightly polished, ceramic-ish look.
Honestly, this is one of those March clay craft projects that takes maybe 30 minutes and looks way more impressive than the effort involved.
2. Clover-Leaf Magnet Set
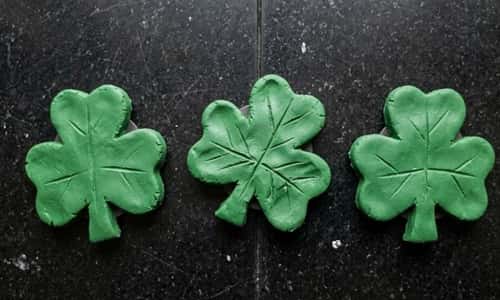
Who doesn’t love a fridge magnet? This is a super practical clay shamrock project that actually gets used year-round – not just stuffed in a drawer after the holiday.
What you’ll need:
- Green polymer clay (a few shades if you want variety)
- Small circle or teardrop cookie cutter (OR just use a bottle cap)
- A toothpick
- Small round magnets (the flat disc kind, about 10 to 12mm wide – find them at any craft store or online)
- Strong adhesive glue (E6000 or similar)
- Rolling pin
Step-by-step:
Condition your green clay and roll it out to about 3mm thickness – roughly the thickness of two stacked pennies.
Use a small round cutter or bottle cap to punch out circles, about 2.5 to 3cm in diameter. You’ll need three of these per shamrock, so cut out multiples.
Take three circles and arrange them in a clover shape – two side by side at the top, one centered below, overlapping just slightly where they meet in the middle.
Press them together gently at the join points. For the stem, roll a tiny thin strip and press it below the bottom circle, curving it slightly to one side.
Use a toothpick to add a leaf vein down the center of each circle – a single line from the join to the outer edge.
Add a tiny curved line on each side of the center vein to give it that botanical feel.
Now here’s something people skip and then regret – before baking, press a flat magnet gently into the back of the shamrock. Not all the way through, just deep enough that it sits flush.
If you press it in now, the clay bakes around the edges and holds it in place far better than glue alone.
If the magnet is thin and you’re worried about it showing through, just bake without it and glue it on after.
Bake flat on a piece of parchment paper at your clay’s recommended temperature.
Once completely cool, if you didn’t embed the magnet, use a strong adhesive to attach it to the back. Let the glue cure fully – usually 24 hours for E6000 – before sticking it on the fridge.
Make a few in different greens. Dark green, sage, bright emerald – a whole set of these clover-shaped clay decorations looks really charming clustered together on a fridge.
3. Lucky Coin Charm Necklace
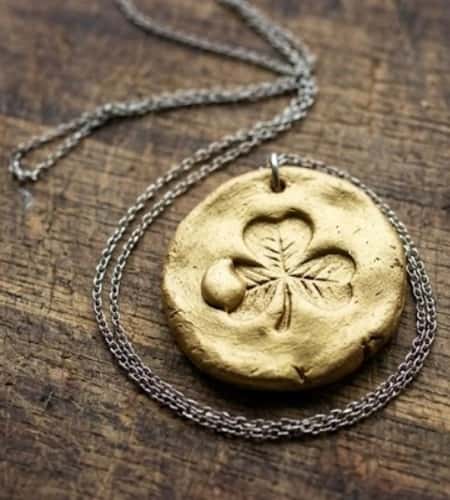
This one is a bit more fiddly but so worth it – a little flat clay pendant shaped like a gold coin with a shamrock stamped into it. It’s the kind of thing you’d actually wear on St. Patrick’s Day.
What you’ll need:
- Gold or yellow polymer clay (or white clay you’ll paint gold after baking)
- A small shamrock-shaped stamp or DIY one from foam
- Toothpick or skewer
- Jump ring (small metal loop for jewelry, from any craft store)
- Chain or cord necklace
- Gold acrylic paint + brush (if using white clay)
- Clear gloss sealer
How to make it:
Roll your gold clay into a ball about the size of a large marble, then flatten it into a disc – aim for 4 to 5mm thick and about 2.5cm across.
The edges don’t need to be perfectly circular. A slightly imperfect coin looks way more charming and handmade than a perfect one.
Press your shamrock stamp firmly into the center of the coin.
If you don’t have a stamp, use a toothpick to draw a shamrock outline by pressing the tip into the clay – it’s slower but totally doable. You can also press a small leaf-shaped cutter in three overlapping spots.
Around the outer edge, use a toothpick to press a series of small dots all the way around – like the milled edge of a real coin. This one detail really elevates the whole thing.
Now, and this is important – before baking, use a toothpick or skewer to make a hole near the top of the coin.
Make it slightly bigger than you think you need, because the clay will shrink ever so slightly and you need to fit a jump ring through it. Push the skewer all the way through cleanly.
Bake flat on parchment paper. If you used white clay, once it’s fully cooled, dry brush gold acrylic paint over the raised shamrock design and dots.
Let most of the gold sit in the recessed areas and leave the flat surface slightly lighter – this creates a gorgeous antique coin effect.
Seal with clear gloss, then once dry, thread a jump ring through the hole and attach to your chain or cord.
This diy St Patricks Day jewelry piece genuinely looks like something you’d find at a craft fair.
4. St. Patrick’s Day Rainbow Hanging Decoration
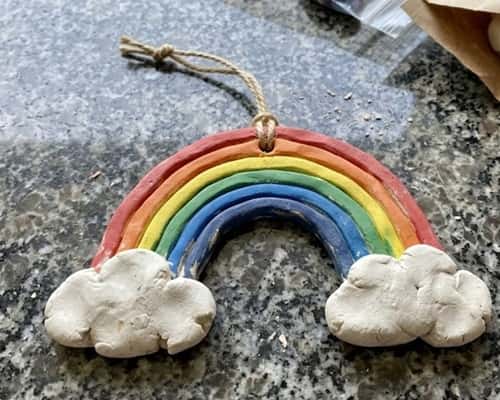
A rainbow with cloud ends – but make it clay.
This is such a satisfying St Patricks Day clay ideas project because you’re working with multiple colors and the result is chunky, tactile, and genuinely beautiful hung on a window or wall.
What you’ll need:
- Polymer clay in red, orange, yellow, green, blue, purple (even just 4-5 colors works)
- White polymer clay (for clouds)
- A ruler or straight edge
- Sharp craft knife
- Twine or thin ribbon
- Toothpick
Making it:
Roll each color of clay into a long rope – about 6 to 7mm thick and roughly 15cm long.
Lay them side by side and gently flatten them slightly so they stick together at the sides.
Curve the whole thing into an arch shape by bending it gently – work slowly so the ropes don’t separate. If they do pull apart, just press them back together at the join.
For the clouds, take white clay and roll it into a rough oval.
Then press three smaller balls of white clay along the top edge to create that classic puffy cloud silhouette.
Flatten the bottom slightly so it’s flat and sits cleanly. Make two clouds – one for each end of the rainbow arch.
Press one cloud onto each end of the rainbow, covering the cut ends of the color ropes.
Blend the cloud clay slightly into the rainbow edge so they look connected rather than just plopped on top.
Use a toothpick to add texture to the clouds – small circular swirls pressed into the surface look great.
Before baking, press a small loop of wire or a folded piece of tin foil into the top of one cloud so you have somewhere to tie your twine after baking.
Bake on a curved surface (a drinking glass on its side works perfectly) so the rainbow holds its arch while it cooks.
Once cool, tie your twine through the loop and hang it somewhere it catches light – the colors look amazing with sunlight behind them.
5. Tiny Pot of Gold
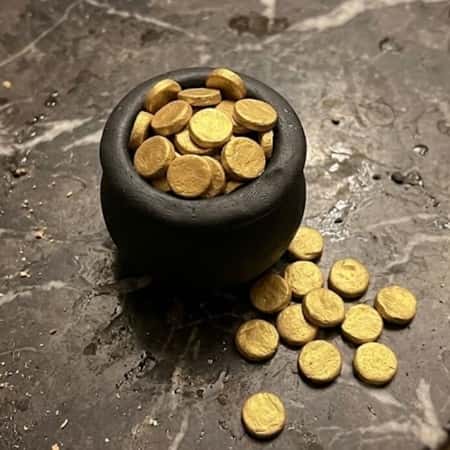
Everyone knows the pot of gold at the end of the rainbow – now you can make a miniature version out of clay.
This is probably one of the most recognizable St Patricks Day clay crafts out there, and for good reason. It’s adorable.
What you’ll need:
- Black polymer clay (for the pot)
- Yellow or gold clay (for the coins)
- A ball stylus tool or the back of a pen
- Optional: gold glitter mixed into the yellow clay for sparkle
Instructions:
Start with the pot. Roll a ball of black clay about 4cm across.
Push your thumb into the top center and pinch upward to form a bowl shape – but keep the walls thicker than your pinch pot from Idea 1.
You want this pot to look chunky and heavy. The opening at the top should be narrower than the widest part of the pot, like a cauldron shape.
Press the flat base down on your work surface to stabilize it.
For the gold coins, roll yellow clay into a thin sheet – about 2mm thick.
Use a small round cutter or the end of a straw to punch out tiny circles.
Stack a few of them and press them together slightly so they look like a stack of coins. Make about 10 to 15 individual coins plus a few small stacks.
Now arrange the coins so they look like they’re overflowing from the pot – some stacked inside the opening, a few “spilling” over the rim and sitting just outside the pot on the base.
If you want to add a shiny element, mix a tiny pinch of gold glitter into your yellow clay before rolling it out. It catches light beautifully after baking.
Use a ball stylus to press small circular details into the coins for that embossed look. Bake the whole assembled piece together on parchment paper.
For anyone doing a green clay craft project like this with kids, it’s genuinely one of the easiest and most satisfying ones – fast to make, immediately recognizable, zero frustration.
6. Shamrock Clay Pin / Brooch
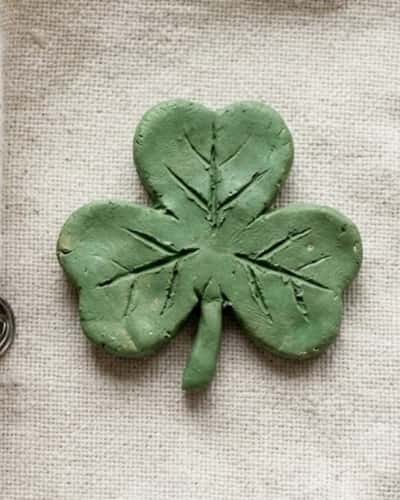
This one right here – this is the project that becomes your go-to gift idea. A little wearable clay shamrock you can actually pin onto a jacket, bag, or hat for the holiday.
What you’ll need:
- Green polymer clay (dark green looks most realistic; bright green is more festive – your call)
- Toothpick
- Pin back finding (from any craft or jewelry supply store – the little flat bar with a clasp)
- Strong adhesive or epoxy
- Optional: fine gold or white chalk pastel for shading
How to make a shamrock clay pin:
If you’ve been wondering how to make a shamrock clay pin, here’s the clearest way to do it.
Start by rolling three equal-sized balls of green clay – each about 1.5cm in diameter.
Flatten each one into a teardrop/heart shape by pressing it slightly and pinching one end to a soft point. These are your three shamrock leaves.
Arrange them in a clover formation with the pointed ends meeting in the center.
Overlap them very slightly at the center and press firmly to join. Run a toothpick through the center join point to really secure all three pieces together.
For the stem, roll a tiny clay rope about 2cm long, taper one end to a point, and press the wider end into the center join below the leaves. Curve it slightly to one side.
Use a toothpick to draw a vein line from the center tip of each leaf outward – one central vein and two short side veins. This turns a flat blob into something that actually looks like a shamrock leaf.
Here’s the shading trick – if you want depth, take a dark green or brown chalk pastel and lightly dust it over the edges and center joins with a dry brush or even your fingertip.
It gives the shamrock incredible dimension. Wipe away any excess before baking.
Bake flat on parchment. Once completely cooled, use epoxy or E6000 to glue the pin back onto the center of the reverse side. Leave it to cure overnight before wearing.
7. Green Textured Leaf Bowl
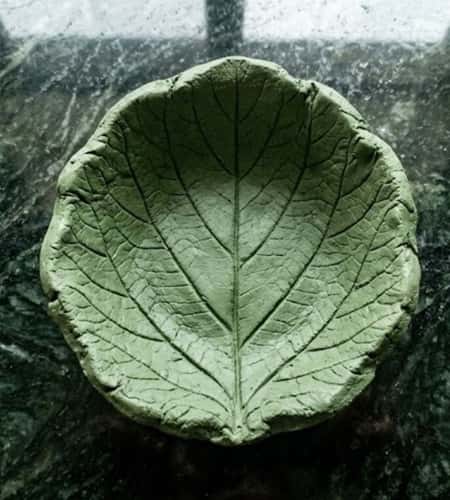
Different from the pinch pot – this one uses actual real leaves to press texture into the clay.
The result looks incredibly organic and expensive, and nobody needs to know it took you twenty minutes.
What you’ll need:
- Green or sage polymer clay
- Fresh leaves with prominent veins (rose leaves, bay leaves, or any textured leaf from your garden)
- Rolling pin
- Sharp knife or scissors
- Clear gloss varnish
The process:
Roll your green clay into a sheet about 4mm thick – bigger than your leaf.
Lay a fresh leaf vein-side down onto the clay surface and roll over it gently with your rolling pin. Press firmly but don’t go so hard that the leaf tears.
Carefully peel the leaf away – and you’ll have a perfect detailed vein impression all across the clay surface.
Use scissors or a knife to cut around the outline of a large leaf shape, or just cut it into a general organic curved shape – doesn’t need to be perfectly leaf-shaped.
To shape it into a bowl, gently drape the flat clay piece over a curved surface – the outside of a small bowl or mug works great.
Let it slump into a natural curve. You can also press it into a real bowl lined with parchment.
Bake it while it’s draped over the mold. Once baked and cooled, it holds that curved shape permanently.
The vein texture catches light and shadows beautifully. Add a coat of gloss varnish to make the green really pop.
This is one of those March crafts that surprises people every time – they always pick it up and turn it over looking for the “how did you do this” moment.
8. Celtic Knot Clay Tile
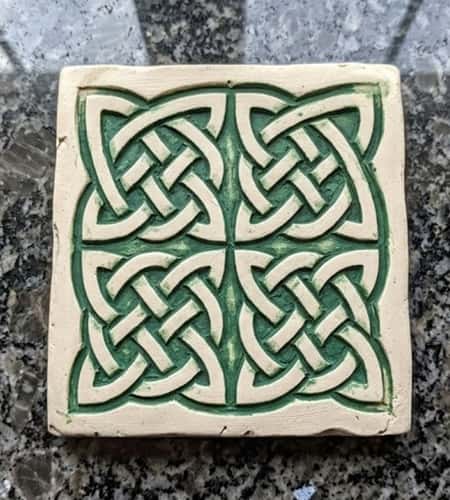
This one takes a bit more patience but it’s genuinely stunning – a small square or circular clay tile with a pressed or carved Celtic knot pattern.
Perfect as a coaster, a decorative wall tile, or just a display piece.
What you’ll need:
- Cream, white, or tan polymer clay (the knot detail shows better on lighter clay)
- Green acrylic paint
- A Celtic knot stamp (easy to find online or in craft stores) OR a printed Celtic knot reference image
- Toothpick and ball stylus
- Rolling pin
- Ruler and knife
Making the tile:
Roll your clay to about 6mm thickness – thicker than most of our other projects because this tile needs to feel substantial.
Cut it into a square (about 7x7cm) or use a round cutter for a circular version.
If you have a Celtic knot rubber stamp, just press it firmly into the clay surface and lift straight up.
The impression should be clean and detailed. Dust the stamp very lightly with cornstarch before pressing to prevent it from sticking.
If you don’t have a stamp, use a printed reference image and a toothpick to trace the knot freehand directly into the clay by pressing the lines in.
It’s slower but the slightly irregular hand-traced version looks wonderful. Don’t overthink the accuracy – small imperfections give it character.
Bake the tile flat. Once cooled, dry brush green acrylic paint across the surface, then quickly wipe most of it away with a slightly damp cloth.
The paint will settle into the recessed knot lines and highlights the pattern dramatically while leaving the raised surfaces nearly clean.
Seal with matte or satin varnish – matte looks more like ancient stone, satin gives it a slight sheen.
9. Leprechaun Hat Toothpick Holder / Desk Organizer
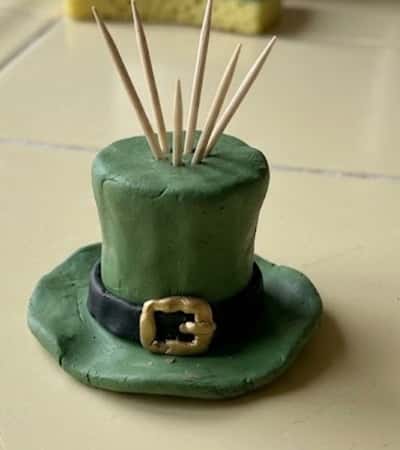
Okay, functional crafts are underrated. This is a little leprechaun hat sculpted in clay that you can use as a toothpick holder, a pen rest, or just a small desk decoration. Super fun to make and it is actually cute.
What you’ll need:
- Dark green polymer clay
- Black polymer clay
- Yellow or gold polymer clay
- Rolling pin and knife
- A small cylinder (a marker cap, a finger, a lipstick tube) for shaping
How to build it:
Start with the brim – flatten green clay to about 4mm and cut a circle roughly 6 to 7cm across.
You can use a cookie cutter or just cut around a small glass. The brim doesn’t need to be perfect.
For the hat body (the tall cylindrical part), roll a thick piece of green clay into a cylinder about 4 to 5cm tall and 3cm across.
If you want it actually hollow so you can store toothpicks inside, build it by wrapping clay around a small cylindrical object – a marker cap works perfectly.
Roll a sheet of green clay around the cap, join the seam, and smooth it with your fingers.
Place the cylinder in the center of the brim piece and press firmly to attach them. Blend the join slightly on the inside so it stays solid.
For the hat band, roll a thin strip of black clay and wrap it around the base of the cylinder, just above the brim.
Press a small square of yellow clay onto the front of the black band as the buckle. Add a tiny rectangle of black clay in the center of the buckle.
If you made it hollow, carefully slide the marker cap out before baking (or leave it in if it’s heat-safe, like a metal pen).
Bake upright. Once cool, this holds toothpicks beautifully or sits as a desk decoration that gets comments every single time.
10. Playdough Shamrock Garden Scene (Kid-Friendly)
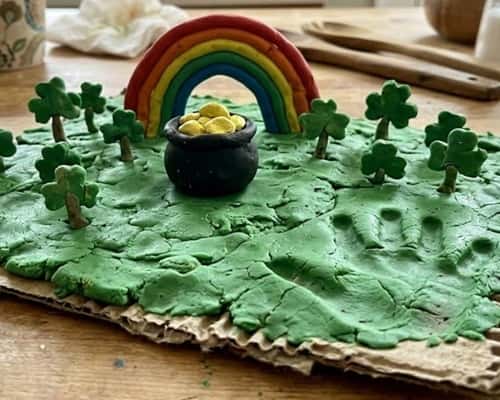
This last one is specifically designed for kids, or honestly for anyone who just wants a low-pressure, playful project.
You’re making a little flat scene – like a diorama but just on a clay base – with shamrocks, a tiny rainbow, maybe a little pot of gold.
No baking required if you use air-dry clay or actual homemade playdough.
And speaking of which – if you want to know how to make St. Patrick’s day playdough for this project, here’s a quick recipe:
Mix 2 cups flour, ½ cup salt, 2 tbsp cream of tartar, 2 tbsp oil, and 1½ cups boiling water. Add green food coloring while mixing. Stir until it comes together, then knead when cool enough to touch. Done. It’s soft, it smells great, and it air-dries overnight on its own.
What you’ll need for the scene:
- Green air-dry clay or playdough (recipe above, or store-bought)
- Small amounts of yellow, white, and rainbow colors
- A flat piece of cardboard or a wooden tile as a base
- Toothpick for detailing
Building the scene:
Press a layer of green clay across your cardboard base, about 1 to 2cm thick – this is the “ground.” Texture it with a fork to look like grass if you want.
Roll three small teardrop shapes for a shamrock, join them at the center, add a stem – refer back to Idea 6 for the detailed leaf instructions.
Make two or three shamrocks of different sizes and press them into the green ground, standing them upright by pressing the stem end down firmly.
Roll tiny yellow circles for coins and scatter them near the edge, with a tiny black clay pot (same technique as Idea 5, just smaller) spilling them out.
Make a mini rainbow arch from rolled clay ropes in different colors – even if it’s small and simple. Press it into the back of the scene.
This is genuinely one of the best diy St Patricks Day activities to do with children because there’s no precision required, no waiting for ovens, and the whole thing comes together in under an hour.
For anyone looking for an accessible green clay craft project to do with young kids, this garden scene hits every mark – simple materials, forgiving process, festive result.
Final Thoughts
You know what’s actually interesting about clay and St. Patrick’s Day? The tradition of working with your hands to mark seasonal celebrations goes back way further than most people think i.e. Celtic cultures had a deep connection to handmade talismans, woven tokens, and carved objects that held symbolic meaning around spring and luck.
So when you’re shaping a little clay shamrock or rolling a tiny coin, you’re accidentally participating in something much older than a craft trend.
Polymer clay is obviously modern, but that impulse – make something with your hands, give it meaning, celebrate the season – that part is ancient.
And honestly, that makes every slightly lopsided St Patricks Day clay ideas project feel a little more worthwhile, doesn’t it?