You know what they say, the way to a man’s heart is through his wardrobe! And what better father’s day gift idea than creating a dapper suit-style fathers day card that’s as stylish as your dad?
A sleek jacket crafted from crisp cardstock, tailored just for him is just about perfect for the occasion of fathers day.
But that’s not all! We’re not just talking about any old suit, this one will be a true reflection of your dad’s unique personality.
From the color palette to the patterns and embellishments, every detail will be a labor of love, designed to make him feel like the most dashing dad around.
So, grab your crafting supplies and let’s get started on a fathers day card that’s sure to earn you some serious kid kudos.
But first let’s take a quick look at the list of items required to craft this suit style DIY Father’s day card.
Step 1: Materials Required To Craft This DIY Fathers Day Card

To begin crafting the Father’s Day greeting card let’s have a look at the basic craft materials you will need.
- Origami Paper: I have used Colorful Origami sheets that include blue, black, white, maroon, and red color papers.
- Scissor: To cut the papers and other elements as required you will need a scissor.
- Glue: To stick the papers and other cutouts you will need a glue such as multipurpose adhesive.
- Markers: To draft your message on the greeting card you can use colorful markers or pens as per their availability.
Step 2: Aligning the Paper Sheets
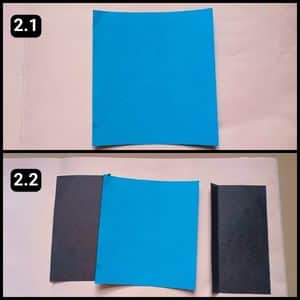
I started with a blue origami sheet as the base for the Father’s Day greeting card.
Then, I took two black origami sheets of the same size to create the card’s cover. To attach them, I folded the edges and secured them to the sides of the blue sheet.
Step 3: Stick the cover to the blue sheet
I applied glue to the folded edges of the black sheets.
Then, I aligned and stuck the black sheets to the sides of the blue sheet, just like in the image above.
I let it dry for a while to ensure the edges adhered evenly before moving on to the next steps.
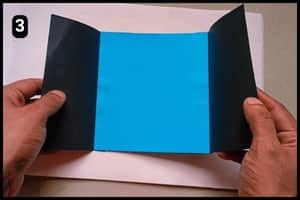
Step 4: Fold The Collars
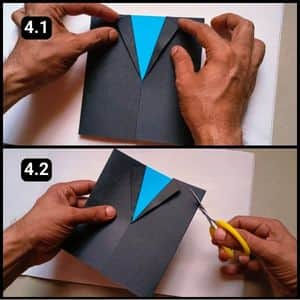
I folded the black sheets in the middle to resemble the long collars of a men’s suit or jacket, just like you see in the image 4.1 above.
Once they were folded evenly, I cut the top edges of both sides to create a slanting shoulder shape, as shown in image 4.2 above.
Step 5: Preparing The Shirt Collar and Tie shapes
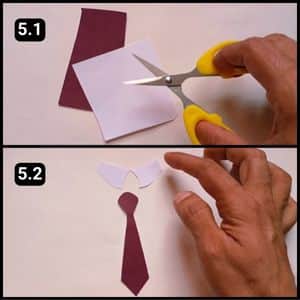
Next up, I cut the collar shape for the inner shirt using a white paper sheet.
Then, I used a dark brown paper sheet to cut out the tie shape. Both pieces turned out perfectly, just like you see in the image 5.2 above.
Step 6: Sticking the Tie and Collar
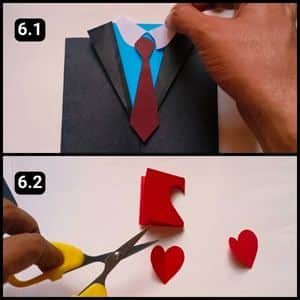
Once you’ve managed to get the tie and collar in place it’s time to stick them.
So, I began by sticking the tie to the middle and top section of the blue sheet. Once it was securely in place, I aligned and attached the white collar shape over it.
Then, I cut a couple of heart shapes from a red origami paper sheet and stuck them inside the card.
Step 7: Drafting the desired message
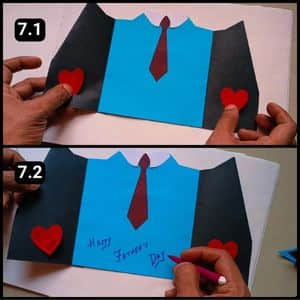
After sticking the heart shapes on the inside of the card, I drafted my message for Dad.
Using a maroon marker, I wrote “Happy Father’s Day” on the card. Feel free to personalize your message with any colorful pens or markers you like.
Step 8: The final Structure
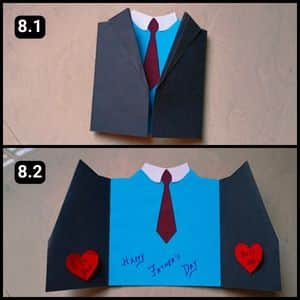
My special Father’s Day greeting card was now ready to be presented to Dad.
You can see the final outcome in the images above. The first image shows the card’s exterior, and the second image reveals what it looks like when opened.
Final Thoughts
This delightful DIY suit card is an ingenious way to showcase your creativity while honoring your dad’s unique style. However, I would encourage adding personal touches that reflect your bond with him.
Perhaps incorporate fabric swatches from his favorite blazer or necktie scraps to craft a truly one-of-a-kind design.
You could also include photographs, inside jokes, or heartfelt messages tucked into the collars or pockets.
This handmade treasure will undoubtedly become a cherished keepsake, serving as a tangible reminder of your love and appreciation for the remarkable man he is.
Above all, remember that the true gift lies in the thoughtfulness and effort you pour into this project.
Note: For your reference I have also uploaded the complete video walkthrough of the Father’s Day greeting craft on our official YouTube channel.
Frequently Asked Questions
How long did it take to make the Father’s Day greeting card?
It took about 15 minutes for me to make this amazing greeting card for Father’s Day.
Can I add more embellishments to this DIY Fathers Day Card?
Yes, You can use small buttons or brad fasteners to your card for a touch of realism. Additionally, you can cut a small square from patterned paper and stick it to the “jacket” for a pop of color. If possible, write your dad’s initials or name on the lapel using a marker or metallic pen. Lastly, cutting a thin strip of contrasting paper and gluing it diagonally across the tie for a tie clip effect will make it more visually appealing.
How can I personalize this fathers day card to reflect my dad’s hobbies?
Think about your dad’s interests and incorporate them into the design. If he loves fishing, add a tiny paper fish sticking out of the pocket. For a music lover, you could draw musical notes on the tie.


