Crafting or modeling shapes and structures with homemade clay can be fun. Especially, if you go with the entertainment trend.
I was just going through the internet and found the tenge boy trending popularly over the internet.
It was all about singing and dancing in his own funny style that was grabbing the attention of people around the world.
I saw a few videos where people have also crafted the face using clay but they looked a bit difficult especially from a beginners point of view.
This is when I thought of modeling a tenge boy’s facial structure with my homemade clay which will be easier for beginners to follow.
If you go through the process it’s actually suitable for beginners as I haven’t used any professional tools to shape the structure.
I have shared the step by step instructions along with supporting images and video in the later part so that you too can create this.
But first let’s take a quick look at the list of items you’ll need to craft the tenge tenge boy face using clay.
Step 1: Things I’ve Used To Craft Tenge Tenge Face

- Black Clay: I have mixed black color to white clay to craft the facial structure.
- White Clay: I’ve used a small lump of white clay to craft eyes and teeth.
- Basic Crafting Tools: I have used popsicle and bamboo sticks to shape the detailing.
The things I’ve used are all basic Crafting items, let’s proceed with the core steps below.
Step 2: Modeling it’s Facial Shape
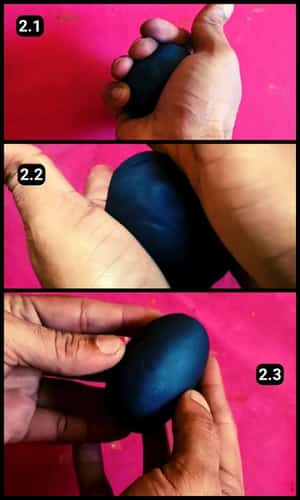
To begin with I first kneaded the clay so that it becomes smooth.
Then, I rolled it between my palms to form an oval shape.
Finally, I’ve got the desired shape similar to a tenge boy’s head structure.
Step 3: Shaping the Mouth
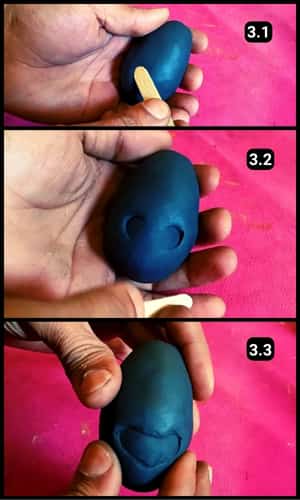
I have used a popsicle stick to shape its mouth.
First, I shaped it from the sides followed by the lower lip section.
And when the curves turned rough during the process I used my fingers to smoothen them.
As seen in image 3.3 above I have the mouth base ready.
Step 4: Modeling it’s eyes

To make the eyes I have first prepared the base.
I’ve pushed the curved edges of the popsicle stick to model the base of the eyes.
Post this, it needs to be shaped further which I will do in the subsequent step.
Step 5: Shaping the eyes
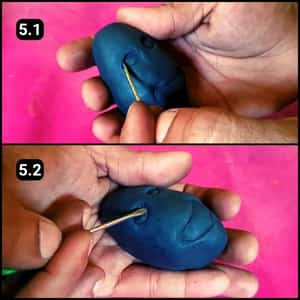
Using a bamboo stick and a tiny screwdriver I shaped the eye lines.
The small screwdriver helped me with the fine detailing process.
The base shapes of the eyes and mouth seem fine to me so I moved further.
Step 6: Shaping the Lips
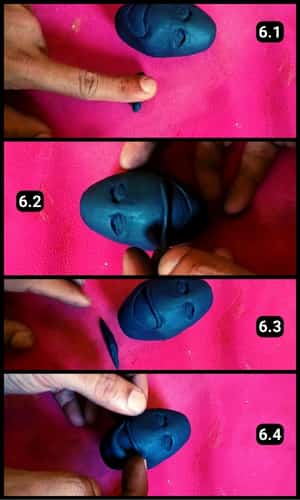
To shape the lips I have used a small lump of dark clay and rolled it using my fingers as seen in image 6.1 above.
Once the structure of the upper lip was complete, it was time to position it accurately in its intended place.
Next, I similarly crafted the lower lip. When you do the same, ensure that the lower lip is slightly thicker than the upper lip.
And then, I placed the lower lip into its position and trimmed the excess part.
Step 7: Shaping the nose
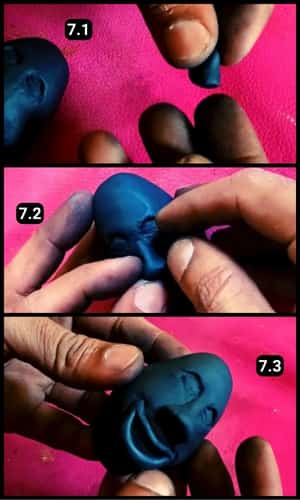
To shape the nose I used a small lump of dark clay.
I rolled it with my fingers and then pressed the edges to form the shape.
Next, I’ve placed it to its position and smoothen the edges with my fingers.
Step 8: Crafting the white eyeballs (Sclera)
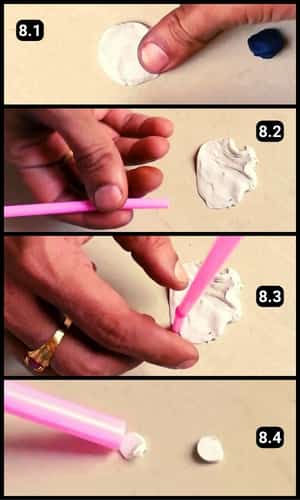
To craft the white portion of the eyes I’ve used the white clay and pressed it on the floor.
Using a plastic straw I got round shapes of equal sizes.
I further spread them using my fingers to form tiny oval shapes, so they would stick to the base
Step 9: Fixing the eyes
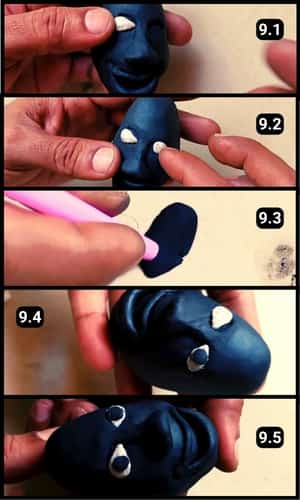
One by one I shaped and placed the white portion of the eyes to the base I had formed earlier.
Next, it’s time to fix the black portion (Iris) of the eyes.
Similar to Crafting the white portion I used the straw to get the identical round shapes from the dark clay.
They didn’t require further shaping so I simply placed them over the white layers and pressed them gently so that they settled firmly.
Step 10: Shaping the Teeth
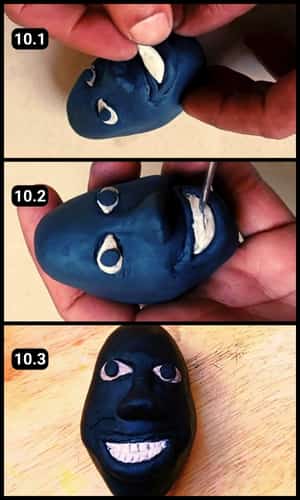
It was among the funnier steps when I had to craft the teeth shapes because this is what actually seemed entertaining.
To shape the teeth I’ve used a small lump of white clay.
I shaped it as per the gap between the lips and placed it accordingly.
To further shape it like teeth I’ve used the tiny flathead screwdriver.
I had to go through the tenge boy’s images to shape the teeth accordingly.
Finally, I started from the center and shaped the upper and lower teeth portions carefully.
I had to do it patiently because altering such fine details would become difficult incase if I made mistakes. However, it all went well and it really looked funny and entertaining.
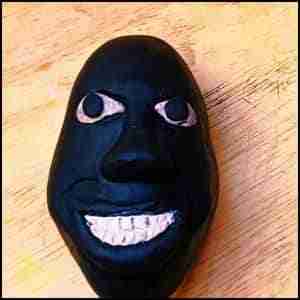
Here’s what the final completed project of tenge boy’s face looks like:
Video Walkthrough of Tenge Tenge Clay Craft (Viral Funny Clay Art)
Final Thoughts
Honestly. This clay project is super easy and this is something any beginner should be able to achieve. The only challenge one can possibly have is crafting the eyes.
I have also uploaded the complete video tutorial of the Tenge boy’s clay art on our YouTube channel for your reference.
Similarly you can also go through an epic sketch available on the same platform. We have also included a downloadable template of the same.
I hope you enjoyed crafting the tenge boy’s entertaining facial structure, for more videos and DIY stuff you can feel free to follow us on YouTube.
Frequently Asked Questions
I don’t have dark clay, what should I use for tenge tenge viral craft?
You can use white clay and shade the fine details using watercolor or acrylic paint. As an alternative you can add a dark color to white clay and knead it properly so that it absorbs the color.
How did you make clay at home that works with these types of project?
I have made homemade clay using cornstarch, vinegar, PVA glue, and coconut oil. We have a complete article on homemade clay and the video tutorial for your reference.
What can I use if I don’t have crafting tools for detailing?
No worries if you don’t have crafting tools. You can use household items like toothpicks, the end of a paintbrush, or even a blunt knife for shaping and adding details.
How can I prevent the clay from cracking while it dries?
To prevent cracking, ensure the clay is not rolled too thin and is uniformly thick. If using air-dry clay, cover your project with a damp cloth as it dries to slow down the drying process, reducing the risk of cracking.
Can I paint my Tenge Tenge clay project?
Yes, once the clay is completely dry, you can paint it with acrylic paints for a more vibrant look, just let the paint dry before handling.
Can I use modeling clay instead of homemade clay for this tenge tenge clay art?
Yes, you can use modeling clay, which might even provide a wider range of colors and a different texture. However, keep in mind that modeling clay might not dry and harden like air-dry or homemade clay.


