Shuffling things around the house to switch up the decor is something I really enjoy.
This time, I wanted to bring a touch of nature into my living room, and what better way to do that than by giving a piece of furniture a fresh, green makeover? The table in question is no stranger to transformation, it previously underwent a playful makeover, as detailed in an earlier post of mine.
If you’re curious, check it out here.
This next step in its evolution is something I’m particularly proud of, and I can’t wait to share it with you.
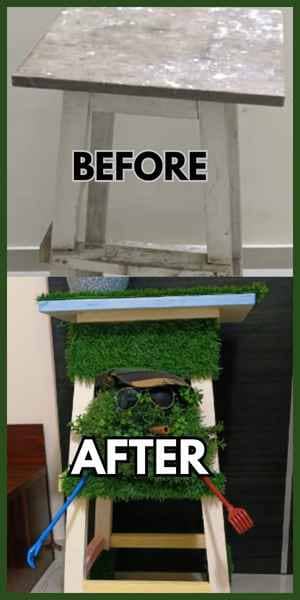
Just take a look at the before and after, it’s a stark transformation from something once overlooked to a piece that truly pops.
In order to achieve the above looks, let’s take a quick look at the list of things that I have used.
Step 1: Look At The List Of Things I’ve used
- Turf grass: I’ve used an artificial sheet of turf grass as the real game changer in this decor project.
- Commercial Stapler: I’ve used a jumbo stapler to fix the turf grass to the wooden table.
- Cutter and Scissor: To cut the required measurements, I’ve used a scissor and a cutter especially to cut the artificial grass sheet.
- Scale Ruler: I’ve used a geometrical ruler to measure the dimensions and sizes of the required areas of decor.
Step 2: Measuring the Table top
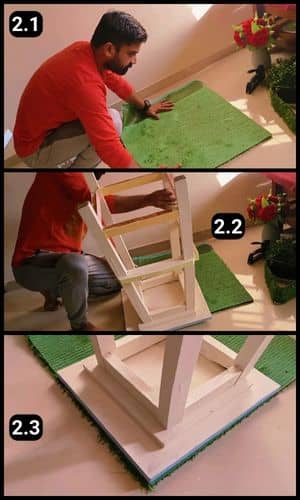
First, I spread out the artificial grass sheet on the floor, making sure it was face down.
Then, I gently flipped the table over and set it on top of the sheet, aligning it with the corners.
This way, I only needed to mark and cut the remaining two edges to fit the table top perfectly.
For a clearer idea, feel free to check out the images I’ve included above.
It’s a simple step, but getting it right makes all the difference in how the final piece looks.
Step 3: Cutting the grass sheet
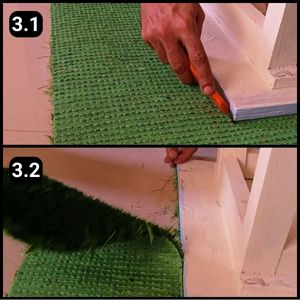
Next, I grabbed a cutter to trim the grass sheet right along the wooden table’s edges.
The cutter glided through smoothly, making it easy to shape one side of the sheet perfectly.
Step 4: Cutting the other end

Moving on, I tackled the other end of the grass sheet just like before.
It was a swift move, and soon after, I pulled away the trimmed section, leaving a neat edge.
You can see how it turned out in image 4.2 above.
Step 5: Align it to the table top
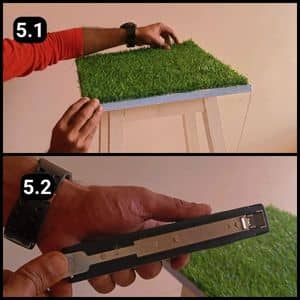
After cutting, I placed the grass sheet on the table top, and it fit like a glove.
To secure it in place, I opted for a heavy-duty stapler, making sure it was fully loaded with staples designed for wood.
If you’re not into stapling, a strong adhesive could also do the trick.
Just choose whatever feels right for you, the key here is making sure the grass stays put, transforming the table into something special.
Step 6: Fixing the table top
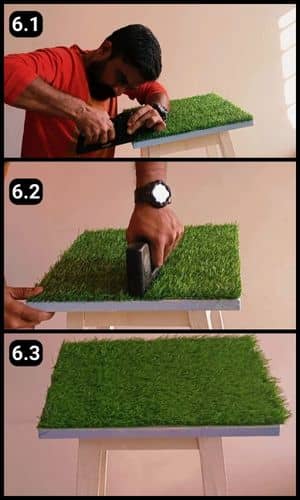
I began by stapling right along the table’s edges, and it went smoothly.
Now, the borders are tightly secured, leaving the tabletop lush and stable.
It’s all set, green, and looking fantastic.
Step 7: Covering the footboard
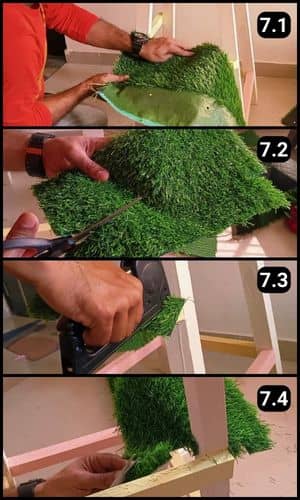
Next up, I decided to wrap one of the table’s horizontal foot supports in artificial grass to boost the green vibe.
Sure, it’s a bit of a task, but well worth the effort for the eye-pleasing outcome.
I started by laying a piece of grass sheet against the support for sizing.
Then, I grabbed scissors to snip away the extra bits.
While the cutter was great for larger cuts, scissors felt just right for this finer work.
A few staples later to secure it in place, and any excess grass was quickly trimmed off. It’s shaping up to be quite the green gem!
Step 8: Continue Stapling the other parts
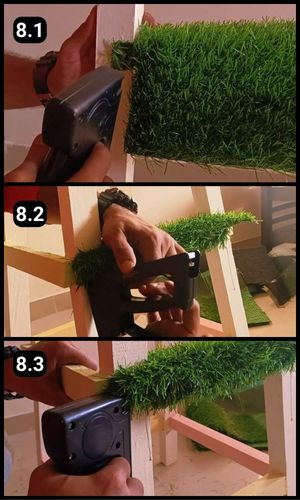
Stapling and trimming did take up a chunk of my time and energy, but the excitement of seeing the final look kept me going.
And, oh, was it worth it! I successfully covered the adjoining arm of the table with the grass sheet (Yippee! It turned out amazing!).
Step 9: Upper draping
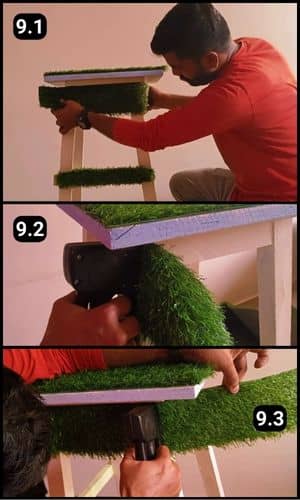
Then, I moved on to covering the top portion, which felt like adding the finishing touch, similar to placing a necklace on a bride.
Funny enough, no stapling required here! Continuing with the makeover, I wrapped the upper part of the table, as you can see in the photos above.
I ended up using two sheets since the sheet that I used initially was a bit short on length.
Once again, it all boiled down to carefully placing everything and securing it with staples (This step really brought everything together).
Step 10: Top to center view
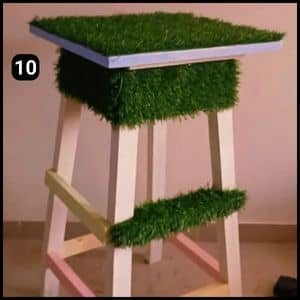
Seeing how stunning it turned out, as shown in the pic above, I still felt something was missing.
Then, my gaze drifted down to the table’s feet, and that’s when it hit me.
I decided to extend the green touch even further below.
Just like that, another layer of greenery was added to the mix.
Step 11: Putting Socks In The Legs

Grass naturally springs from the ground, so I thought it only fair to mimic that, even with artificial materials.
For the final flourish in this decor project, I decided to give the table’s feet a “green sock” makeover.
With a ruler in hand, I measured and cut the grass sheet to size.
Then, I secured these green socks to the table’s feet with the stapler, as you can see in the pictures above.
Now, it’s perfectly poised to brighten up any corner of my home.
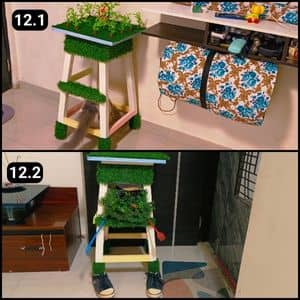
Step 12: Dress It Like A Dude

Check out the photo above, it’s got that cool cowboy vibe going on.
I threw in some artificial decor pieces for an extra pop, and I’m totally digging the result.
The canvas shoes, army cap, and aviators really steal the show.
I’ve mixed and matched different decor themes and placed it all in the living room. It’s a fun way to keep the space lively and interesting.
For video handholding of this project, you can refer to the below video:
Final Thoughts
Transforming an old table with a green makeover not only refreshed my living space but also allowed me to merge creativity with sustainability.
This project, a blend of nature and decor, proves that with a little imagination, we can breathe new life into forgotten pieces.
So, before you decide to throw out that old wooden piece, pause and consider its potential.
A bit of decor flair and your own creative spark can turn what was once destined for the scrapheap into something truly special.
This table, for example, now serves as a perfect addition to a cozy living room, a snug bedroom, or even a welcoming front porch.
It shows that with a little imagination, anything is possible.
For more DIY decor inspiration, make sure to check back with us often. And don’t forget to subscribe to our YouTube channel for all the visual guides you’ll need.
Frequently Asked Questions
Is this project suitable for any type of table?
Yes, this green makeover can be applied to any old piece of wooden furniture, making it ideal for small living rooms, bedrooms, front porches, etc.
Do I need any special skills to complete this green table makeover?
No special skills are required. Basic DIY skills like measuring, cutting, and stapling are enough to achieve this transformation. The project is designed to be accessible to beginners.
How long does it take to complete the green table makeover?
The time can vary depending on your pace and experience with DIY projects, but typically, it can be completed in a few hours, including the measuring, cutting, and securing of the artificial grass.
Can this makeover technique be applied to other furniture items?
Absolutely! This technique can be adapted for other pieces of wooden furniture, like stools, benches, or even shelves, to add a touch of greenery and freshness to any room.