What do you usually do with a broken or worn-out umbrella? Most people throw it away, right?
However, did you know that the fabric used in umbrellas is incredibly durable and strong?
Knowing about the durability of umbrella fabric, I decided to make a utility pouch as a gift for my son.
It turned out even better than I expected, serving its purpose exceptionally well.
Therefore, I couldn’t wait to share my experience with this particular project with you.
This article is special and will show you the value of something you might have considered trash.
Let’s begin with the step-by-step instructions on how to transform waste into a useful tool.
Here’s a quick list of the items I used in this DIY project.
Things I’ve Used to make DIY Pouch
- Umbrella fabric: This is the core item of our DIY pouch.
- Scissor: To cut the required sizes I’ve used a regular craft scissor.
- Sewing machine: I took help from my wife to get the borders and the zip sewed using her electrical sewing machine. You can do this manually as well, I took help of my wife to save some time on this.
Step 1: Acquiring the proper size
While walking out on a rainy afternoon, the handles of my trusty umbrella snapped under the force of a strong gust of wind.
I’d used this umbrella for a couple of years through at least two monsoons, and it had always held up well.
I tried to repair it, but the damage was beyond repair. However, I knew the fabric was still strong, so I carefully removed it from the frame.
That’s the end of a small story about my umbrella, but definitely not the end of its story as I was determined to give it a new life as a repurposed utility tool that will stay with me for even longer.
With all that said, it was time to make my first move i.e to lay the fabric flat on the floor to determine the size I need for my project.
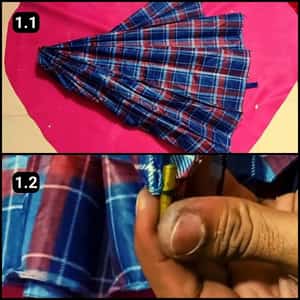
Step 2: Separating a layer
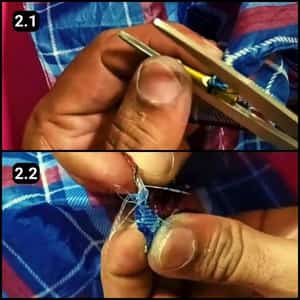
Typically, umbrella fabric covers are sewn with multiple layers and to make a pouch the right size, I had to take a layer off the umbrella fabric.
I started off by taking off the plastic cover that usually goes over the umbrella’s sticks to keep them in place. Followed by, removing the stitches to separate a layer from the fabric cover.
Step 3: Obtaining the proper size
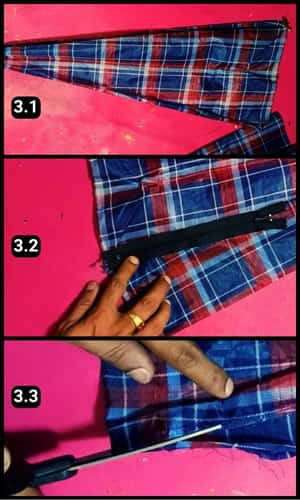
Next, I positioned the zipper over the separated fabric to indicate the appropriate size of the pouch.
For this project, I purchased a regular-sized zipper from a local shop, which is the only investment required for the entire project.
To achieve an even size for the pouch, I used scissors to trim the fabric from the designated areas.
Step 4: Unfolding the usable section
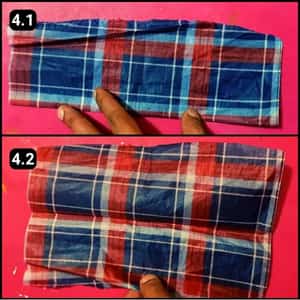
After trimming the excess areas, I unfolded the usable section to verify the desired shape.
It appears satisfactory, which means that we can proceed to the next step.
Step 5: Fixing the Zip
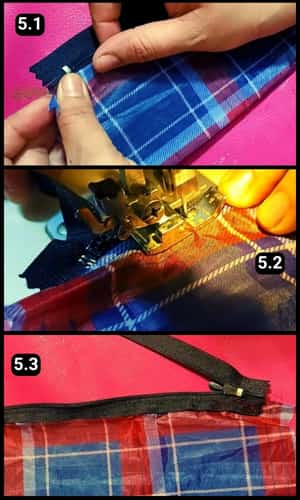
In this step I aligned the zip over one of the edges of the fabric for sewing.
Post which, I took my wife’s help to sew it using her electrical sewing machine.
She’s an expert in this particular process so it made my task easy.
That being said, if you don’t have access to a sewing machine you can manually sew with a needle and thread.
Make sure to apply short or small stitches if you do it with your hands.
Step 6: Sewing and Trim the sides
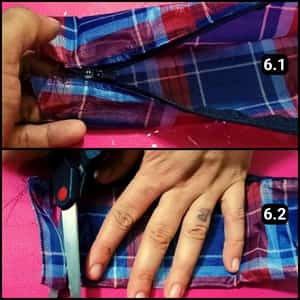
Now that the zipper is neatly sewn, it’s time to sew the sides together.
Once the sides are sewn successfully, I carefully trim the excess fabric from each side.
With the excess fabric trimmed from both sides, my handmade product is almost complete.
Step 7: Roll it inside out
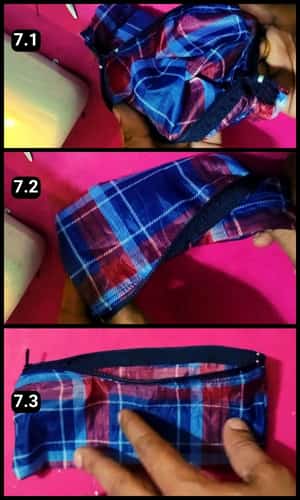
Next, I carefully inverted the pouch, ensuring that the sewn side faces inward and the finished edges face outward.
Step 8: Placing objects for testing
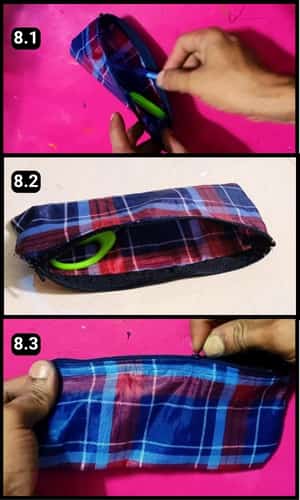
Lastly, I put my son’s regular pencil and other stationery items in the pencil case, and I ensured there was ample space to accommodate his usual belongings.
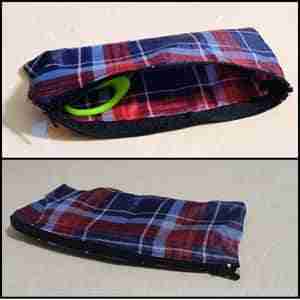
The zippers worked smoothly, and my son was delighted to receive the handmade gift, as always.
Here’s how the pouch made of umbrella fabric looks like:
Video Walkthrough Of DIY Utility Pouch Made From Umbrella Cover
Final Thoughts
Turning a worn-out umbrella into a utility pouch is a fantastic way to repurpose and recycle.
This project not only breathes new life into something that would otherwise end up in the trash but also offers a personalized and practical gift option.
My tip for anyone diving into this DIY is to play around with the design.
You can add internal compartments for better organization or even personalize it with fabric paint or patches for that extra touch.
Remember, the key to a successful DIY project lies in creativity and the willingness to experiment.
This pouch is just the beginning, imagine what else you could craft with materials that are typically overlooked.
I still have a decent part of this fabric remaining and I am sure that I will be crafting more utility items out of it, subscribe on our YouTube channel to get the latest DIY Video projects.
For now I’ve shared the video walkthrough of this complete video above for your reference.
Frequently Asked Questions
How long did it take to complete this DIY pouch project?
I was able to make this DIY pouch within 30 minutes. However, it would take 10 minutes of my extra time, if I had to sew it manually using the needle and thread.
Is the umbrella fabric pouch waterproof?
The fabric can resist water, however, there’s a possibility of water entering into it through the edges of the zip.
How can I make this DIY pouch waterproof?
You can use the plastic ziplocks instead of a regular zip and stick them using a multipurpose glue.
Can I sew this pouch using a non electrical sewing machine?
Yes, you can make use of a non-electrical sewing machine for this project, it’s all about stitching the edges properly.
Can I stick the edges of this pouch instead of stitching them?
Yes, you can glue the edges using a strong multipurpose adhesive if you want to avoid the stitching process. However, make sure each application dries evenly.


