Valentine’s Day is just around the corner, and what better way to celebrate than adding a personal touch to our homes? This year, I decided to sprinkle a little magic into my bedroom with some DIY lights, using things I already had lying around.
I thought, why not share this simple yet impactful idea with you? It’s quick, easy, and perfect for those of us who are always racing against the clock.
Together, let’s take a look at how a few basic items can transform our space into a cozy retreat for this day of love.
In today’s craft, I will make a valentines flower from resources which were sitting idle in my wardrobe.
This craft is about creating flowers with lights which can be placed in the bedroom to create a nice ambience.
Here’s how to go about it.
Step 1: Gather the available resources
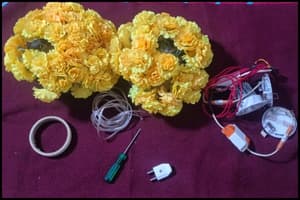
I stumbled upon some artificial flower decor and figured, why not brighten them up a bit? I remembered I had saved clip lights from an old wardrobe I was about to throw away.
It turns out they were just what I needed for this project.
Along with a two-pin socket, some extra electrical wire to extend the reach, and electrical tape, I was all set.
It’s amazing how these few simple items can come together for such a fun DIY project.
Step 2: Wire Extension
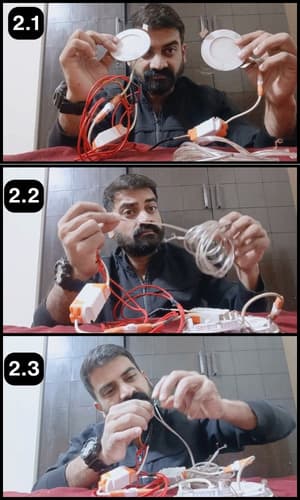
The light’s cord was a bit too short, so I grabbed a three-meter electrical wire to give it the extra length it needed to reach the nearest outlet.
You could also go for an extension board if that’s easier.
Then, I carefully stripped the ends of the wires to connect them securely.
Step 3: Mask the joints
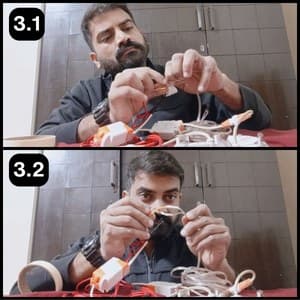
It’s very important to mask the electrical wire joints and make sure to use electrical tapes for the same.
I have masked both the joints carefully and now will move to the next step.
Step 4: Connect the Two-Pin Socket

Now, I will fix a two-pin socket to plug it into the nearest power outlet.
It requires peeling the wires and unmounting the two-pin plug. A screwdriver can be used to disassemble and reassemble the plug.
The two-pin plug is ready as seen in the image 4.3 above.
Step 5: Test the lights
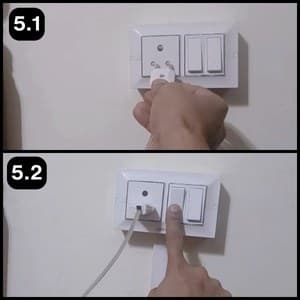
I will first test if the clip lights are working by plugging in the connected plug to the nearest power outlet.
It’s plugged in and ready to be powered with a click of a button.
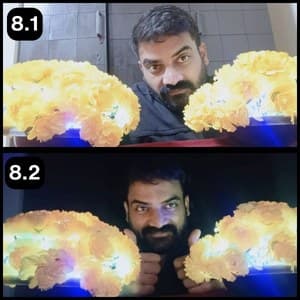
Step 6: Check the Progress

I am amazed and happy as these clip lights are flashing and can be used for my DIY project.
Let me fix them to artificial floral decors and enhance the overall ambience of my space.
Step 7: Adjust them with the decor

I have adjusted the clip lights between the floral base areas so that the light reflects upward.
Step 8: The final inspection
Before fixing them in place, I tested the lights to see if they flashed just right.
They worked so beautifully, it made me even more excited to think about how they would look in the dark.
I couldn’t wait to find the perfect spot for them, ready to fill my room with a warm and inviting glow.
Step 9: Placement idea
After the lights were ready, finding the right place for them was easy.
I chose a spot right above an empty wardrobe that had always seemed a bit plain to me. Below, I’ve shared some photos so you can see exactly how it turned out.
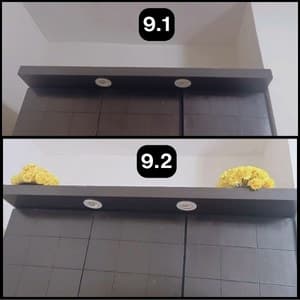
Setting everything up was straightforward.
I positioned the decor in the corners, where the lights’ wire lengths fit perfectly.
Then, I simply placed and adjusted the lights at the base of the artificial flowers.
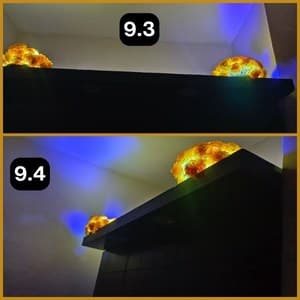
During the day, it adds a lovely touch to the room, but it’s the night when the magic truly happens.
The images below capture the stunning effect of light and shadow, creating a mood of reflection and affection in the darkness.
Video Handholding on Making DIY Valentines day light for bedroom
Final Thoughts
Crafting a cozy ambience with DIY lights in your bedroom for Valentine’s Day is not just about following steps, it’s about adding your personal touch and creativity to every corner of your space.
Remember, the beauty of DIY projects lies in experimenting and personalizing.
My advice? Don’t be afraid to mix and match different elements.
Perhaps try intertwining fairy lights with your floral arrangements for a softer glow, or experiment with colored lights to set different moods.
Also, safety is paramount, so always opt for LED lights, they’re cooler, safer around flammable materials, and energy-efficient.
Remember, every project is a chance to make your space more uniquely yours, especially on occasions like Valentine’s Day.
Frequently Asked Questions
Can I use real flowers instead of artificial ones for this DIY project?
While real flowers bring natural beauty and fragrance, they’re not the best choice for this project due to their short lifespan and potential fire hazard with close proximity to lights. Artificial flowers are safer, reusable, and can be just as beautiful, making them the ideal choice for a lasting DIY decor.
What if I don’t have clip lights? Are there any alternatives?
Absolutely! If clip lights aren’t available, fairy lights or string lights are great alternatives. They’re flexible, easy to work with, and can be woven through your floral decor to create a similar stunning effect. Plus, they come in various colors and lengths, offering you more creative freedom.
Is it safe to leave these DIY lights on overnight?
While LED lights are cooler and safer than traditional bulbs, it’s always best to turn off any electrical decorations before going to sleep to reduce any risk of fire, especially if you’re using older electrical sockets or extensions.
Can this project be done on a budget?
Definitely! One of the best parts of this DIY project is its cost-effectiveness. You can repurpose items you already have at home, like artificial flowers or unused lights, and even find affordable materials at dollar stores or thrift shops.
How can I customize this project for other occasions?
This DIY light decor is versatile and can be adapted for any occasion by changing the theme of your decorations. For Christmas, add red and green flowers or ornaments. For a birthday, incorporate bright, festive colors and balloons. The possibilities are endless, just swap out the decor elements to match the event or season.


