If you’re looking for a fun and easy caterpillar craft to brighten up your day, you’ve come to the right place.
After crafting a paper caterpillar resembling its natural hues, I sought to infuse more creativity, resulting in this vibrant, easy caterpillar craft that ignited excitement among kids.

Their enthusiasm for this happy caterpillar inspired me to share detailed instructions, complete with images, allowing you to create your own delightful paper caterpillar craft for kids.
This vibrant paper caterpillar craft for kids is not only super simple to make, but it’s also a great way to unleash your creativity and add a pop of color to any room.
Get ready to turn ordinary paper into an adorable crawly friend that will have you feeling as cheerful as a, well, caterpillar in a garden
Items Required for Vibrant Caterpillar Craft
- Paper:
- Pre-colored caterpillar template (downloadable) or
- Colored construction paper (various colors for customization)
- Scissors
- Glue
- Optional:
- Pencil (for tracing if using plain construction paper)
- Ruler (for drawing circles if not using template)
Template Options:
The article provides two options for the caterpillar body:
- Pre-colored template: Download and print this template for a quick and easy craft.
- Blank template: Use this template to customize the colors with your own construction paper. You can draw your own circles on the paper if you don’t want to print a template.
Step 1: Creating The Vibrant Caterpillar Template
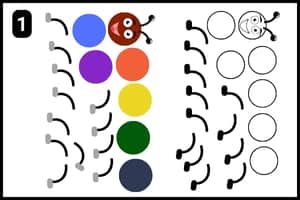
Here’s a peek at the paper caterpillar templates I’ve put together for you (look at the image above).
You can choose from two styles i.e. one is a blank outline, perfect for adding your own colors and personal touches. The other is already filled with vibrant colors, making it super easy to download, print, and assemble your caterpillar right away.
I usually create my own designs, and I encourage you to try designing your own too.
But feel free to use my templates as they are, you’re welcome to them without any worries.
Step 2: Cutting the Template Shapes
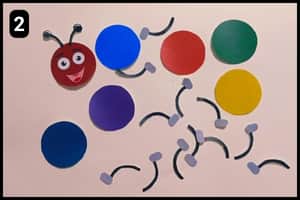
If you look at the image 2 above, you’ll see that I’ve used the pre-colored caterpillar template.
It features seven circular shapes in various shades, including one that forms the caterpillar’s face.
The 12 legs were the trickiest part to cut out and took up the most time. When cutting these small details, patience and precision are key.
Step 3: Assembling the Caterpillar Cutouts

After cutting out all the necessary shapes, I assembled the paper caterpillar.
I started by aligning the face with the circle below it and sticking them together. Then, I attached each of the yellow and green circles one by one.
Step 4: Fixing the main Body Structures

I aligned the remaining circles to complete the main body structure of the paper caterpillar.
Following the images as a guide, I stuck them together one by one.
This completed the main body structure of the vibrant caterpillar craft, and it really looked amazing.
Step 5: Fixing the front legs
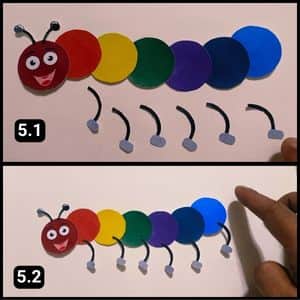
I fixed the tiny legs of the paper caterpillar next.
There were twelve in total, with six pointing to the right and the other six to the left.
I first aligned the ones heading right just below the caterpillar’s body structure.
Then, I began sticking them one by one, as shown in image 5.2 above.
I made sure to apply glue carefully to the edges without too much pressure to avoid tearing them. They all turned out perfect, so I moved on to the next set of legs.
Step 6: Fixing the back legs
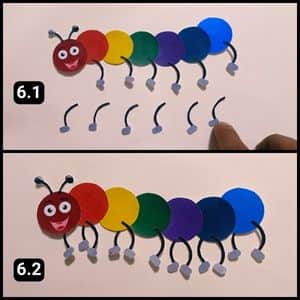
We have now moved to the final step of the vibrant paper caterpillar craft which is to assemble the remaining 6 legs.
Similar to the previous step, I first aligned this last bunch of legs below the caterpillar’s structure.
Then, I carefully stuck them on one by one from behind the structure. The vibrant caterpillar came to life and it turned out absolutely adorable.
Final Thoughts
To be honest this paper caterpillar craft is a perfect way to spend quality time together, unleash your creativity, and create a fun, colorful masterpiece.
Don’t be afraid to experiment with different color combinations and patterns, make it your own.
You could even add googly eyes or pipe cleaners for extra flair.
Once your caterpillar is complete, display it proudly or use it as a unique decoration for a kid’s party or classroom.
The possibilities are endless, I highly recommend giving this easy yet rewarding craft a try.
It’s a fantastic way to encourage fine motor skills, creativity, and a love for arts and crafts in little ones.
Most importantly, it’s an opportunity to make cherished memories together.
Note: For your reference, I have also uploaded the complete video walkthrough of the vibrant caterpillar Paper craft on our official YouTube channel.
Frequently Asked Questions
How long did it take to craft the vibrant caterpillar?
It took 10 minutes for me to craft this amazing and vibrant paper Caterpillar using the colorful template from the website.
What are some other ways to customize the caterpillar?
Instead of circles, cut out different shapes for the body segments. Try ovals, squares, or even triangles for a more abstract look. Use patterned construction paper or fabric scraps for a unique textured effect. Add yarn or felt scraps for the antennae instead of pipe cleaners.
How can I turn this paper caterpillar craft into a learning activity?
Count the caterpillar’s body segments and legs while assembling it. Discuss the different colors used and their names. Learn about the life cycle of a caterpillar and recreate the stages (egg, caterpillar, chrysalis, butterfly) using different colored paper or materials.


