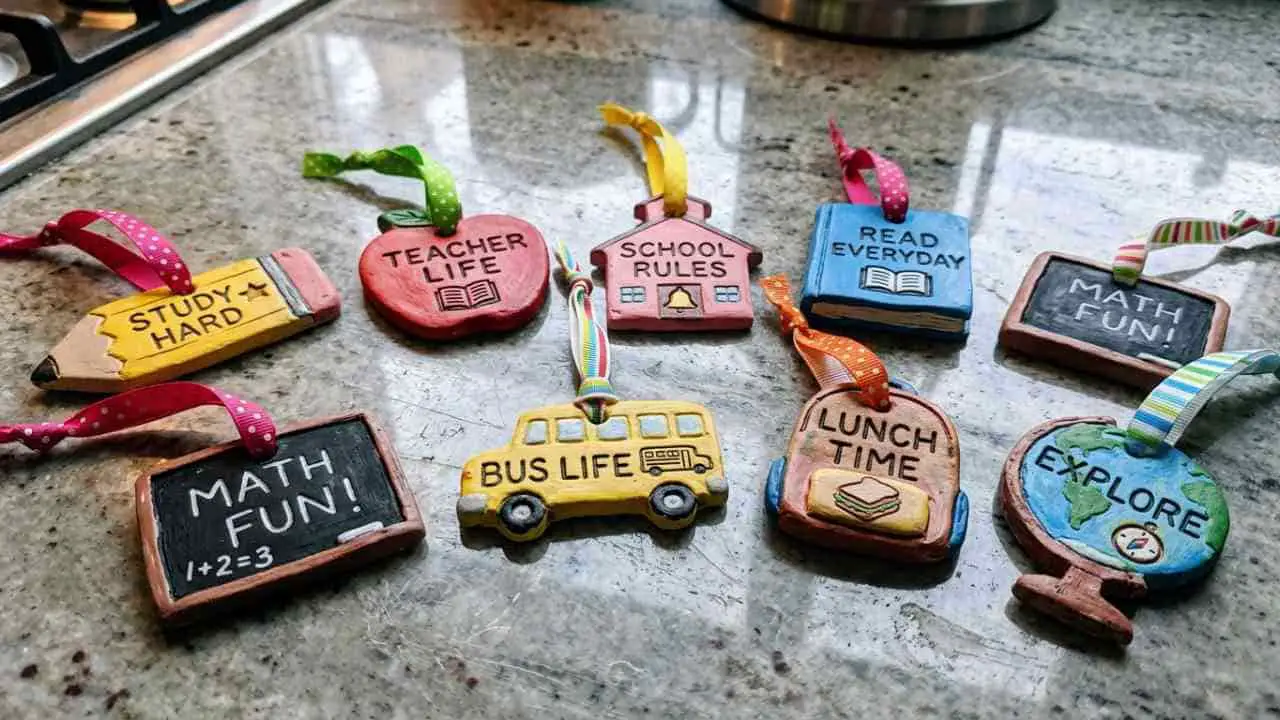
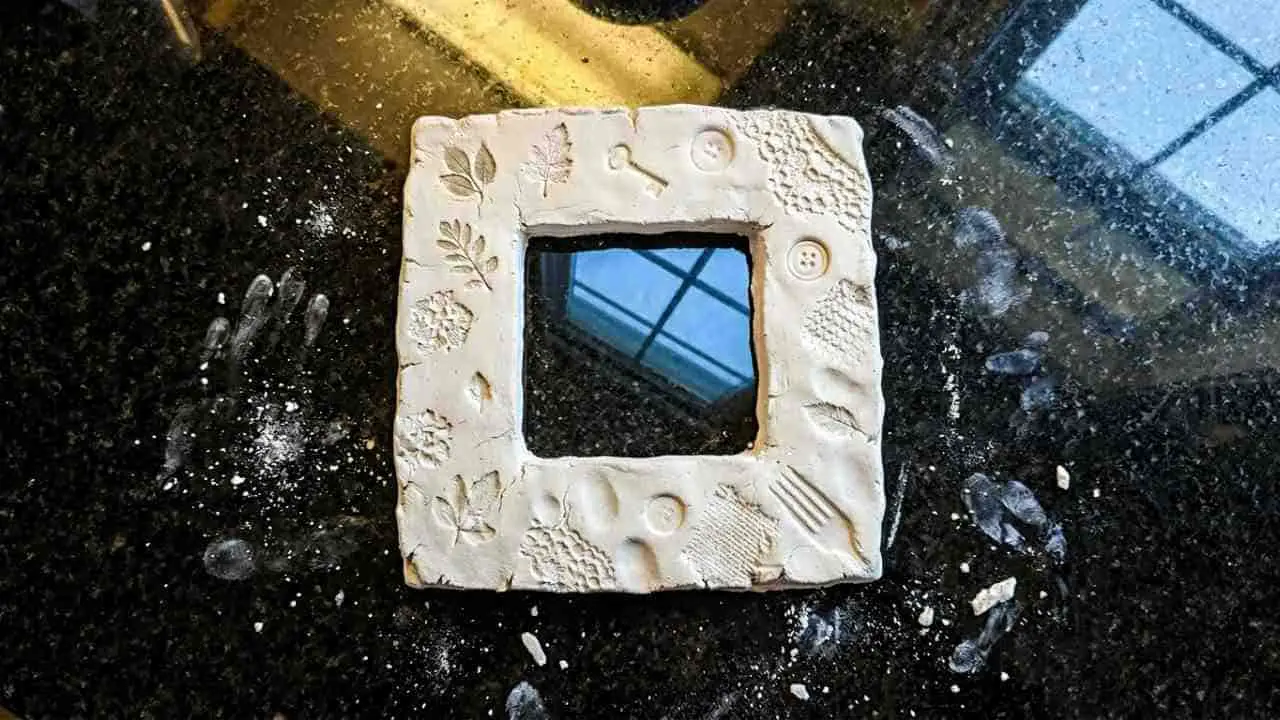
I keep getting asked, what can I actually make if I’m just starting out with clay? And honestly, Clay Crafts For Beginners don’t have to look fancy to feel satisfying.
You don’t need a pottery wheel. You don’t need expensive tools. You just need some air dry clay, your hands, and a little patience.
These clay crafts are simple, slightly imperfect, and totally doable at home. I haven’t personally tried these, but they’re designed so clearly that even a first-timer can follow along. Ready to get your hands messy?
1. Minimalist Pinch Clay Bowl
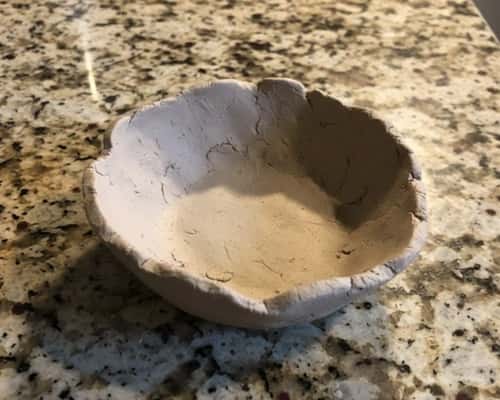
Let’s start easy. A basic clay bowl using the pinch method. This is classic sculpting for beginners clay technique.
What you need:
- Air dry clay
- Small bowl (for size reference)
- Water
- Sandpaper (fine grit)
- Acrylic paint or varnish (optional)
Steps:
- Take a ball of clay. About the size of a lemon.
- Roll it smooth in your palms.
- Press your thumb gently into the center. Not all the way down.
- Start pinching around the edges while rotating the clay slowly.
- Keep turning. Keep pinching. Don’t rush.
- If cracks appear, dip your finger in water and smooth them out.
- Aim for about 0.5 cm thickness. Too thin and it may crack.
- Let it dry 24 to 48 hours.
- Lightly sand rough edges.
- Paint or seal if you want.
It might wobble a bit. That’s okay. It’s handmade, it suppose to feel handmade.
2. Easy Clay Leaf Imprint Dish
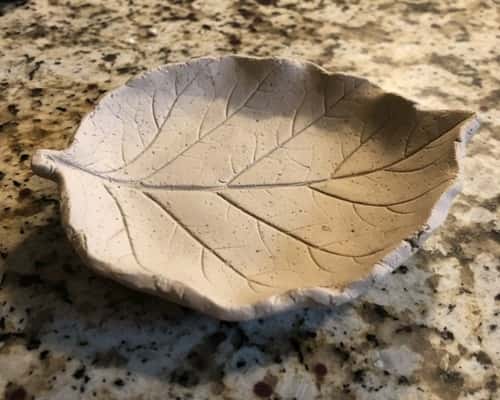
Nature is the best mold ever, right? This is one of those relaxing Air Dry Clay Projects Ideas Crafts that feels almost therapeutic.
What you need:
- Air dry clay
- Real leaf with visible veins
- Rolling pin
- Knife
- Clear sealant
Steps:
- Roll clay flat to about 0.5 cm thick.
- Place the leaf vein-side down.
- Press it firmly using a rolling pin.
- Carefully peel the leaf away.
- Cut around the shape using a knife.
- Smooth edges with wet fingers.
- Gently place it over an upside-down bowl to create a curve.
- Let it dry fully before moving.
- Seal it so the details pop.
Is it perfect? Probably not. But the veins and texture makes it beautiful anyway.
This fits beautifully under Beginner Sculpting Ideas and even overlaps with simple Diy Keramik style decor.
3. Cute Clay Mushroom Decor
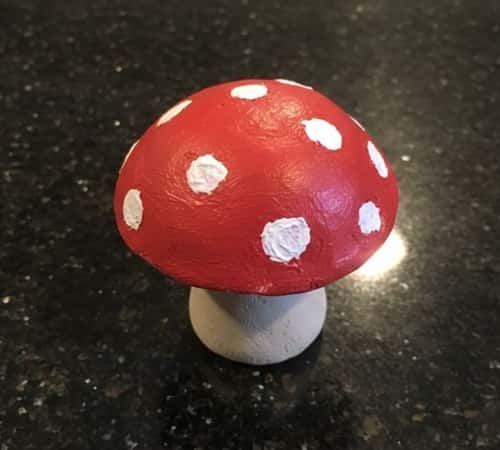
Okay tell me this isn’t adorable. Tiny mushrooms are trending in Diy Cute Clay Ideas.
What you need:
- Air dry clay
- Toothpick
- Red and white acrylic paint
Steps:
- Roll a small ball for the mushroom cap.
- Shape a short cylinder for the stem.
- Insert a toothpick halfway into the stem.
- Attach the cap onto the toothpick.
- Blend the joint with wet fingers.
- Let it dry upright.
- Paint the cap red.
- Add white dots once dry.
- Seal lightly.
These work for fairy garden decor or desk pieces.
If the cap tilts slightly, don’t panic. It still looks cute.
4. Clay Ring Holder Cone
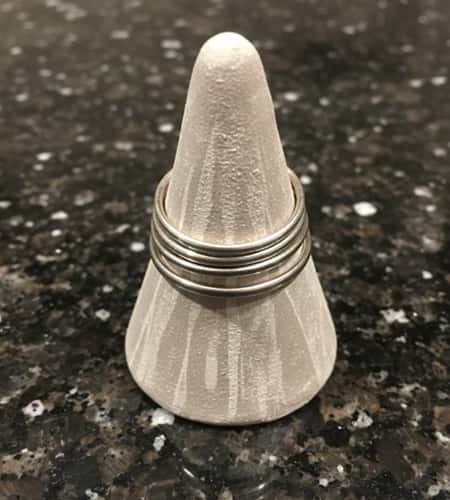
Now this is practical. And simple. A cone shape for stacking rings.
What you need:
- Air dry clay
- Knife
- Sandpaper
- Metallic paint (optional)
Steps:
- Roll clay into a thick log.
- Shape one end into a point.
- Smooth the sides by rotating it on a flat surface.
- Cut the base flat so it stands.
- Let dry completely.
- Sand lightly.
- Paint or keep raw for rustic look.
This is one of those Clay Diy Projects that looks way harder than it is.
Don’t overthink symmetry. Slight tilt makes it characterful.
5. Simple Clay Wall Hanging (Boho Style)
Ever looked at those minimal wall charms and thought… I could make that? You can.
What you need:
- Air dry clay
- Rolling pin
- Knife
- Straw (for hole)
- Jute twine
- Acrylic paint (optional)
Steps:
- Roll clay about 0.5 cm thick.
- Cut into arch, circle, or abstract shape.
- Utilize a straw to make a hole at the upper end.
- Smooth edges with wet fingers.
- Add small texture lines using a toothpick if you want.
- Let it dry flat for 24 to 48 hours.
- Sand lightly.
- Thread jute twine through hole.
- Paint in muted earthy tones or leave raw.
Remember, it doesn’t have to look perfectly symmetrical.
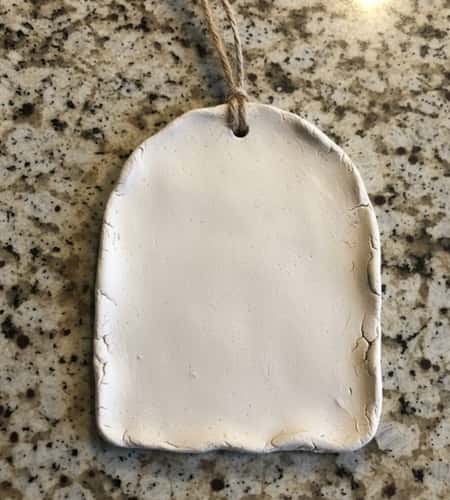
6. Clay Name Tag Keychain
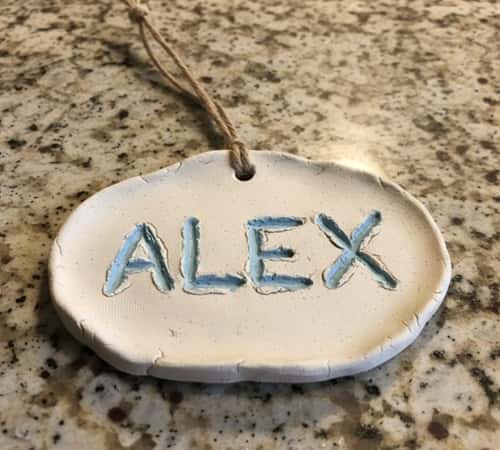
This one feels personal. And slightly addictive.
Perfect for Diy Clay Projects and even beginner level Sculpy Clay Crafts if using polymer clay instead of air dry.
What you need:
- Air dry clay or polymer clay
- Toothpick
- Keychain ring
- Acrylic paint
- Clear varnish
Steps:
- Roll clay flat.
- Cut into rectangle or oval.
- Smooth edges gently.
- Use toothpick to carve a name or word.
- Poke a hole at the top for the key ring.
- Let dry fully (or bake if polymer clay).
- Paint inside the letters for contrast.
- Seal with varnish.
- Attach key ring.
If letters look uneven, it’s okay. That’s how handmade things are suppose to feel.
7. Tiny Clay Cactus (No Water Needed!)
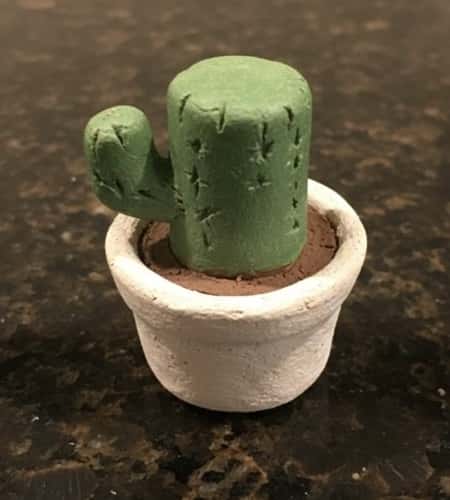
Why buy fake plants when you can sculpt one? This is such a fun sculpting idea for beginners.
What you need:
- Air dry clay
- Toothpick
- Small bottle cap or tiny pot
- Green paint
Steps:
- Roll clay into small oval.
- Flatten bottom slightly.
- Use toothpick to draw vertical lines around it.
- Poke tiny dots randomly for texture.
- Let dry upright.
- Paint green.
- Insert into small pot using glue.
If the lines are crooked, even better. Real cactus aren’t ruler-straight either.
8. Air Dry Clay Roses
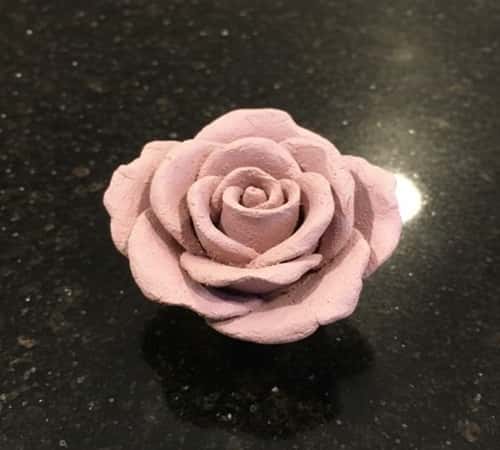
Now we’re stepping into floral territory. Think How To Make Flowers From Clay, but keep it beginner friendly.
What you need:
- Air dry clay
- Rolling pin
- Glue
- Paint (optional)
Steps:
- Roll clay thin.
- Cut small oval petal shapes.
- Roll one petal tightly for center.
- Wrap more petals around it.
- Slightly bend edges outward.
- Blend base together.
- Let dry fully.
- Paint soft pink, red, or keep natural.
These make lovely decor pieces or fridge magnets. Makes a perfect fit as Air Dry Clay Roses.
Don’t stress about symmetry. Flowers in nature are never perfect. And that’s why they’re beautiful.
9. Mini Clay Food Magnets
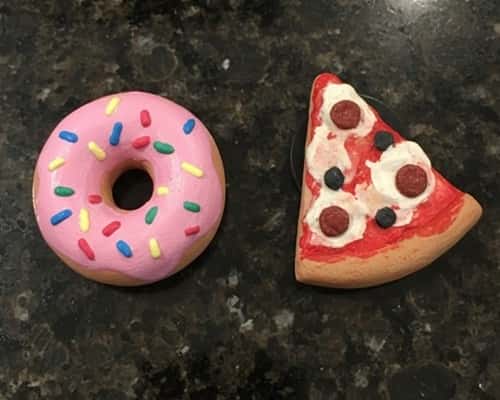
Who doesn’t smile at tiny fake food? This comes straight under playful Clay Food and cute Clay Molding Ideas Diy.
What you need:
- Air dry clay
- Toothpick
- Acrylic paints
- Small magnets
- Strong glue
Steps:
- Decide your food. Donut? Pizza slice? Tiny toast?
- Shape base form first. Keep it small, about coin-sized.
- Add texture using toothpick. Poke holes for donut. Add crust line for pizza.
- Let dry completely. Don’t rush this part.
- Paint in layers. Base color first, details later.
- Once dry, glue magnet at the back.
- Let glue cure before sticking to fridge.
If proportions look funny, honestly that makes it cuter. Mini food isn’t suppose to be anatomically perfect.
This is such a fun branch of beginners clay projects and lighthearted diy cute clay ideas.
10. Textured Clay Coasters
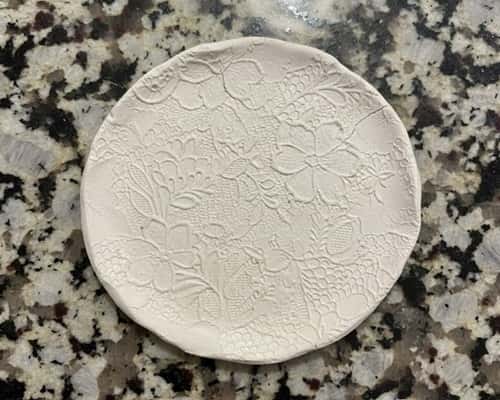
Functional and decorative. I love crafts that actually get used.
This falls beautifully into practical air dry clay projects.
What you need:
- Air dry clay
- Rolling pin
- Lace fabric or textured cloth
- Round cutter or glass
- Clear sealant
Steps:
- Roll clay about 0.7 cm thick.
- Place lace over surface.
- Roll gently so texture presses in.
- Remove fabric carefully.
- Cut round shapes using glass.
- Smooth edges with water.
- Let dry flat for 48 hours.
- Sand lightly.
- Apply waterproof sealant.
Make sure they’re evenly thick or they may crack while drying. And yes, small cracks sometimes happens.
These textured pieces feel like subtle diy keramik without needing a kiln.
11. Simple Clay Incense Holder
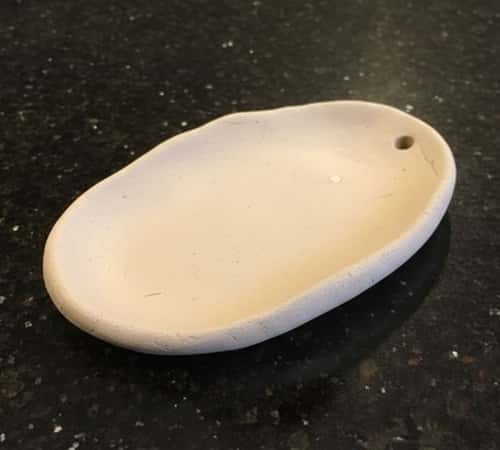
Minimal. Calm. Slightly rustic.
Perfect for those exploring beginner friendly sculpting clay techniques.
What you need:
- Air dry clay
- Skewer stick
- Small bowl (for curve shape)
- Sandpaper
Steps:
- Roll clay into thick oval.
- Flatten gently.
- Use skewer to poke angled hole for incense stick.
- Smooth top with wet fingers.
- Place over bowl to create shallow curve.
- Let dry 24 to 48 hours.
- Sand lightly underneath so it sits flat.
Test hole size before fully drying. It shouldn’t wobble too much.
This is one of those calm clay diy projects that feel grounding while making.
It may lean a little to one side, and that’s okay.
12. Clay Bead Bracelet
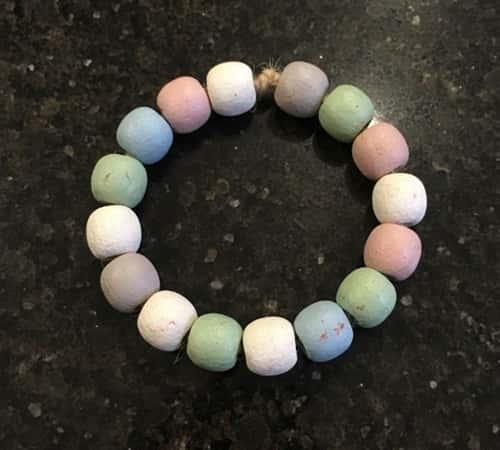
Tiny beads. Big patience. But doable.
This belongs naturally under creative molding clay ideas or if you are looking for a light modeling clay art project this makes an excellent fit.
What you need:
- Air dry clay
- Skewer or needle
- Acrylic paint
- Elastic thread
Steps:
- Roll small equal balls of clay.
- Use skewer to poke hole through center.
- Gently rotate skewer so hole stays open.
- Let beads dry completely while still on skewer.
- Paint in solid colors or patterns.
- Once dry, thread onto elastic.
- Tie tight double knot.
Keep holes wide enough. If they shrink during drying, threading becomes difficult.
Some beads will not be perfectly round. That’s normal. Handmade jewelry isn’t machine-made.
13. Minecraft-Style Clay Block
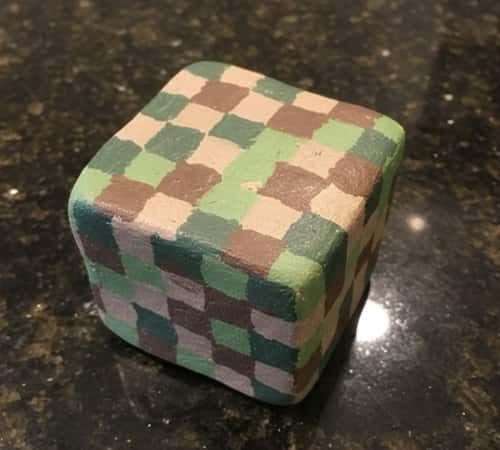
Let’s do something playful. Ever thought of turning Minecraft Diy into real life? This is such a fun direction for beginner friendly clay crafts, especially if kids are around.
What you need:
- Air dry clay
- Knife or blade
- Ruler
- Acrylic paints (green, brown, gray etc.)
Steps:
- Shape clay into a cube. Use a ruler to check sides.
- Flatten each face gently on a table so it stands straight.
- Let it firm up slightly for 1 to 2 hours. Not fully dry.
- Use knife to lightly mark pixel squares.
- Let dry completely.
- Paint square by square using small brush.
- Let paint dry before adding second layer.
If edges are not perfectly sharp, that’s fine. It still reads as a block. Actually, slightly rounded corners makes it look handmade and charming.
14. Simple Clay Face Planter

This one feels artsy. A little bold. But still very beginner friendly.
What you need:
- Air dry clay
- Small plastic cup (for mold shape)
- Spoon
- Toothpick
- Acrylic paint (optional)
Steps:
- Wrap clay around an upside-down plastic cup.
- Press evenly so thickness stays around 0.7 cm.
- Smooth outside using wet fingers.
- Gently slide clay form off cup before fully dry.
- Use spoon to hollow slightly if needed.
- Draw simple closed eyes and nose using toothpick.
- Let dry fully for 48 hours.
- Sand bottom flat so it stands.
- Paint neutral tones or leave raw.
Make sure walls aren’t too thin or it may crack. And don’t add real soil unless sealed properly.
If the face looks slightly crooked, it still works. Art doesn’t need perfect symmetry.
This is one of those Beginners Clay Projects that looks Pinterest-worthy but is actually very doable.
Final Thoughts
Here’s something interesting about these clay crafts for beginners. Clay teaches patience more than perfection. It cracks if rushed. It bends if forced. It rewards gentle handling.
That’s kind of life, isn’t it? Even basic clay crafts build hand strength, coordination, and creative confidence.
And you don’t need expensive tools to start sculpting for beginners clay projects at home. Just simple materials. Slight mess. A little time.
You don’t need to be “artistic” to begin. You just need to begin.