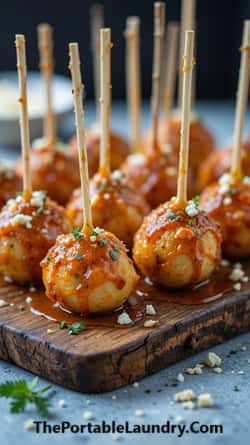
Ever wondered how to transform humble ground chicken into a show-stopping appetizer that’ll have your guests thinking you hired a caterer? Let me introduce you to my Blue Cheese Chicken Pops – a revolutionary twist on traditional chicken lollipops that combines creamy, tangy blue cheese with perfectly seasoned ground chicken, all crowned with a mind-blowing hot honey glaze.
Why These Chicken Pops Will Likely Become Your Favorite
After countless hours in my test kitchen (and maybe a few happy accidents), I’ve cracked the code on creating the perfect hand-held party bite. These aren’t your average chicken skewers – they’re a sophisticated fusion of comfort food and gourmet flair that’s surprisingly simple to master.
Pro Tip: While any ground chicken will work, I’ve found that using my trusted KitchenAid Stand Mixer with Grinding Attachment helps achieve the perfect texture. The metal construction keeps the meat cold during grinding, which is crucial for maintaining the right consistency.
Affiliate Disclosure: Kitchen tools and ingredients mentioned in this post have been carefully selected based on years of professional experience. Some links above and within the article are affiliate links, meaning I earn a small commission if you make a purchase. Rest assured, I only suggest or recommend kitchen essentials or things I use and trust in my own kitchen.
The Secret Behind That Perfect Pop
The magic of these chicken pops lies in the perfect balance of ingredients.
I’ve discovered that using a specific ratio of dark to white meat chicken (30:70) creates the ideal texture.
My go-to is Organic Prairie Ground Chicken, which consistently delivers the perfect fat content for juicy, flavorful results.
Essential Equipment for Success
- Heavy-duty wooden lollipop sticks (I swear by these Natural Bamboo Sticks)
- Digital meat thermometer (ThermoWorks Thermapen is my ride-or-die kitchen companion)
- Large mixing bowl with non-slip base
- Sturdy baking sheet with wire rack
- Silicone brush for glazing
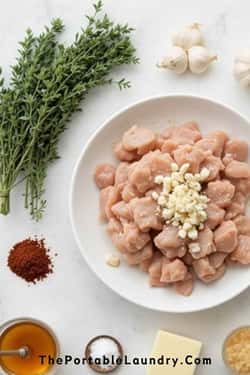
Ingredient Required To Make Blue Cheese Chicken Pops with Spicy-Sweet Honey Glaze
For the Chicken Pops (serves 8-10):
- 2 lbs premium ground chicken
- 6 oz aged blue cheese (splurge on Point Reyes Blue – trust me on this)
- 1 tbsp fresh thyme leaves
- 2 cloves garlic, microplaned
- 1 tbsp Worcestershire sauce
- 1 tsp smoked paprika
- 1 tsp onion powder
- ¾ tsp kosher salt
- ½ tsp freshly ground black pepper
For the Hot Honey Glaze:
- ⅓ cup premium raw honey (Savannah Bee Company Honey is spectacular here)
- 2 tbsp unsalted butter
- 1 tbsp Calabrian chili paste
- 1 tsp apple cider vinegar
- Pinch of sea salt
Step-By-Step Instructions To Make Blue Cheese Chicken Pops with Spicy-Sweet Honey Glaze
Step 1: Prep Your Station
Start by setting up your workspace like a pro.
Line your baking sheet with parchment and place a wire rack on top.
This dual-layer system ensures even cooking and prevents sticking. Soak your wooden sticks in water for at least 10 minutes to prevent burning.
Step 2: Master the Mix
In your mixing bowl, combine the ground chicken with thyme, garlic, Worcestershire sauce, and seasonings.
Here’s my pro tip: use the paddle attachment on your stand mixer on low speed for 1 minute. This ensures even distribution without overworking the meat.
Step 3: The Art of Assembly
Here’s where we get creative! Divide the mixture into 16 equal portions (about 2 oz each).
Each part should be flattened in your palm. Place a ½-ounce cube of blue cheese in the center, then carefully wrap the meat around it, forming a golf ball-sized sphere.
Insert a wooden stick through the center, then gently shape the meat into a lollipop form.
Kitchen Hack: Keep a bowl of ice water nearby to dip your hands in between shaping each pop. This prevents the meat from sticking and helps maintain its shape.
Step 4: The Perfect Cook
Preheat your oven to 375°F (190°C). Place the pops on your prepared rack, leaving space between each one.
Bake for 18-22 minutes, rotating the pan halfway through, until the internal temperature reaches 165°F (74°C).
Step 5: Glaze of Glory
While the pops are cooking, prepare your hot honey glaze.
In a small saucepan over medium heat, combine honey, butter, and Calabrian chili paste.
Once melted and combined, stir in the vinegar and salt. Keep warm until ready to use.
Serving Suggestions & Style Points

Present these bad boys standing upright in a Rustic Wooden Serving Board with Pre-drilled Holes for maximum impact.
I like to create a dramatic display by varying the heights – some pops standing tall, others at an angle.
Drizzle with additional hot honey glaze and garnish with fresh thyme sprigs and crumbled blue cheese.
Entertaining Tip: These can be assembled up to 24 hours in advance! Store uncooked pops covered in the refrigerator, then bake just before serving.
Variations to Keep Things Interesting
- Mediterranean Twist: Swap blue cheese for feta and add chopped Kalamata olives to the meat mixture
- Asian Fusion: Replace the blue cheese with cream cheese mixed with gochujang, and glaze with a soy-honey mixture
- Buffalo Style: Use ranch-seasoned cream cheese for stuffing and coat with classic buffalo sauce instead of honey glaze
Troubleshooting Tips for Perfect Pops
- If your mixture feels too wet, add 2-3 tablespoons of panko breadcrumbs
- For extra stability, freeze the shaped pops for 15 minutes before baking
- If the cheese starts to ooze during cooking, don’t panic! The meat will create a natural seal as it continues to cook
Why These Ingredients Matter
The success of this recipe relies heavily on quality ingredients. The Point Reyes Blue cheese, with its creamy texture and bold flavor, creates pockets of melty goodness within each pop. The Calabrian chili paste adds a complex heat that perfectly complements the sweet honey in the glaze.
Final Thoughts
Remember, the key to these show-stopping chicken pops is patience in the assembly and attention to temperature control.
Don’t rush the process, each step contributes to creating that perfect bite that’ll have your guests begging for the recipe.
Also, these chicken pops can be stored in an airtight container in the refrigerator for up to 3 days. To reheat, place them in a 350°F oven for 8-10 minutes until warmed through. The glaze can be stored separately for up to 2 weeks.
Food Safety Tip: Always use a reliable meat thermometer like the ThermoWorks Thermapen to ensure your chicken is properly cooked.